How to set up Develover accounts
To create a white label application, you need to set up developer accounts and get the keys that will be used in the application builder.
In this article:
How to set up Apple developer account
BUNDLEID
To connect your app with your Apple ID you need to create BundleID:
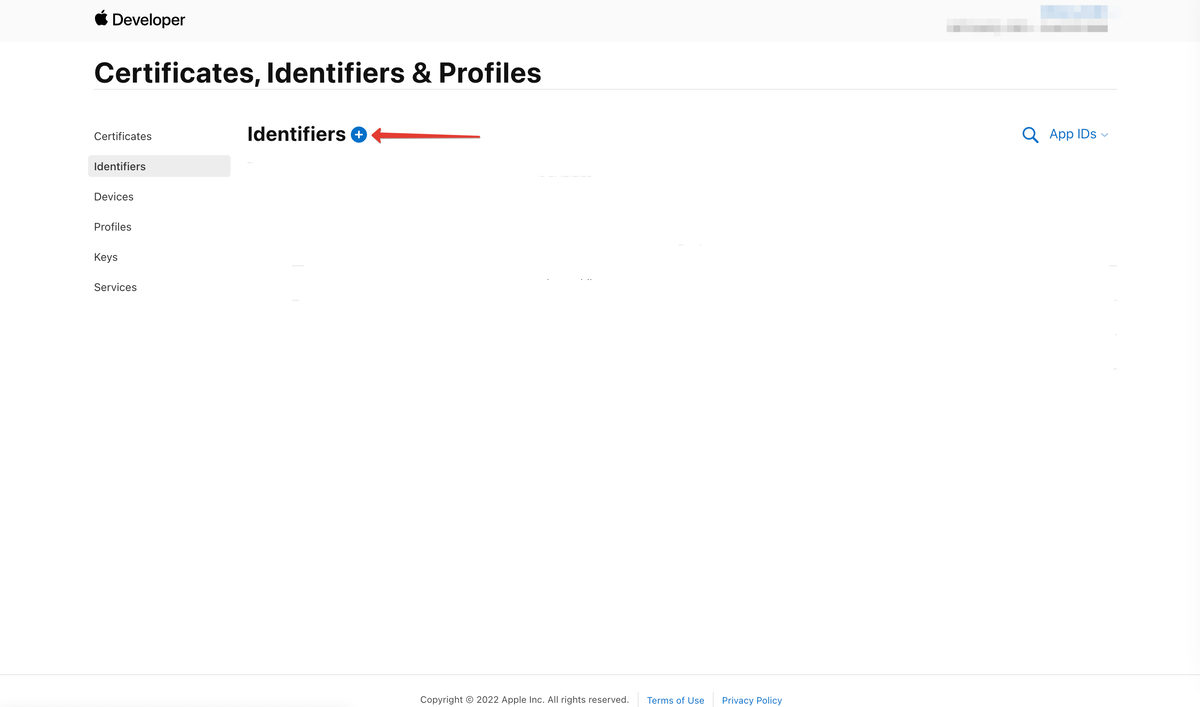
1. Go to "Account" -> "Identifiers".
2. Press "+" next to the title "Identifiers".
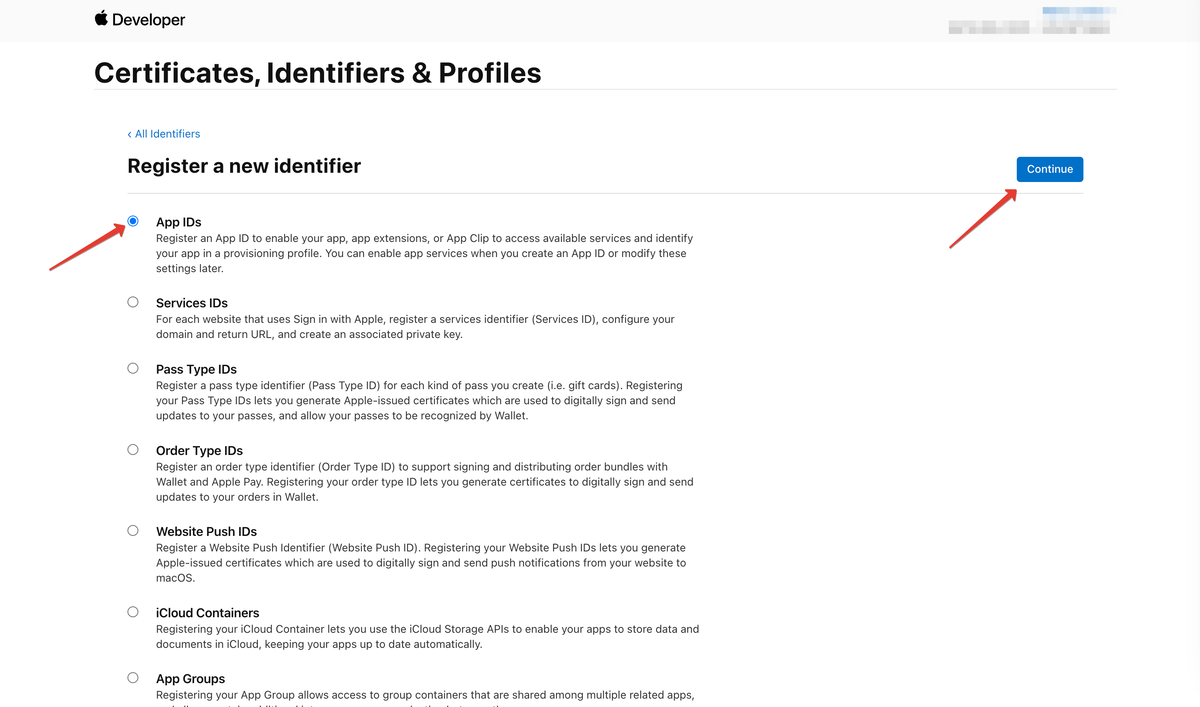
3. Choose «APP IDs» and press «Continue».
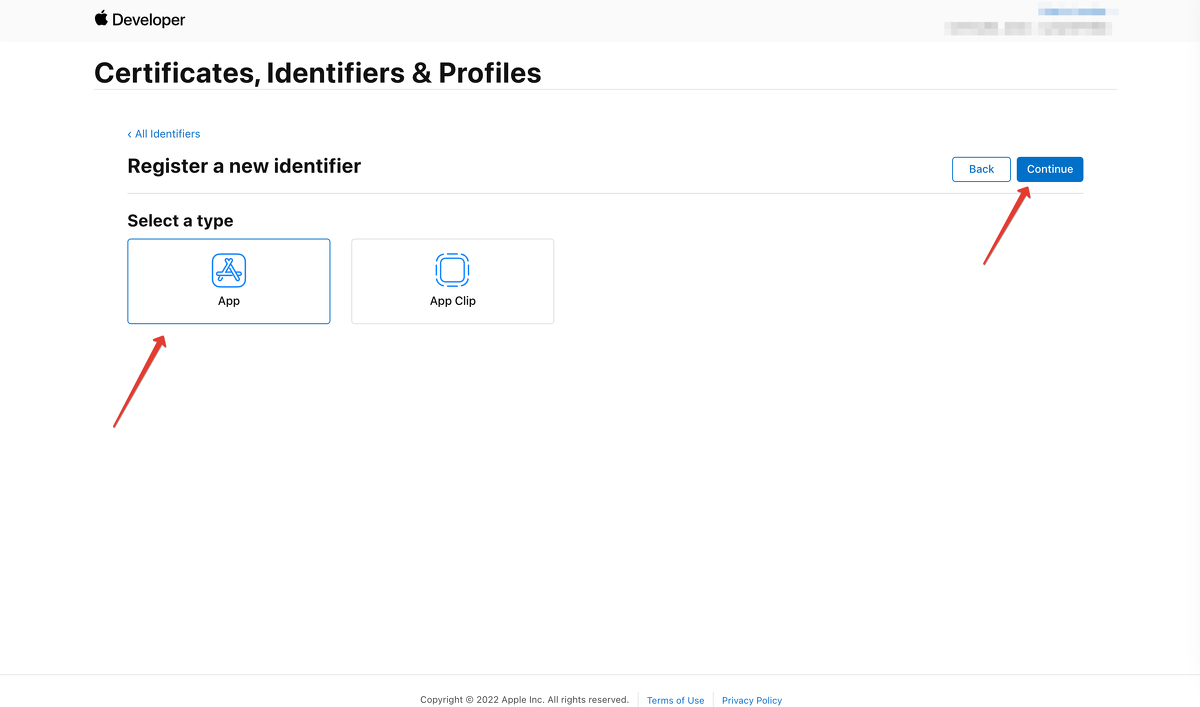
4. Select a type — «App» and press «Continue».
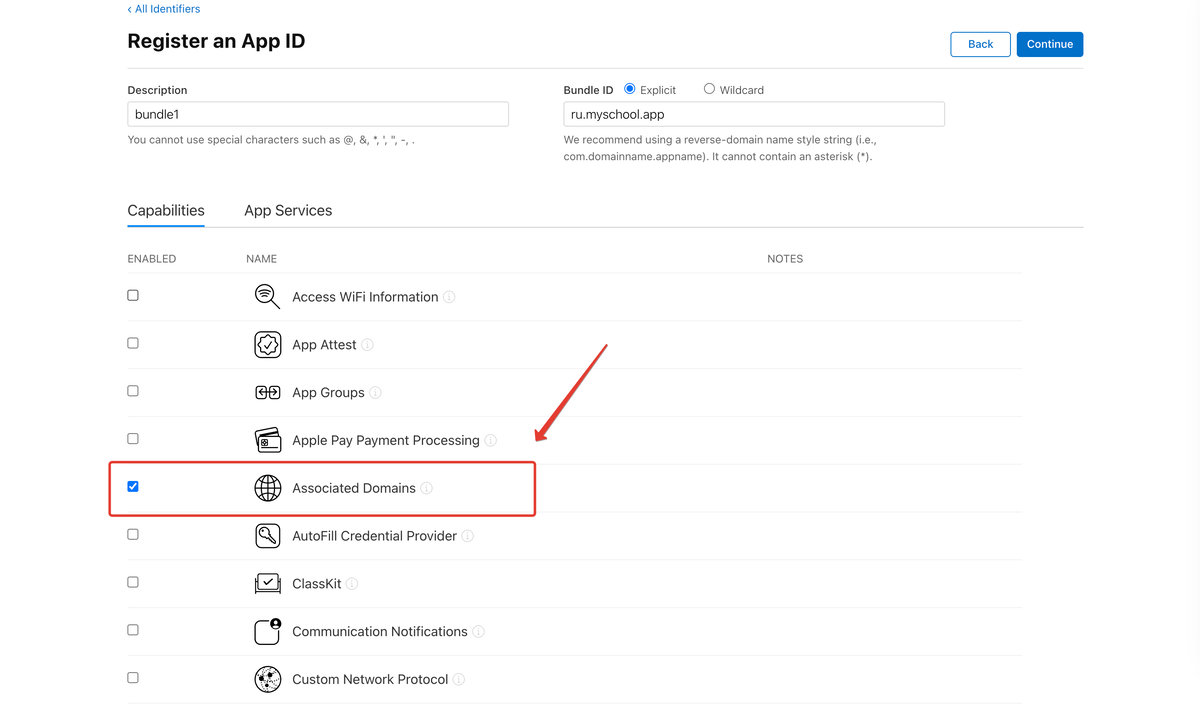
5. Fill in the fields:
- "Description" — enter your description, for example, bundle1.
- "Explicit" — enter the address in reverse order: domain zone (ru, com, etc) - domain - app, for example ru.myschool.app.
If the project is located on a subdomain, then provide the address with the subdomain.
For example, the address of the online project is edu.myschool.ru — enter ru.myschool.edu.app in the field.
The domain address must include only letters and no hyphens. Use the system domain if it meets these requirements, or add a new domain to your account.
Important! Make a note with the BundleID value that is written in the "Explicit" field. It is necessary for further work with the application.
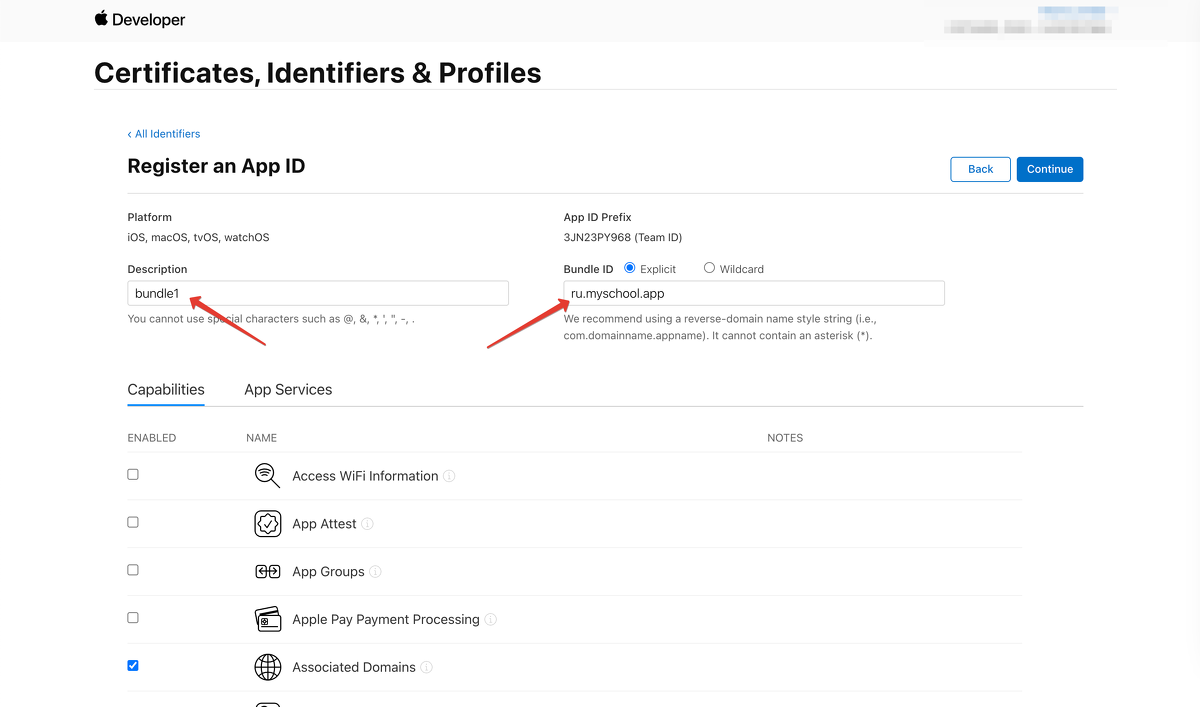
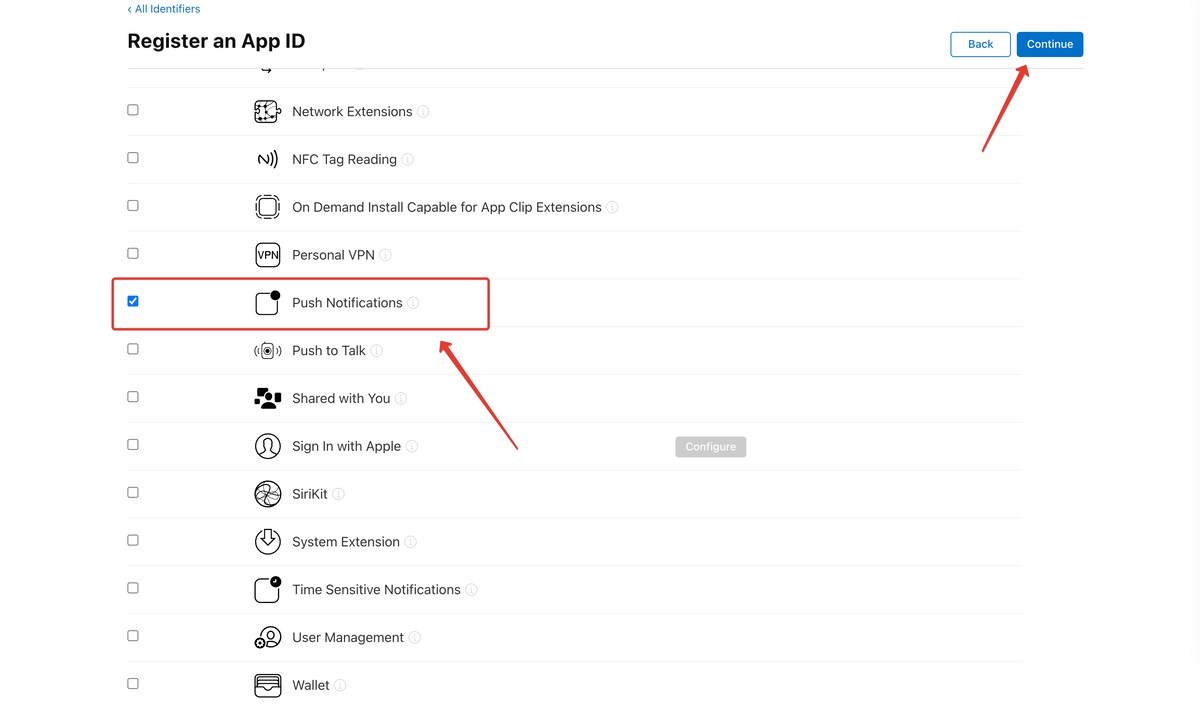
6. Scroll down and mark the options "Associated Domains" and "Push Notifications".
7. Then press "Continue" and "Register".
Push Notifications
Your primary BundleID is ready!
Now you need to create an additional BundleID — it is used for push notifications.
ADDITIONAL BUNDLEID
To create an additional BundleID:
1. Press "+" next to the title "Identifiers".
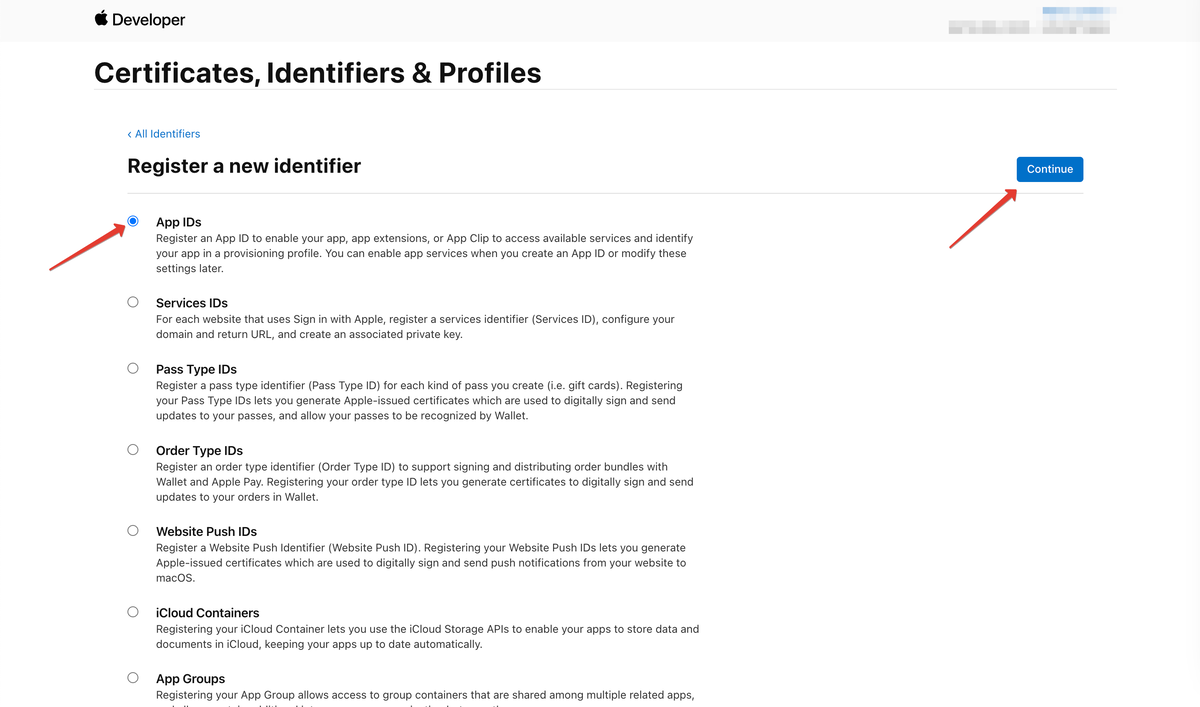
2. Choose «APP IDs» and press «Continue».
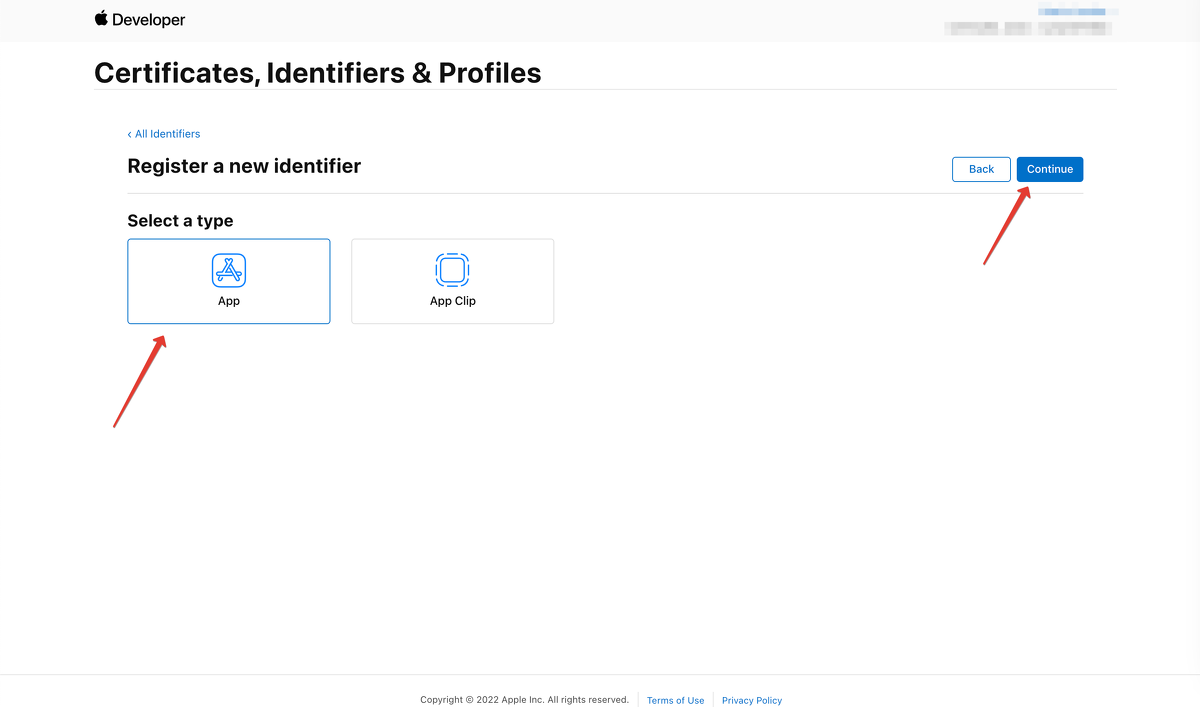
3. Select a type — «App» and press «Continue».
App IDs
Type: App
4. Fill in the fields:
- "Description" — enter your description, for example, bundle2.
- "Explicit" — enter the address in reverse order with the addition ImageNotification: domain zone (ru, com, etc) — domain — app — ImageNotification, for example ru.myschool.app.ImageNotification
If the project is located on a subdomain, then provide the address with the subdomain.
For example, the address of the online project is edu.myschool.ru — enter ru.myschool.edu.app.ImageNotification in the field.
The domain address must include only letters and no hyphens. Use the system domain if it meets these requirements, or add a new domain to your account.
Important! Make a note with the additional BundleID value that is written in the "Explicit" field. It is necessary for further work with the application.
5. Scroll down and mark the options "Associated Domains" and "Push Notifications".
6. Then press "Continue" and "Register".
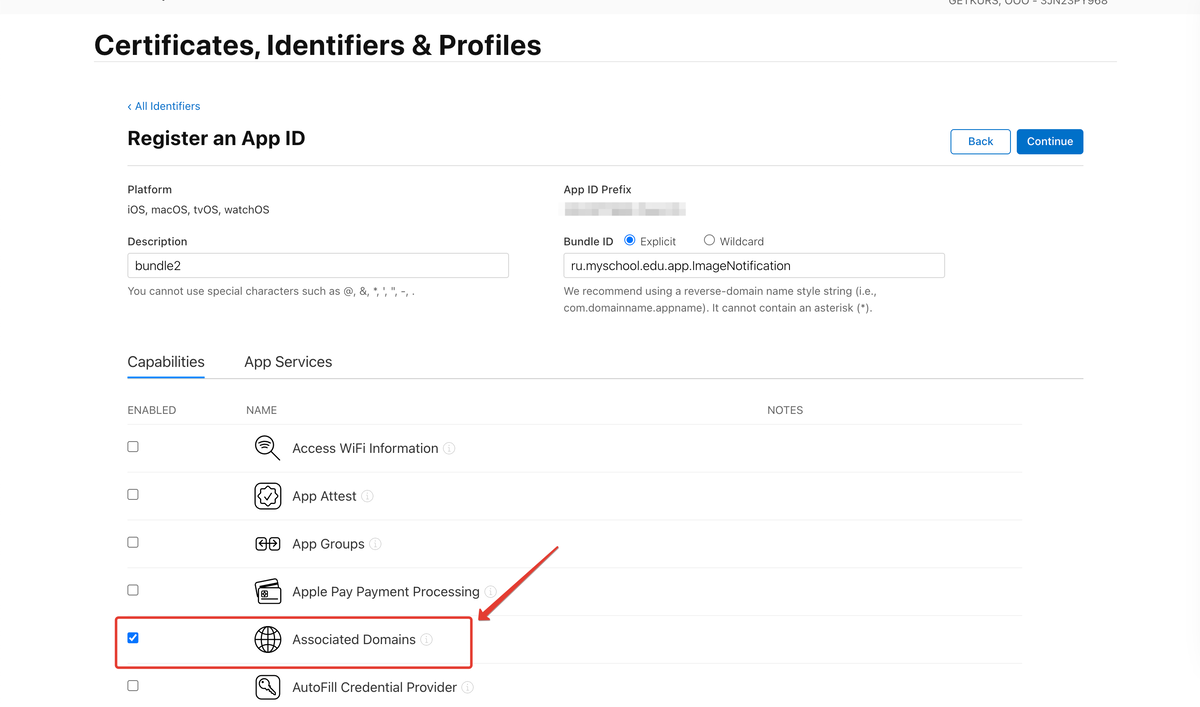
Associated Domains
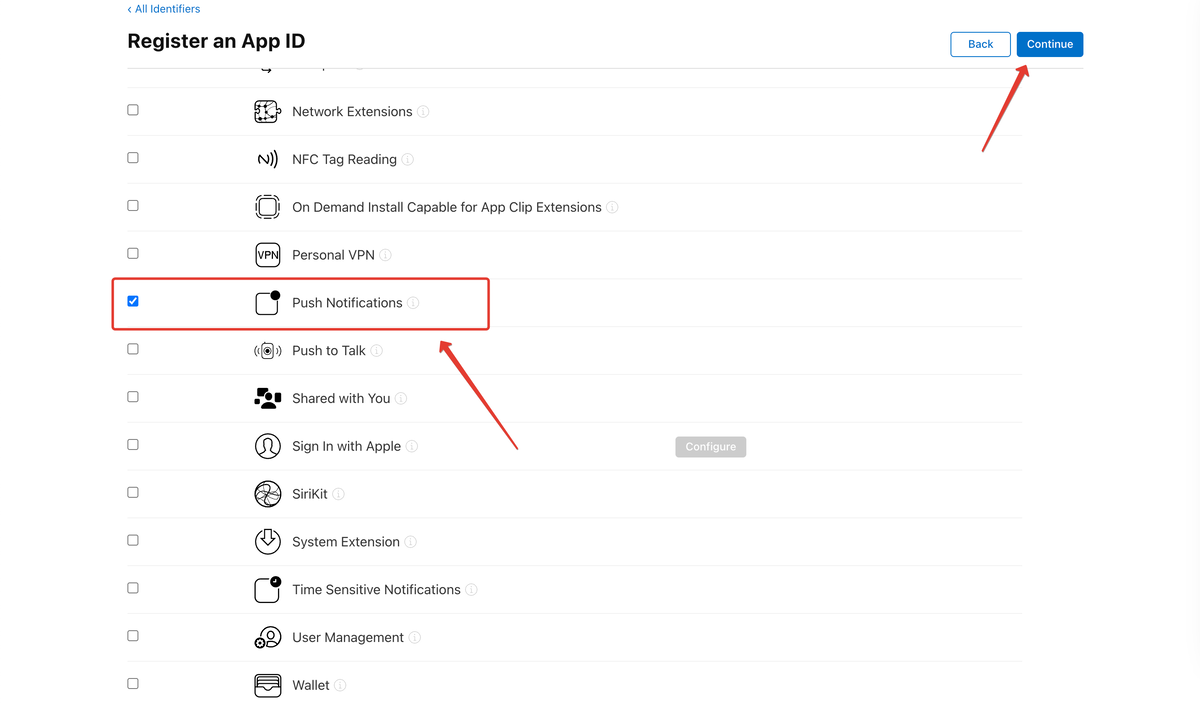
Push Notifications
.P8 FORMAT KEY
1. Go to the tab "Keys" and press "+" next to the tab title.
2. In the block "Register a new key" enter key name Chatium Firebase Push Key.
3. Enable the option "Apple Push Notifications service (APNs)" and press "Continue" — "Register".
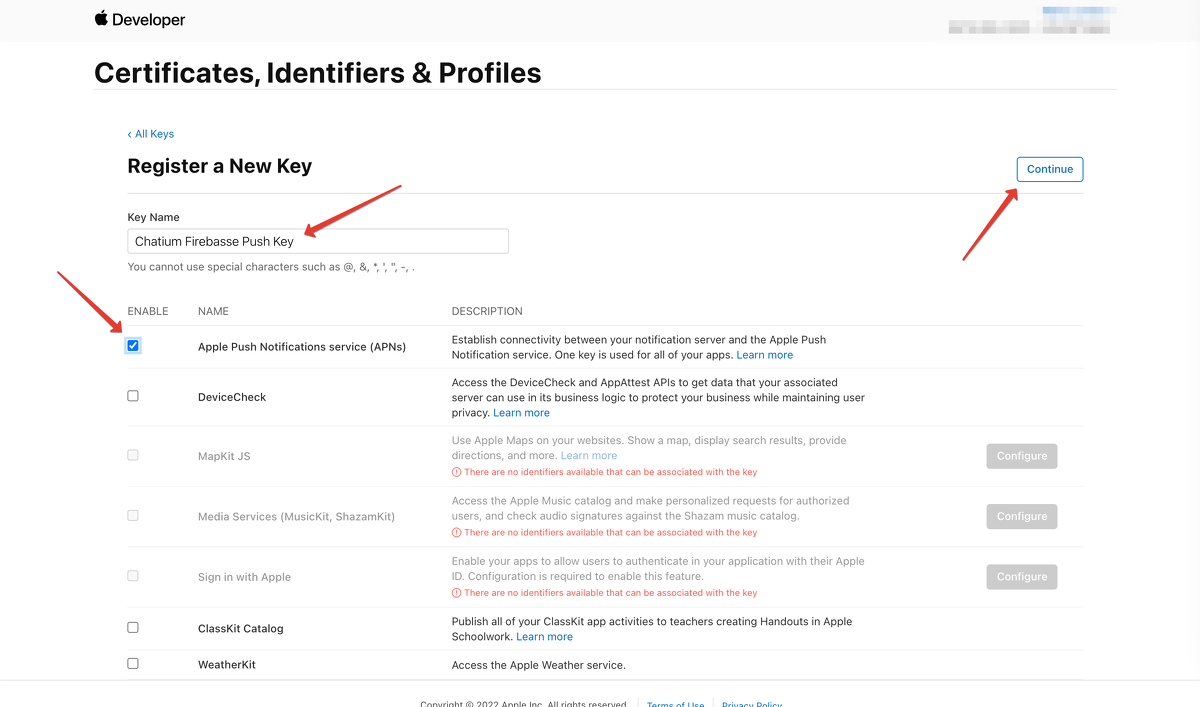
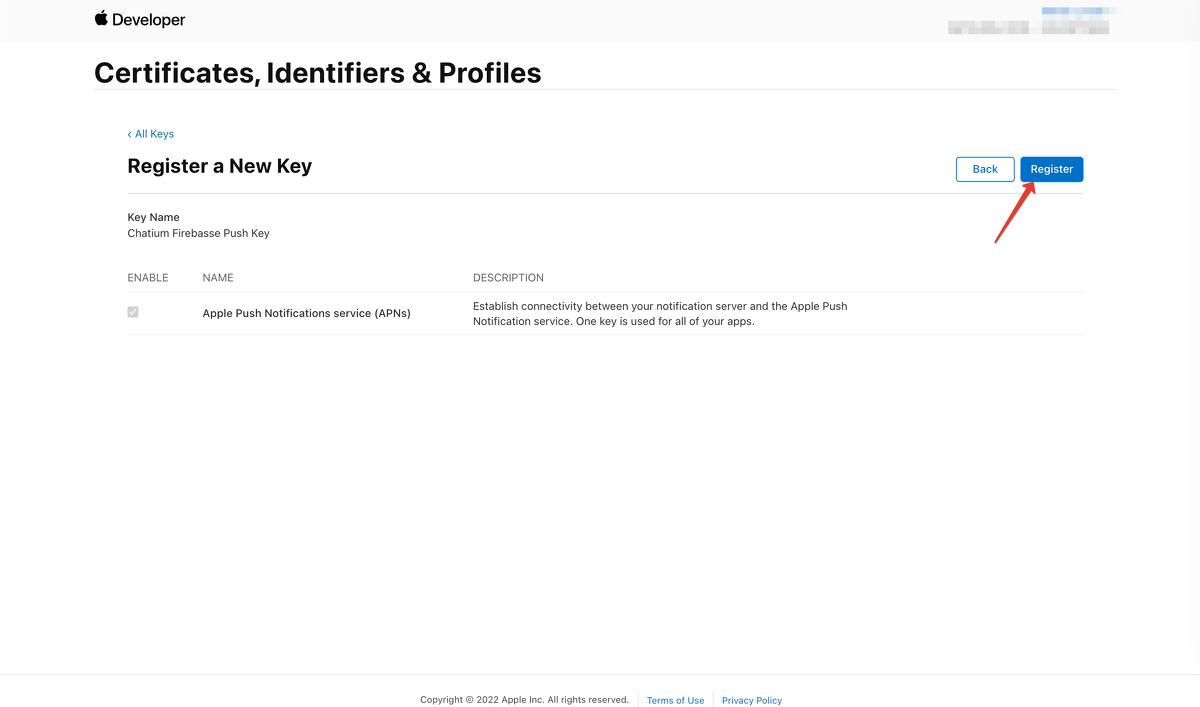
4. Press the "Download" button to download the key.
Important! The key can be downloaded once only, that is why you need to save the KeyID and download the .P8 format key by the "Download" button. Save the route to the downloaded file, do not change the file name and the file extension. Then pass the file and the KeyID to the technical specialist for the further work with the application.
API KEY
1. In App Store Connect go to "Users and Access" and then to the tab "Keys".
2. Choose "App Store Connect API" on the left side menu and press "Request Access".
3. In the form mark the box to agree with the conditions of using App Store Connect API and press "Submit".
4. You will see the notification "Your request to access the App Store API was approved", the button "Generate API key" will appear — press the button.
5. Add the name — Chatium Deploy — and choose access "Admin".
6. Press «Generate».
You will see Issuer ID, Key ID and the button "Download API Key" to save the key.
- Issuer ID;
- Key ID;
- The API Key by "Download API Key" button.
This data will be necessary for the further work with the application.
Please note that the key can be downloaded once only.
CREATING THE APP PAGE
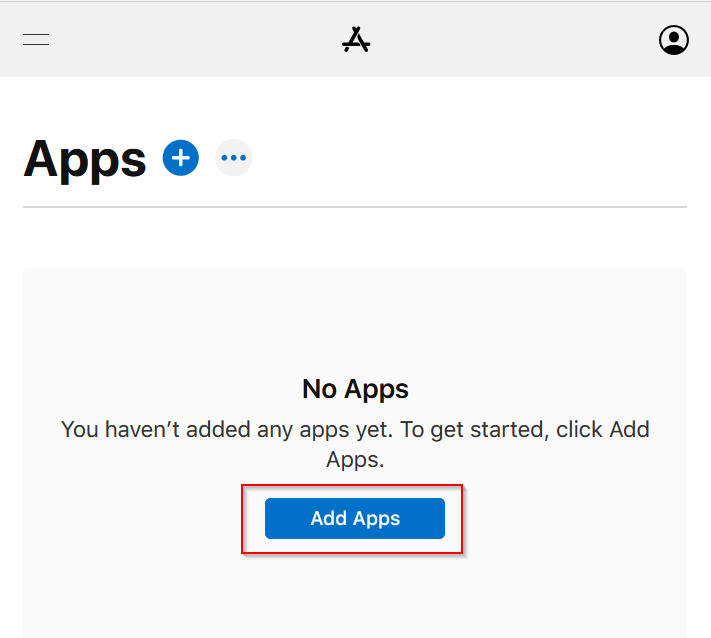
1. Go to "Apps" on the menu and press "Add Apps".
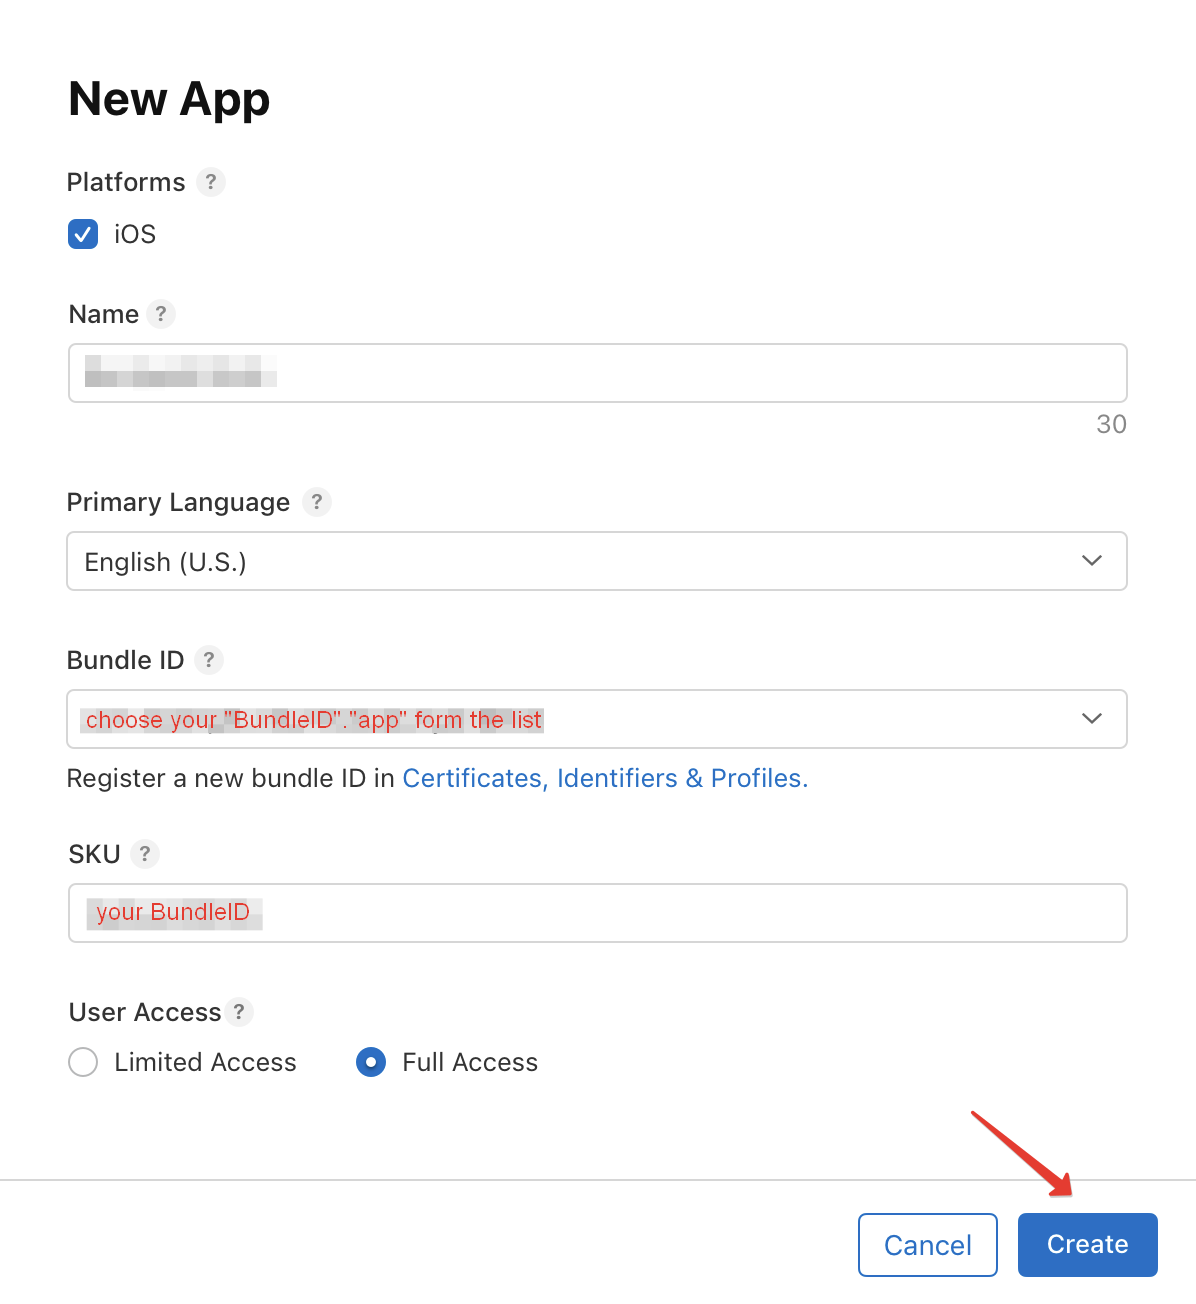
2. Fill in the fields:
- Platforms — tick iOS;
- Name — enter the name of your app;
- Primary Language — choose language;
- Bundle ID — choose your app from the list, the option will contain BundleID which you've got before;
- SKU — the same as BundleID, for example, ru.domain.app;
- User Access — Full Access.
3. Press "Create".
TEAM ID
In the right upper corner the Team ID is displayed under your name.
Important! Save this Team ID to your notes, it will be needed for the further work with the app.
How to set up Google Developer account
To create an Android version of your app you need to set up your Google Developer account.
CREATING SERVICE ACCOUNT AND ADDING API KEY
1. Open Google Cloud Platform
2. Go to "Service Accounts" section on the menu and press "+ Create Service account".
3. Fill in the field "Service account name" — enter the account name, for example, MySchool Service Account. Service account ID will be generated automatically.
Press "Create and continue"
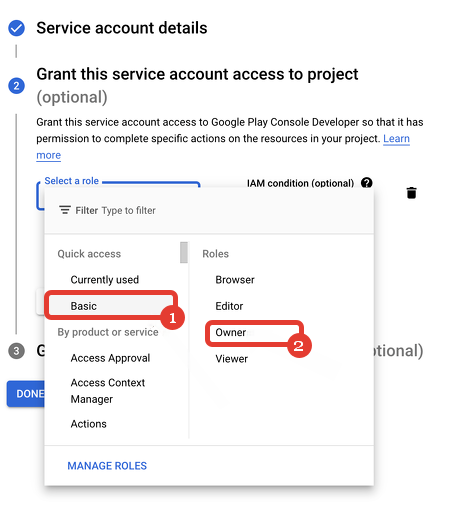
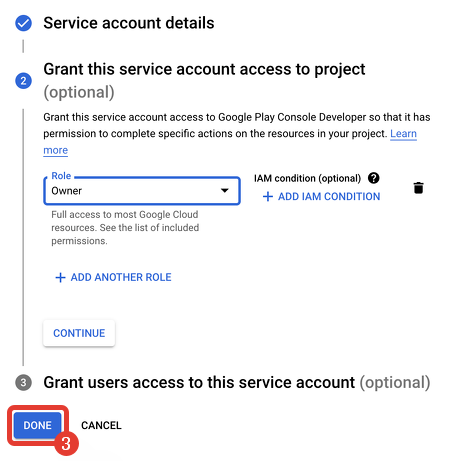
3. In "Role" choose "Basic" — "Owner" and press "Done".
After that the created service account will be displayed on the "Google Cloud Platform" panel and the API key can be generated. To do it:
1. Press the action bar and choose "Manage keys":
2. Press "Add key" — "Create new key":
3. Choose the type "JSON" and press "Create". The file downloading will begin automatically.
Important! Save the generated key in .json format. Save the route for the file, do not choose its name and extension.
Setting up the service account and adding API key are completed.
Then you need to get the SHA-256 fingerprint.
SHA-256 FINGERPRINT
1. Open Google Play Console and choose your developer account.
2. Go to "All apps" tab on the left side menu and press "Create app".
3. Set the app details:
- Fill in the name of your app (will be displayed for users in the store).
- Choose default language of your app.
- Select the option "App".
- Select the type "Free".
- Tick that you agree with the Developer Program Policies, Google Play App Signing Conditions and US export laws.
Then press "Create app".
4. Go to "Production" tab on the left side menu and press "Create new release".
5. On the opened page "Create production release" press "Change app signing key".
6. Press "Use Google-generated key".
6. Go to "Setup" — "App integrity" — "Play App Signing" and copy SHA-256 certificate fingerprint.
Important! Do not change the key and save it to your notes for the further work on the application.
How to set up Firebase Developer account
You need to create and configure a Firebase account to collect and analyze the app work data. This datawill be displayed in your Developer account after the app release.
SETTING UP FIREBASE
1. Open Firebase console and create a project.
2. Enter the project name, for example, myschool. Accept and confirm that you agree with the Firebase policies. Press "Continue".
3. Enable Google Analytics and press "Continue".
4. Set the analytics location — this location represents the country or region of your organization.
Tick "Use the default settings" and "I accept the Google Analytics Terms".
Press "Create project".
The project creating process usually takes up to 2 minutes. After the process is completed press "Continue".
6. Click on settings icon and choose "Project settings".
7. Go to "Service accounts" tab, choose "Node.js" option and press "Generate new private key".
8. Press "Generate key", the key file will be downloaded automatically.
Important! Save the route for the key file, do not change its name and extension. The key file will be needed for the further work on the application.
Now it is necessary to connect your Firebase account with your app.
To connect the Firebase account with the iOS app you need to generate GoogleService-Info.plist file:
1. On "Project Settings" page go to the tab "General", scroll down to the section "Your apps" and click on the iOS icon.
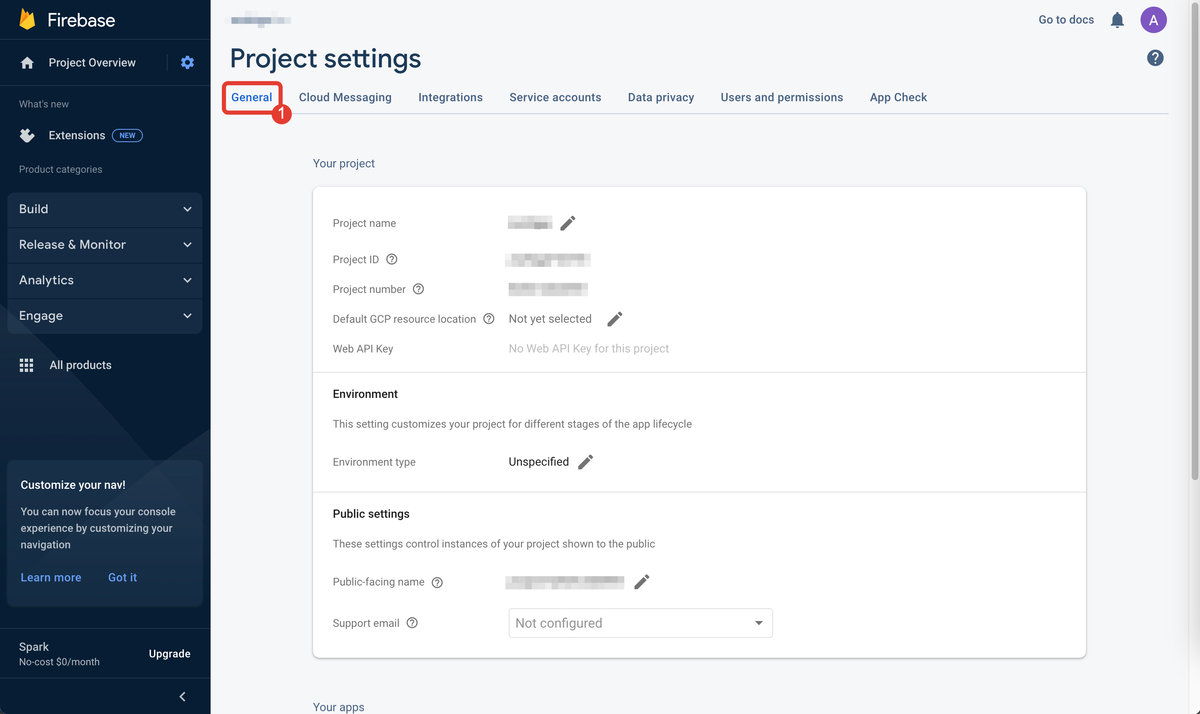
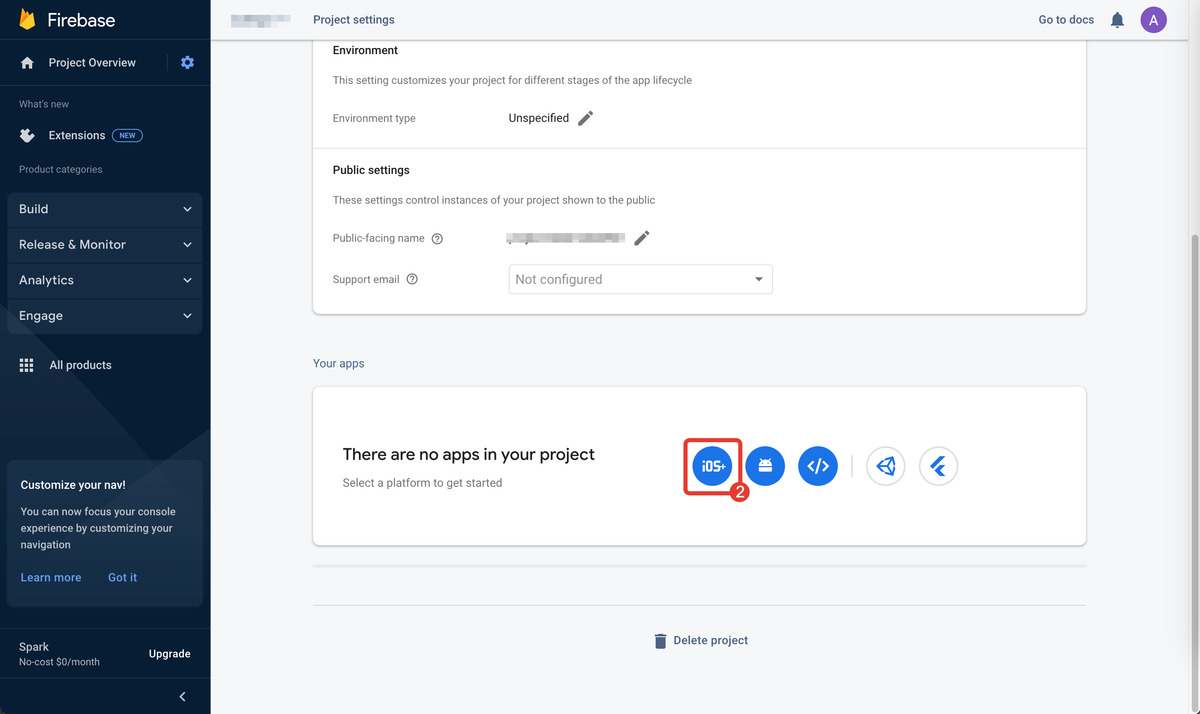
2. Enter Apple BundleID that you have generated before (setting up the Apple Developer account). The other fields are optional. Press "Register app".
3. Press "Download GoogleService-info.plist".
Important! Save the route for the file, do not change its name and extension. Send the file to the technical specialist for the further work on the app.
After the file is saved, close the window without completion next steps.
To connect the Firebase account with the Android app you need to generate google-services.json file:
1. On "Project Settings" page go to the tab "General" and press "Add app".
2. In the pop-up window click on the Android icon.
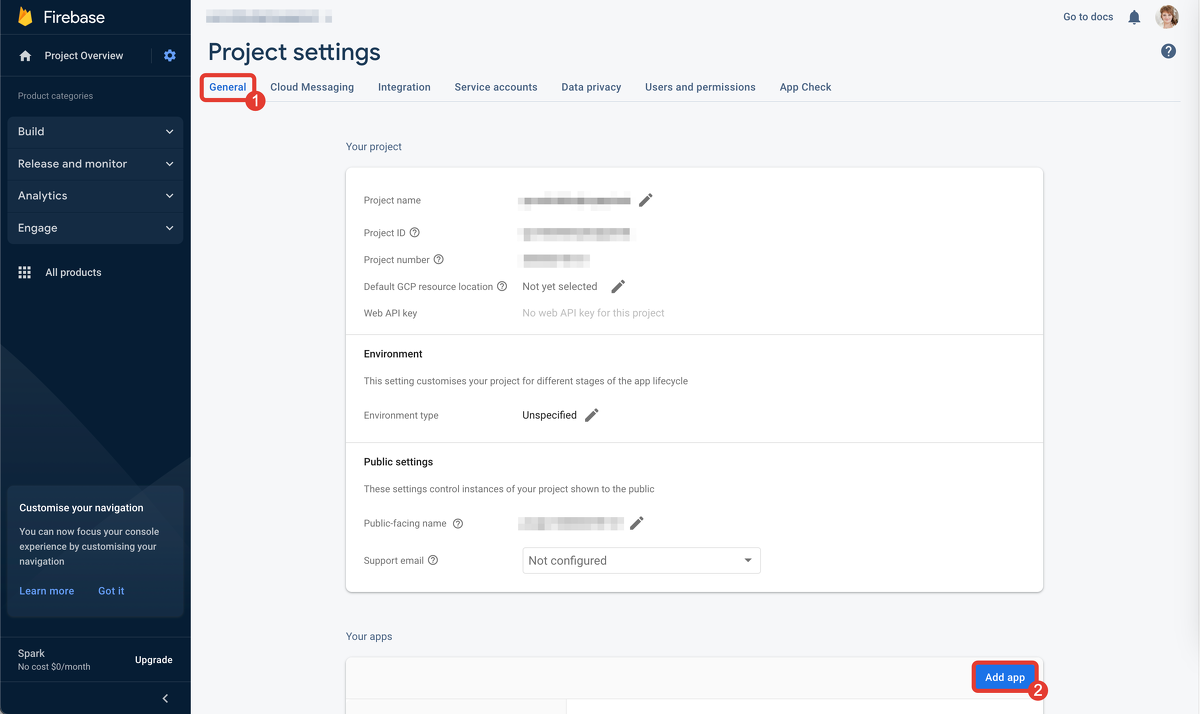
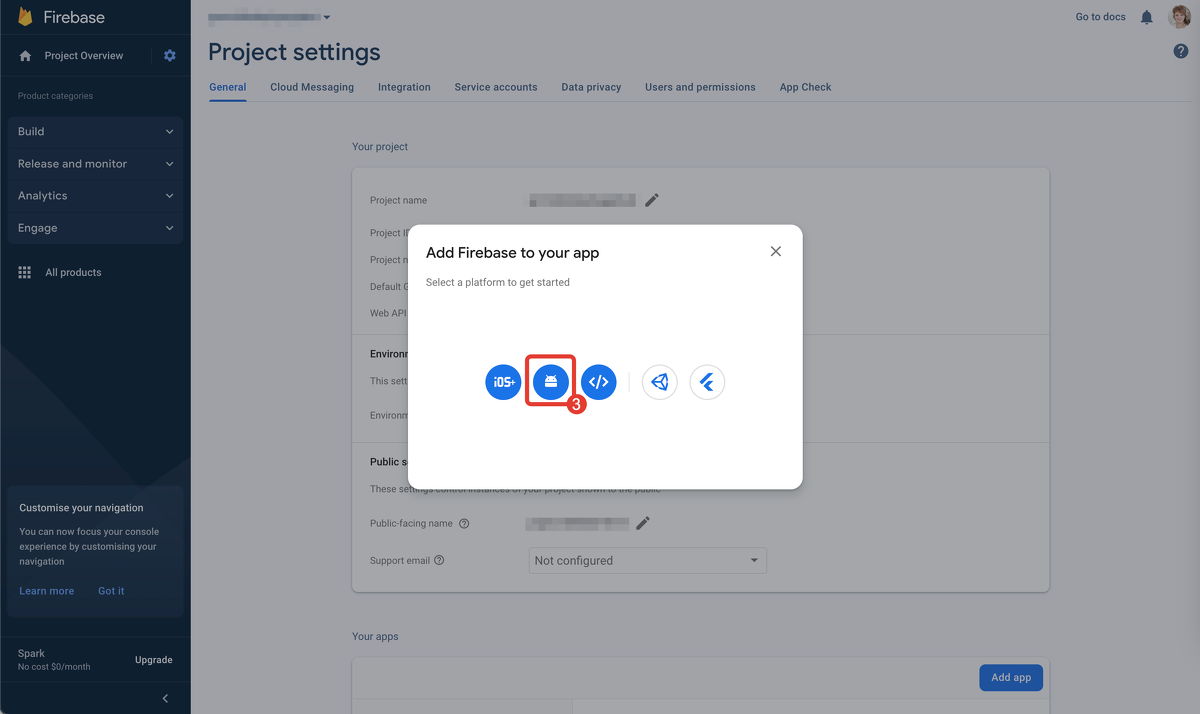
3. Into the field "Android package name" enter BundleID (same as for iOS). The other fields are optional. Press "Register app".
4. Press "Download google-services.json".
Important! Save the route for the file, do not change its name and extension. The file will be necessary for the further work on the app.
After the file is saved, close the window without completion next steps.
To connect Firebase account with push notifications:
1. On "Project settings" page go to "Cloud Messaging" tab.
2. In "Apple app configuration" — "APNs Authentication Key" section press "Upload".
3. In "APNs auth key" upload the .P8 key file, enter KeyID and TeamID which were generated while setting up Apple Developer account. Press "Upload".
Now everything is ready to start the work in the application builder.
To get further instructions please address our support.
We use technology such as cookies on our website to personalize content and ads, provide media features, and analyze our traffic. By using the GetCourse website you agree with our Privacy Policy and Cookies Policy.


please authorize