In this article, we will explore how to set up domain mail on the GoDaddy service. This service is provided on a paid basis.
3. Adding a domain to an account
4. Setting up a domain and domain mail, if the domain is hosted on Getcourse servers.
4.1 Delegating a domain to a GetCourse
4. 2 Settings on the Godaddy side
5. Setting up a domain and domain mail, if the domain is located on GoDaddy servers.
5.1 Settings on the GetCourse side
5.2 Settings on the Godaddy side
1. Creating a domain
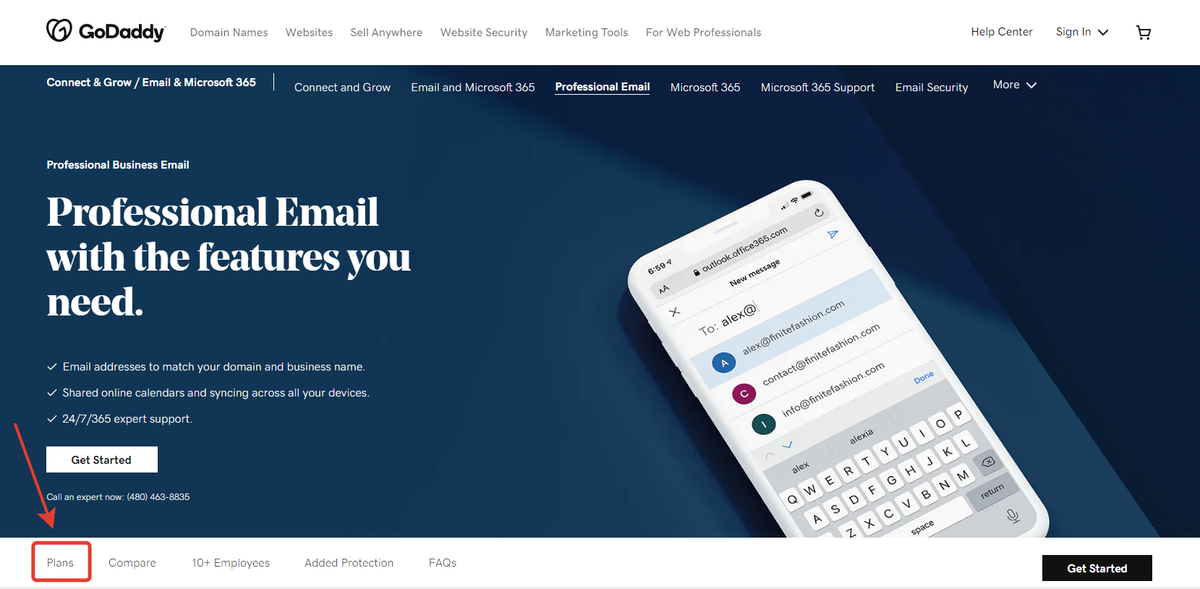
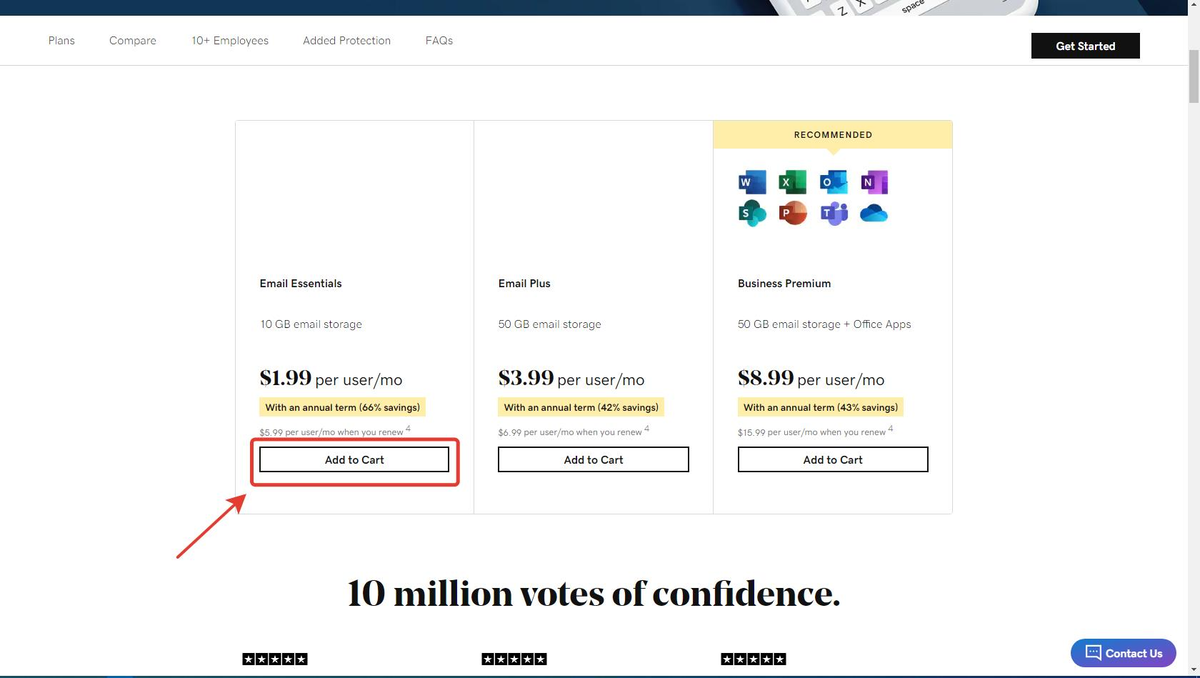
To create and configure domain mail, go to the GoDaddy service. Next, you need to choose the desired tariff. To create a domain mail, it is enough to choose the «Email Essentials» tariff.
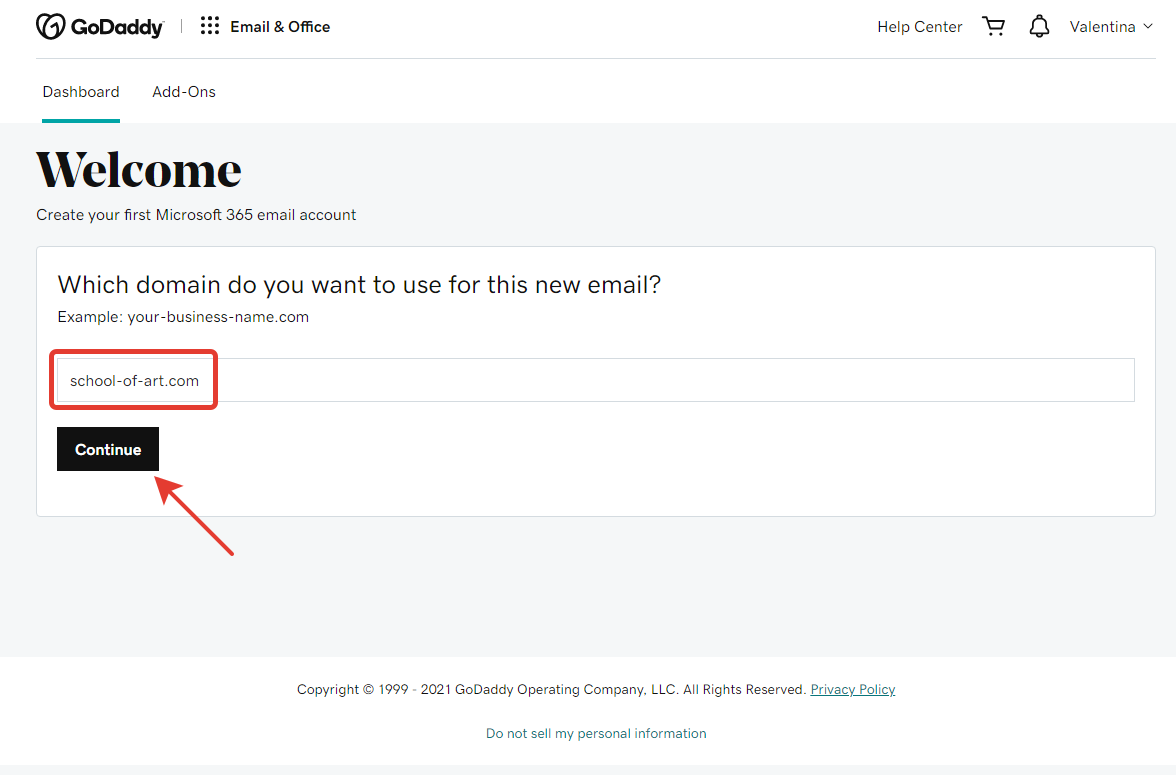
After paying the tariff, specify the domain on whose behalf you are setting up domain mail, and click «Continue».
Then go to the next step: "Adding a domain to an account".
2. Buying a domain
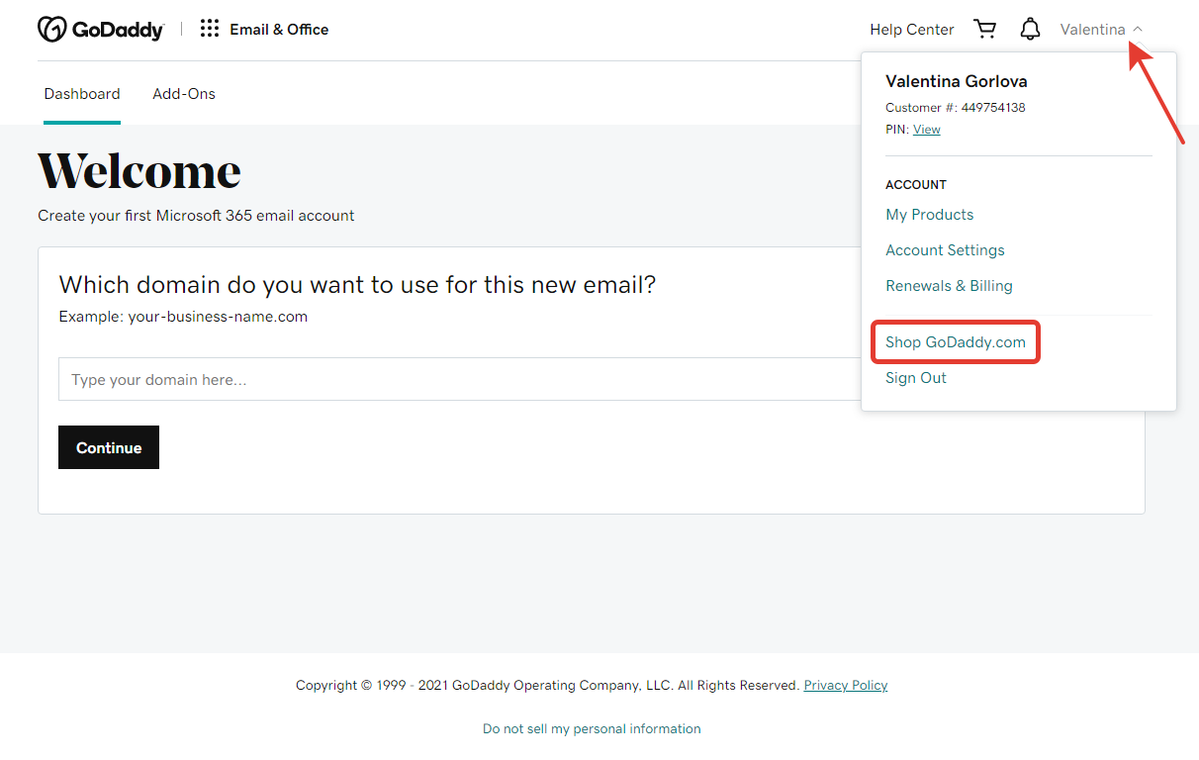
If you don’t have a domain yet, go to the GoDaddy store:
Enter the desired domain name and click "Search Domain":
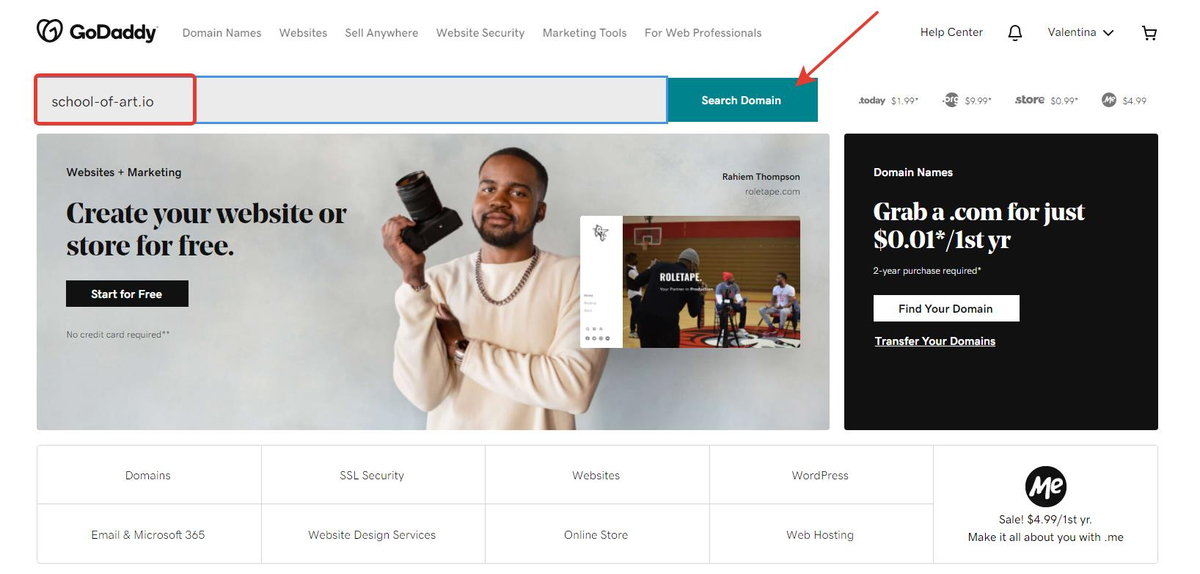
Choose a suitable domain from the ones offered by the system and pay.
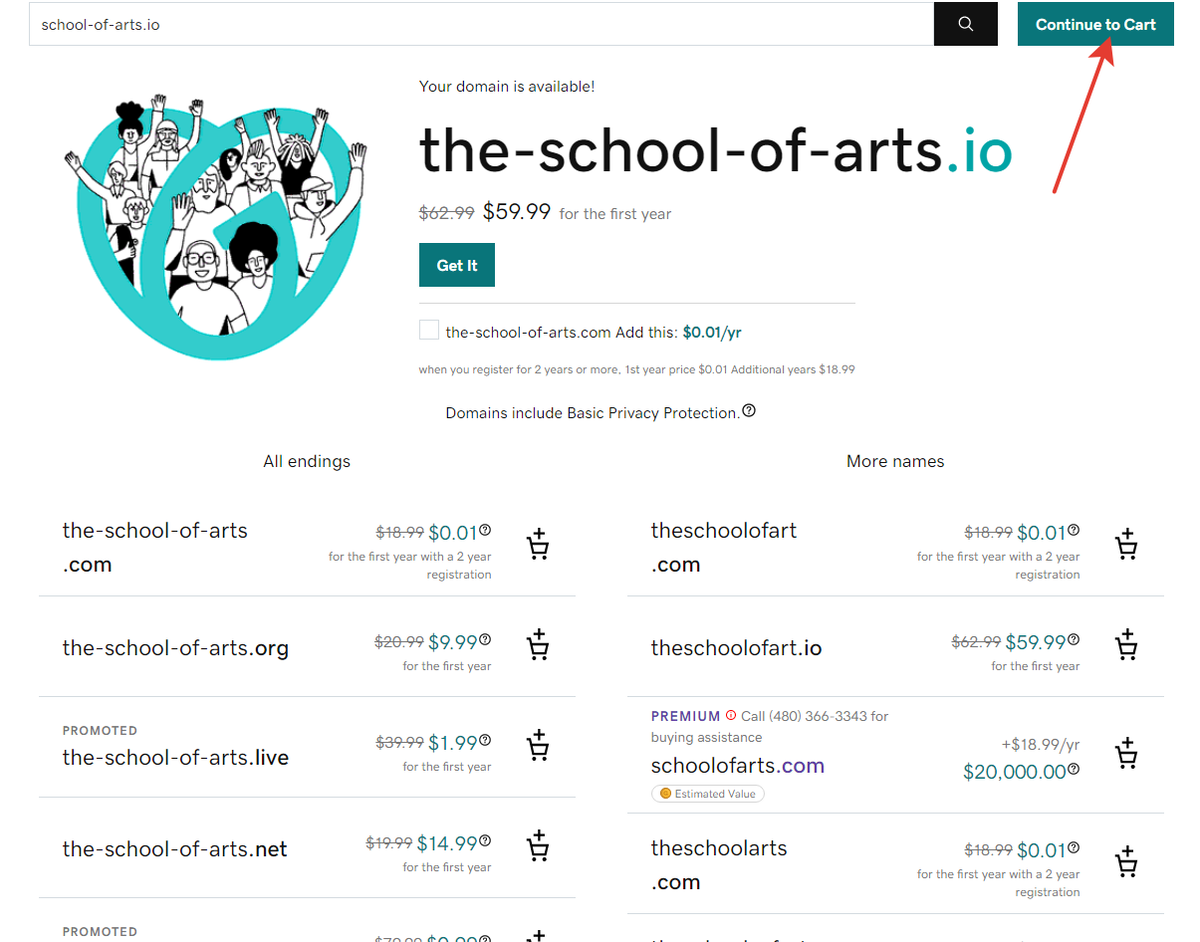
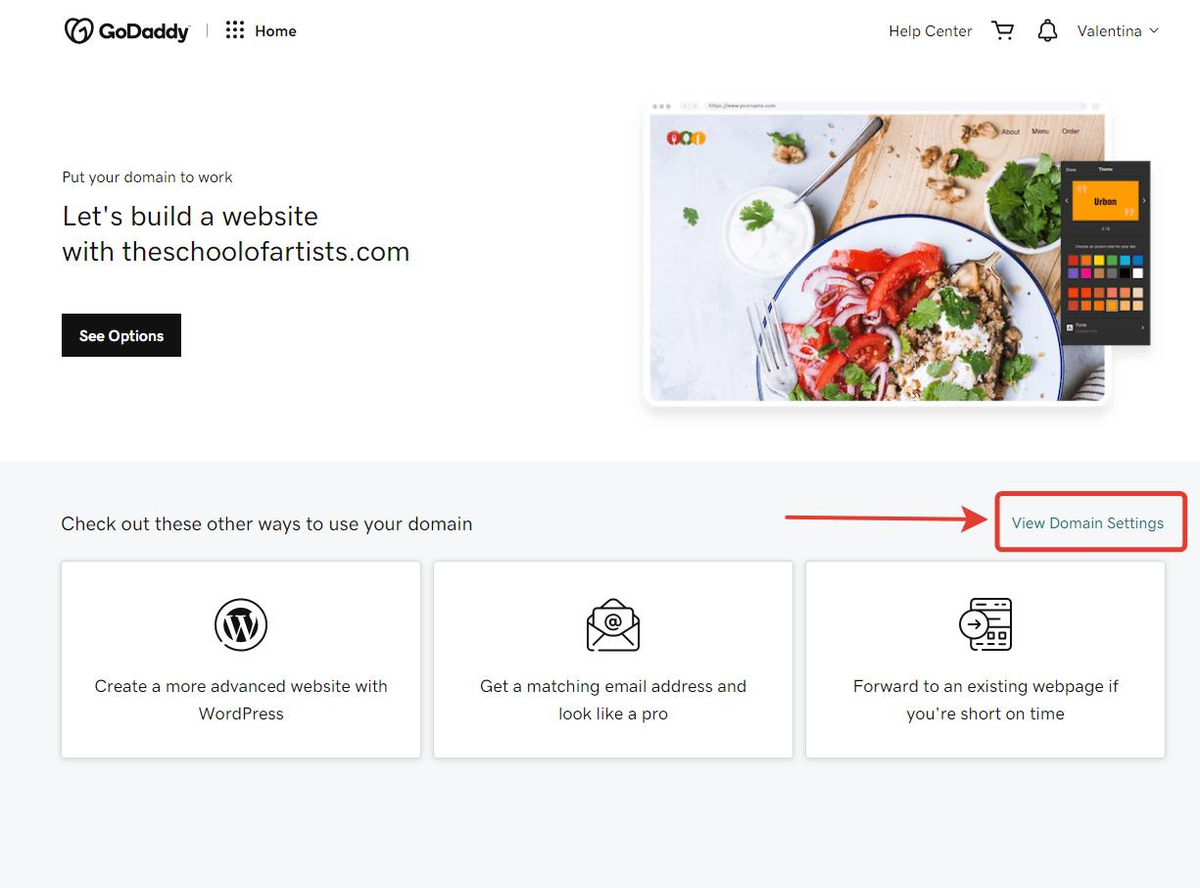
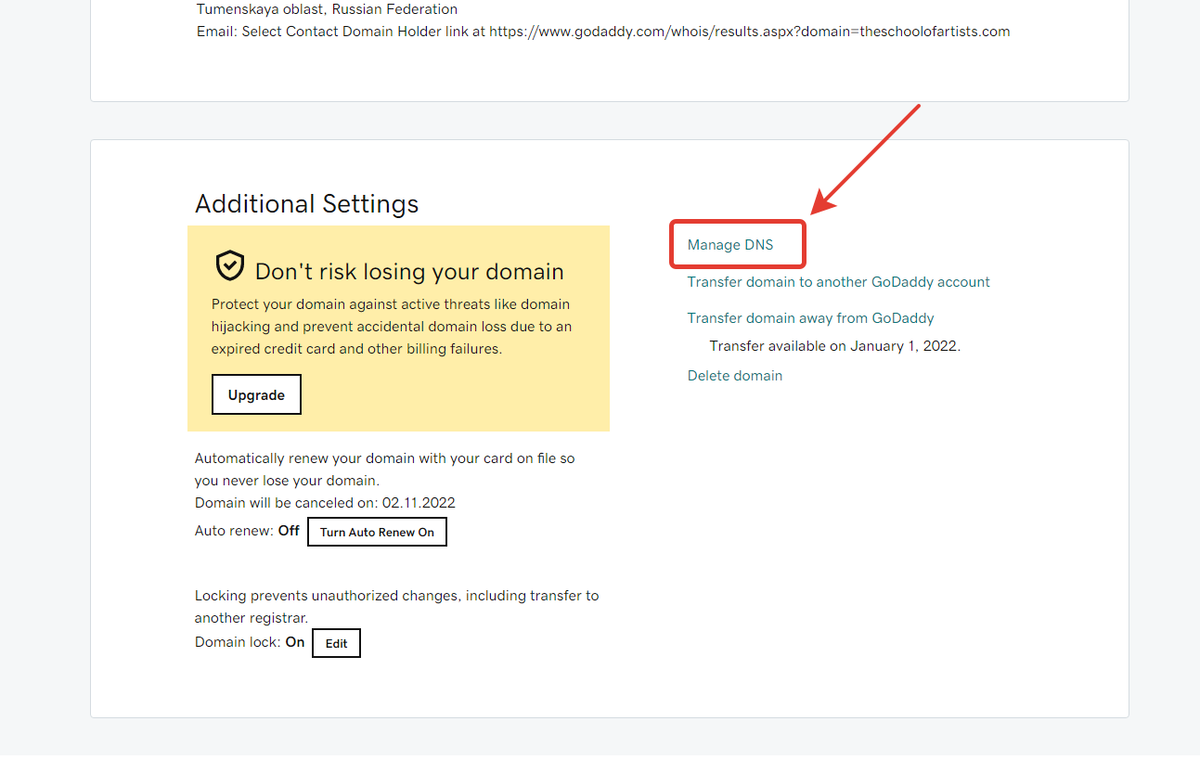
After the purchase, go to the DNS domain management zone. To do this, click on "View domain settings":
Go down the page:
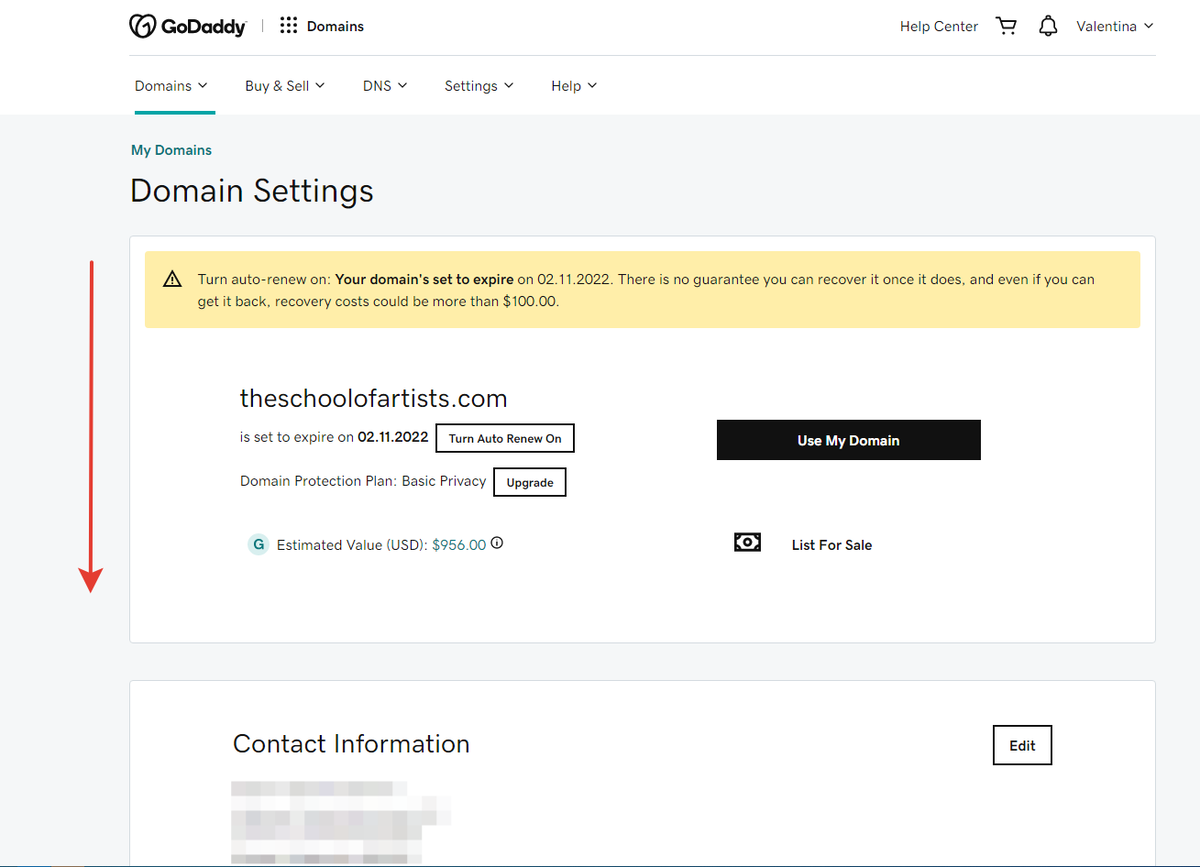
Click on the "Manage DNS" button:
To continue the setup, add the purchased domain to your Get Course account.
To do this, in the GetCourse account click to the Profile > Account Settings > Domains tab > Add domain
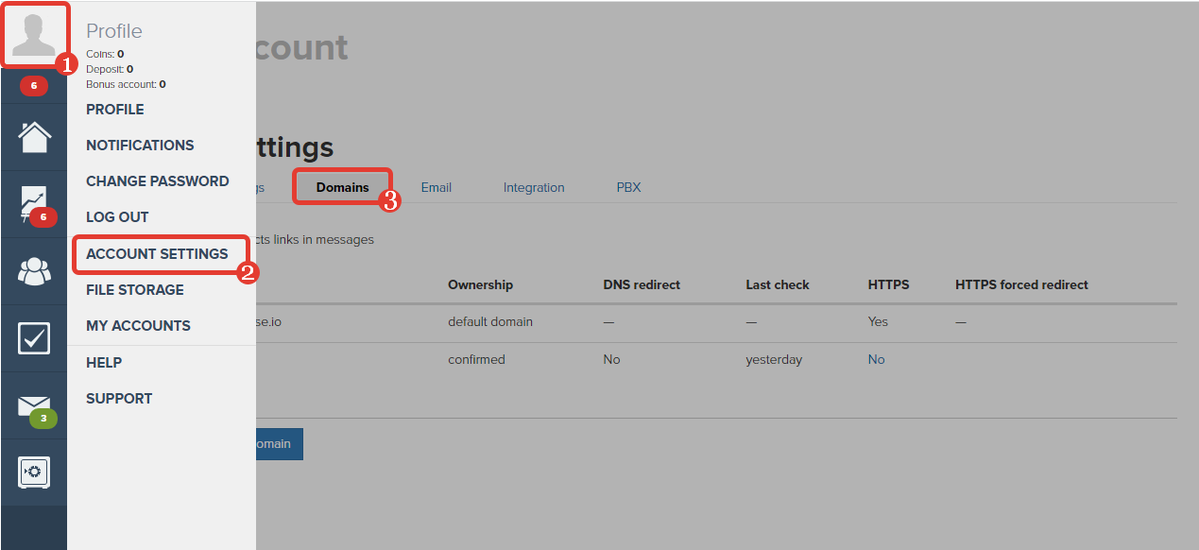
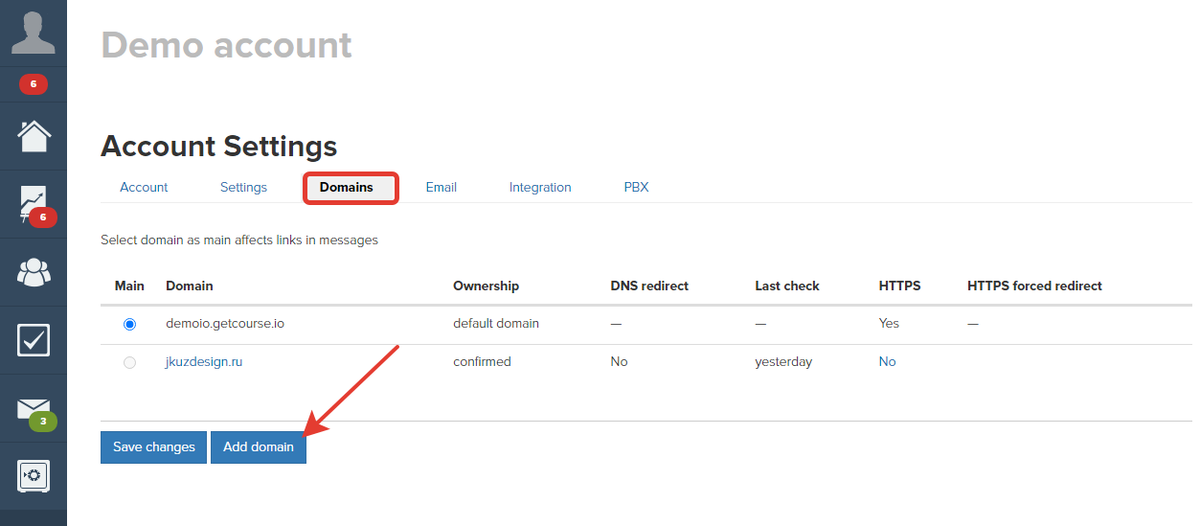
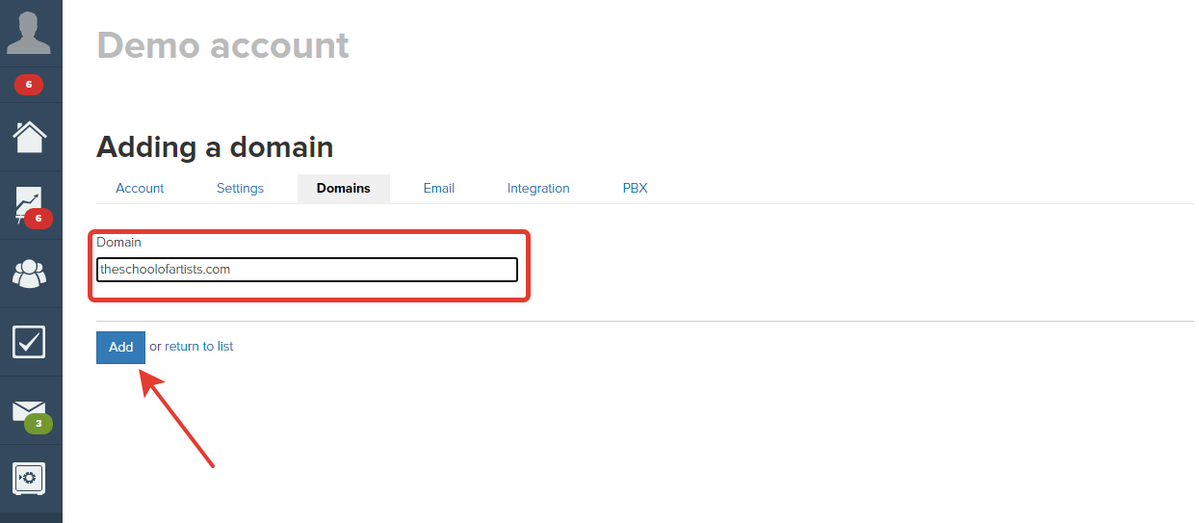
Enter the domain name and click on the "Add" button:
Specify the domain placement method:
"Use GetCourse name server" — if you want your GetCourse account to be opened by the name of this domain. In this case, the domain management zone will be transferred to the Getcourse.
"Use your own name server" — if you do not want the GetCourse account to be opened by domain name. Domain management will remain in Godaddy.
4. Setting up a domain and domain mail, if the domain is hosted on Getcourse servers.
4.1 Delegating a domain to a GetCourse.
In the first case, put the selector in the 'Use GetCourse name server" position and save the setting:
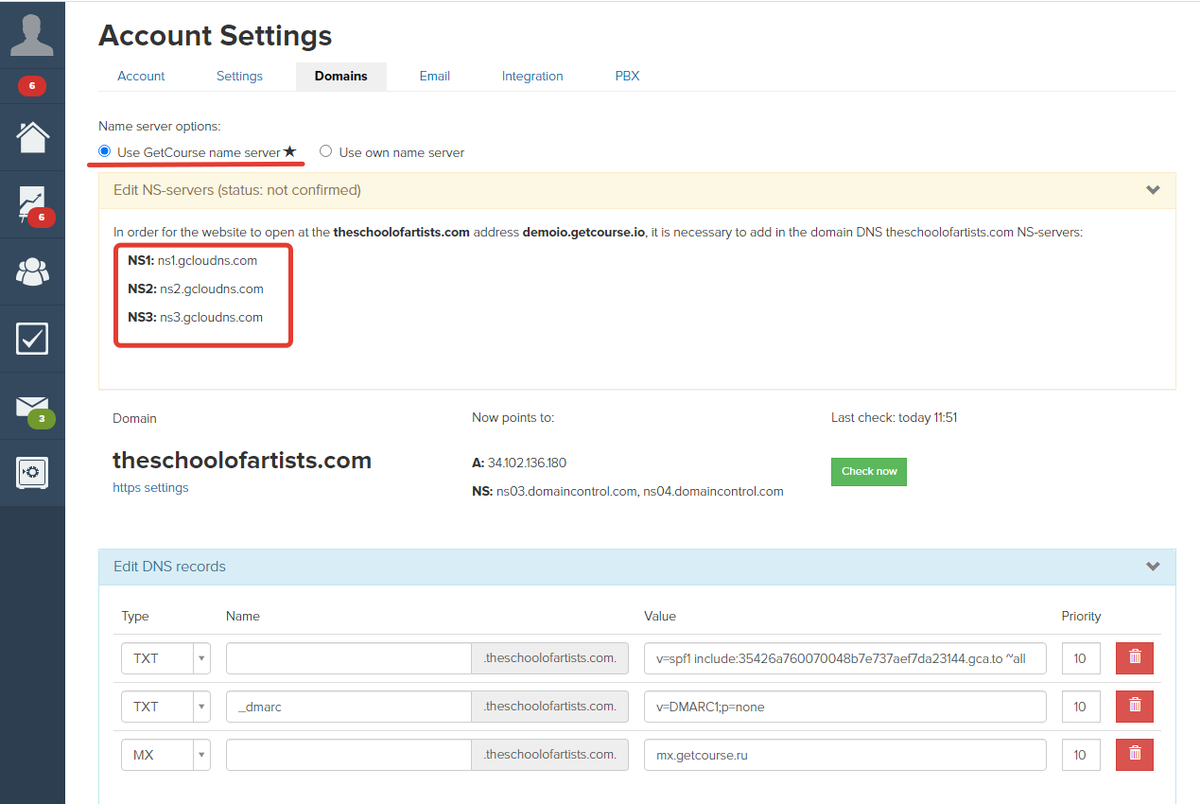
Go back to your GoDaddy account, go to the "Nameservers" block, click the "Change" button and enter the NS-records of the Getcourse specified in the domain settings.
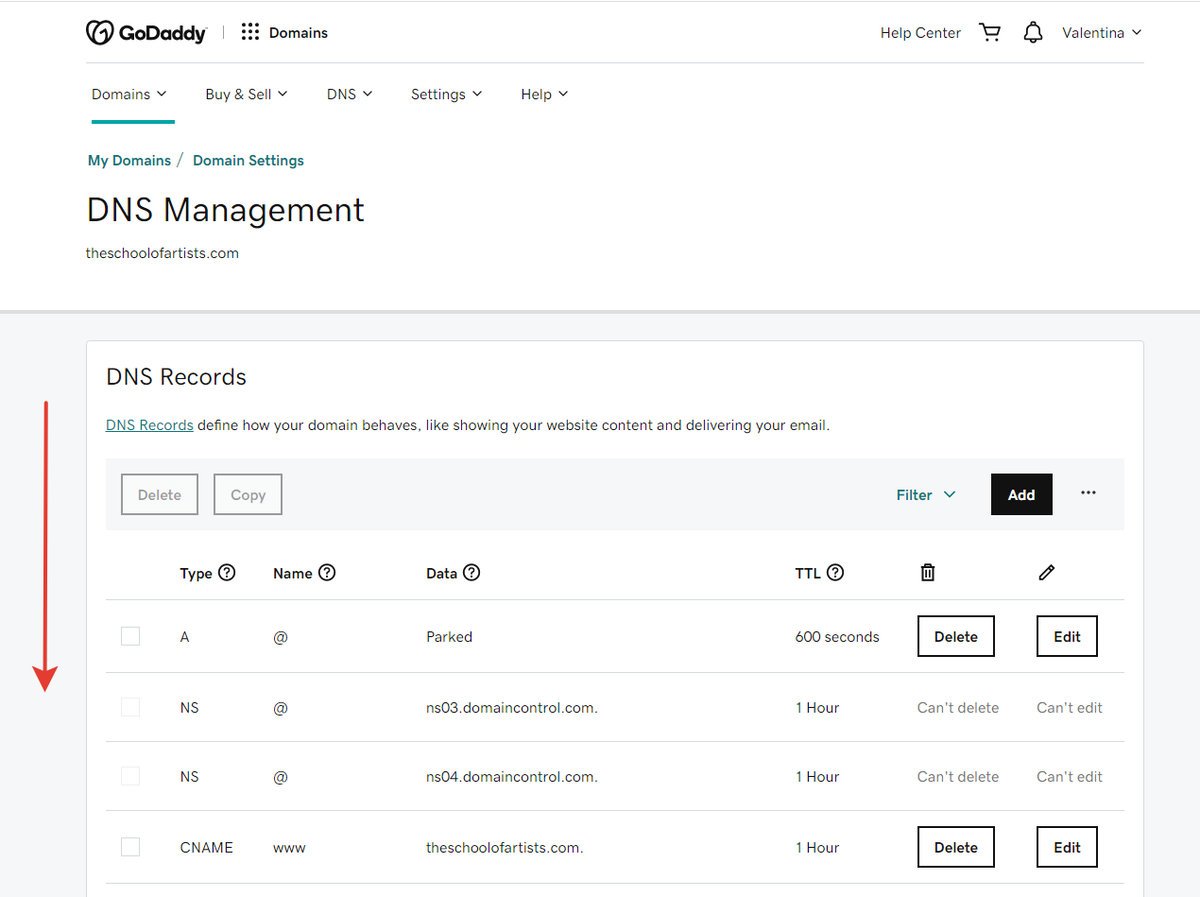
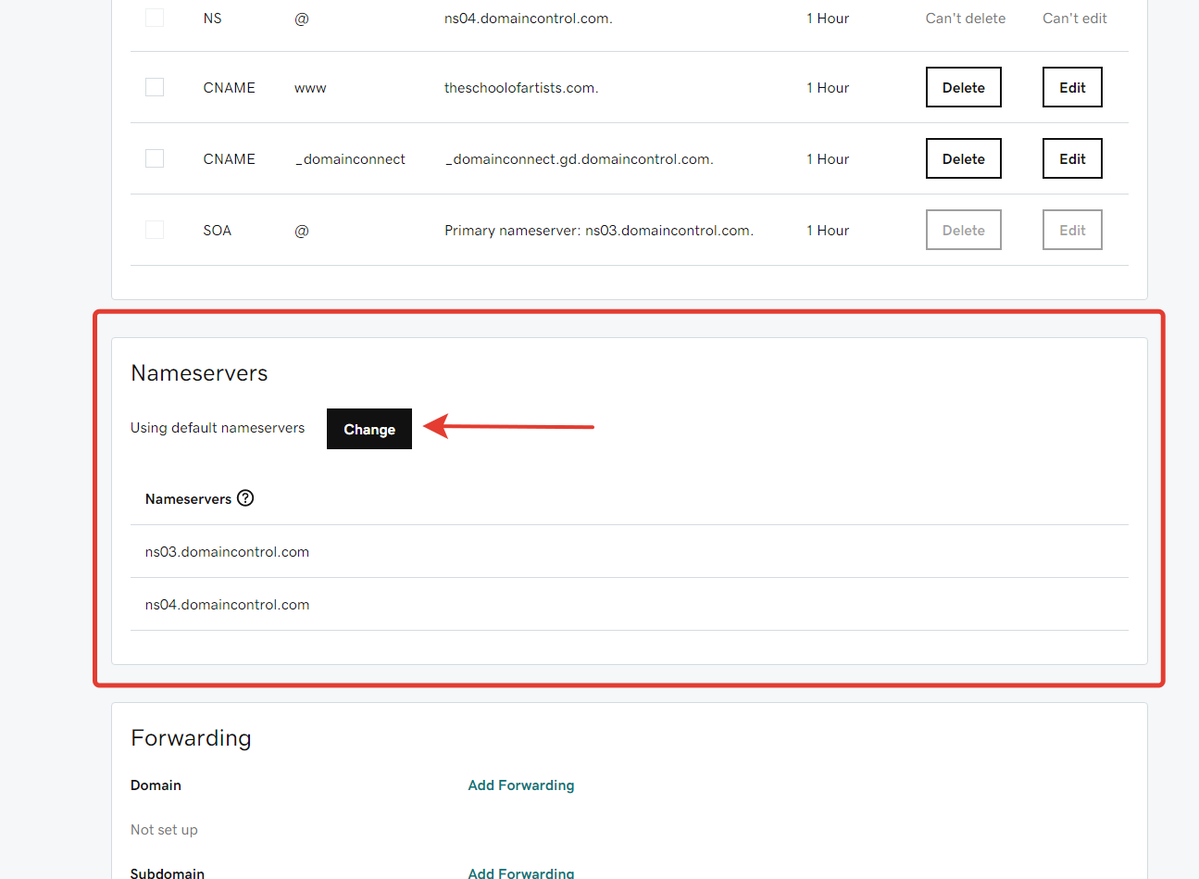

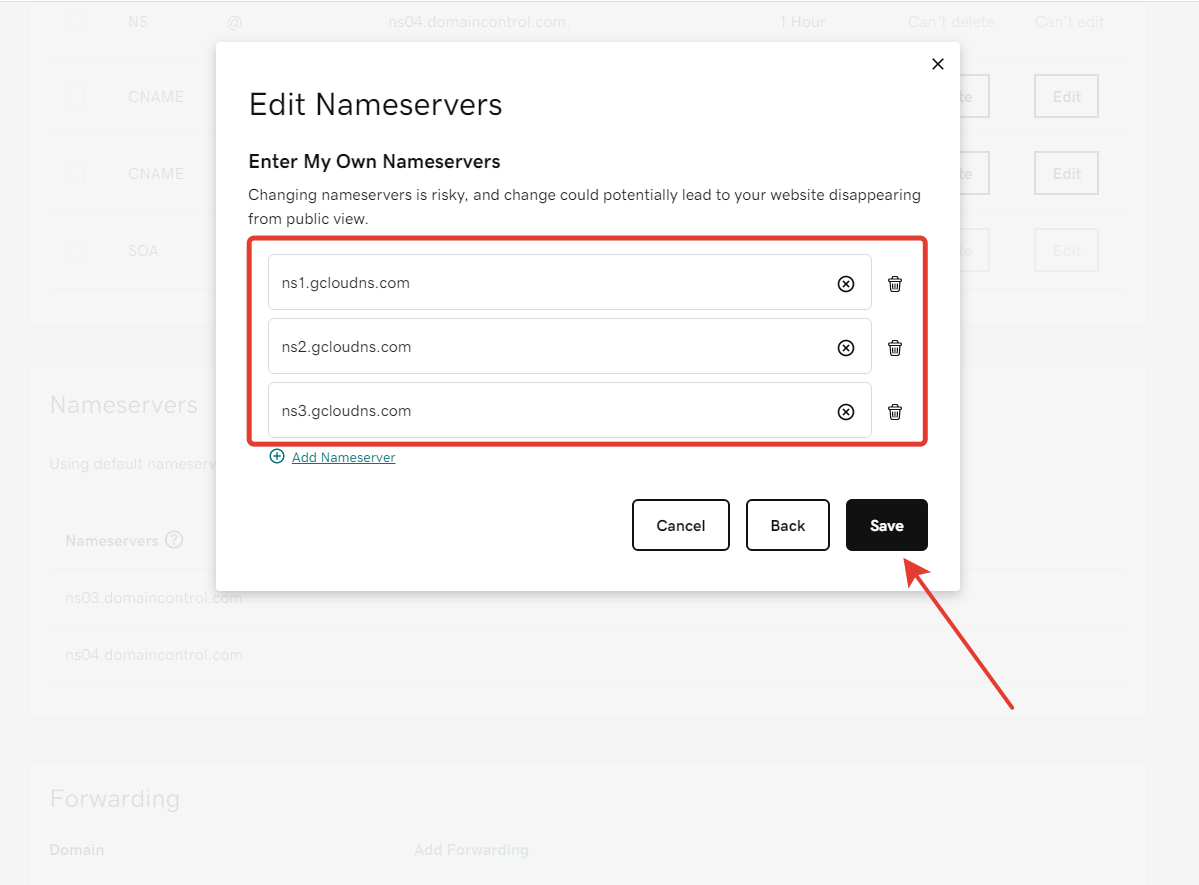
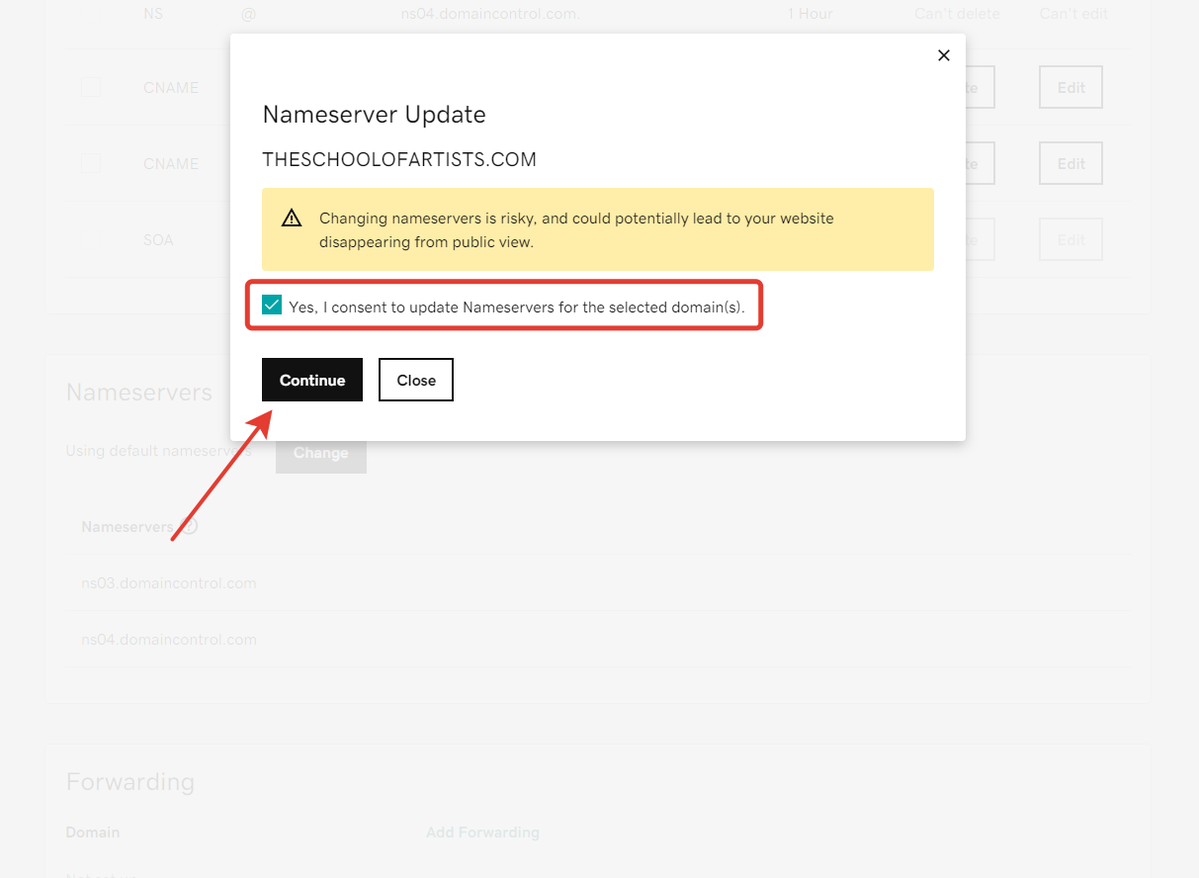
Please note that the records are updated for up to 72 hours.
4.2 Setting up Domain Mail
Next, to configure the domain mail, go to the Email & Office section:

Select the domain on behalf of which you will configure mail:
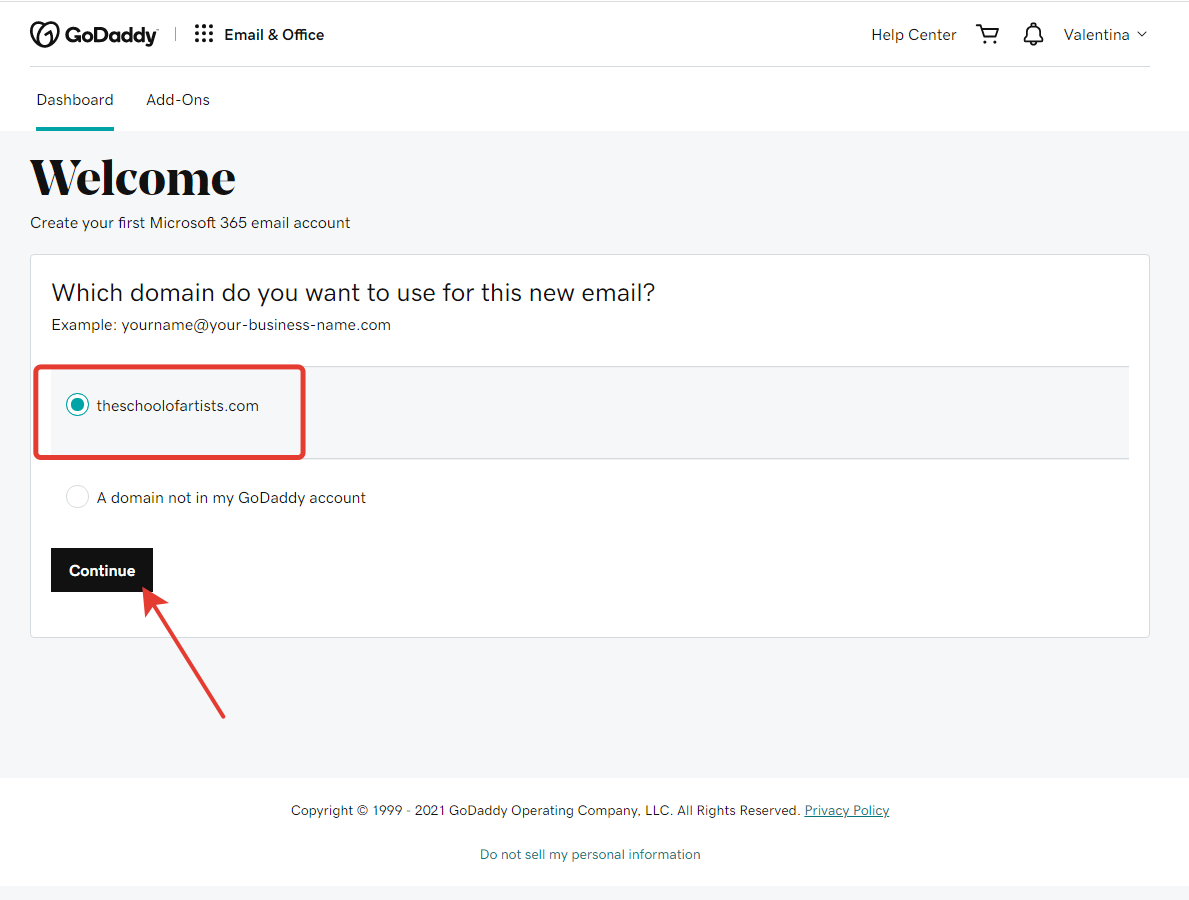
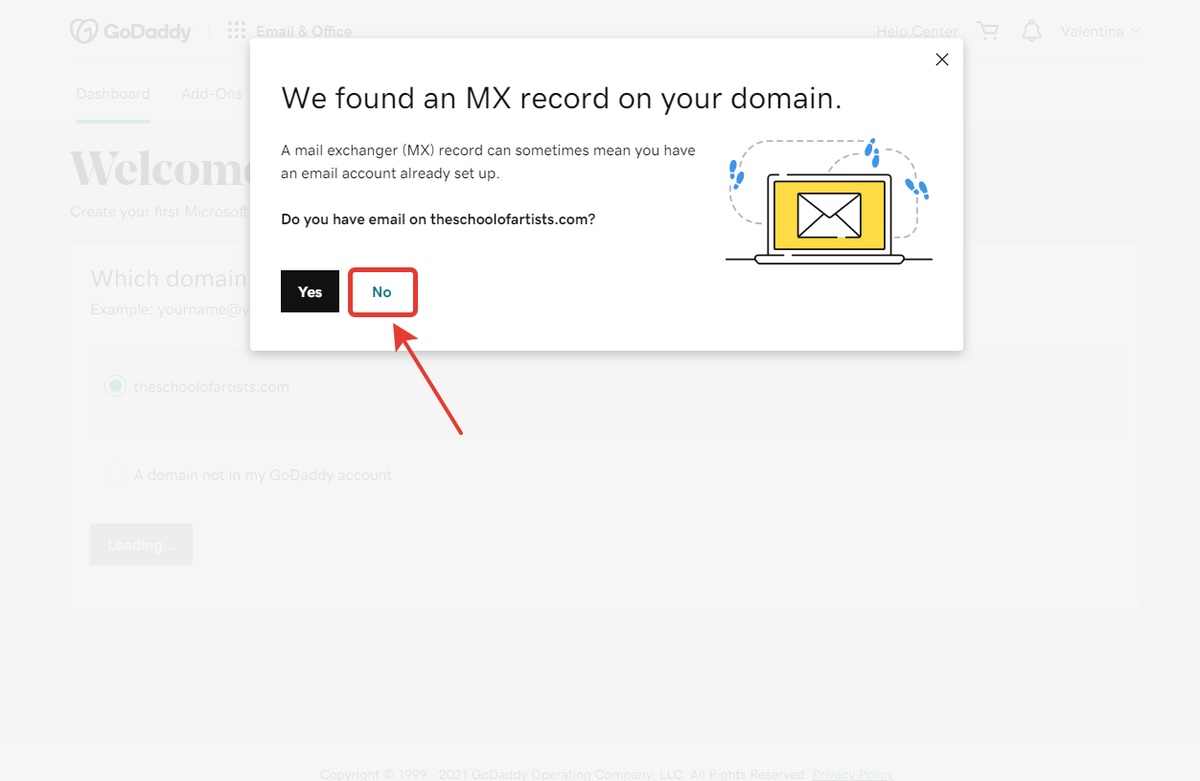
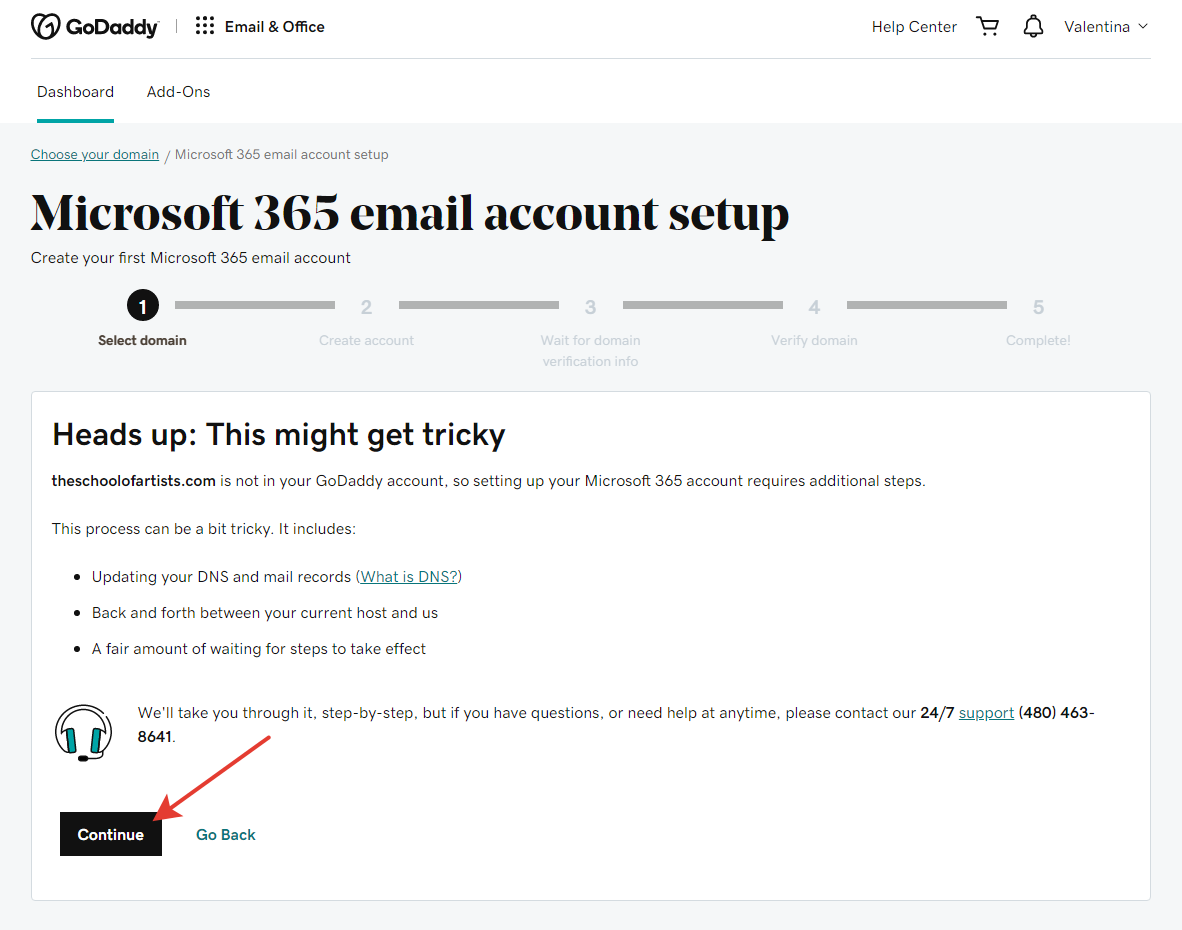
Next:
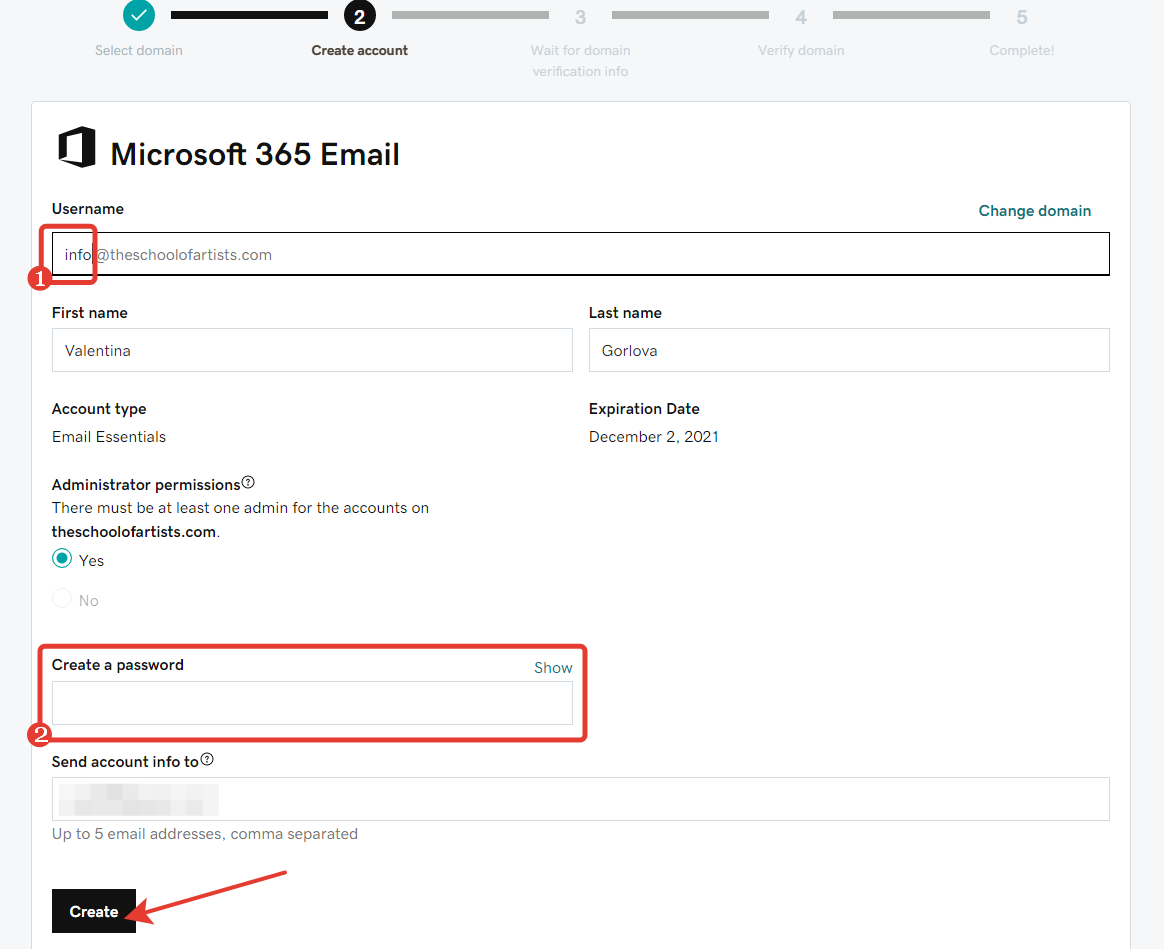
1. Enter the name of the domain mailbox.
2. Set a password to log in to the domain mail.
3. Click the "Create" button.
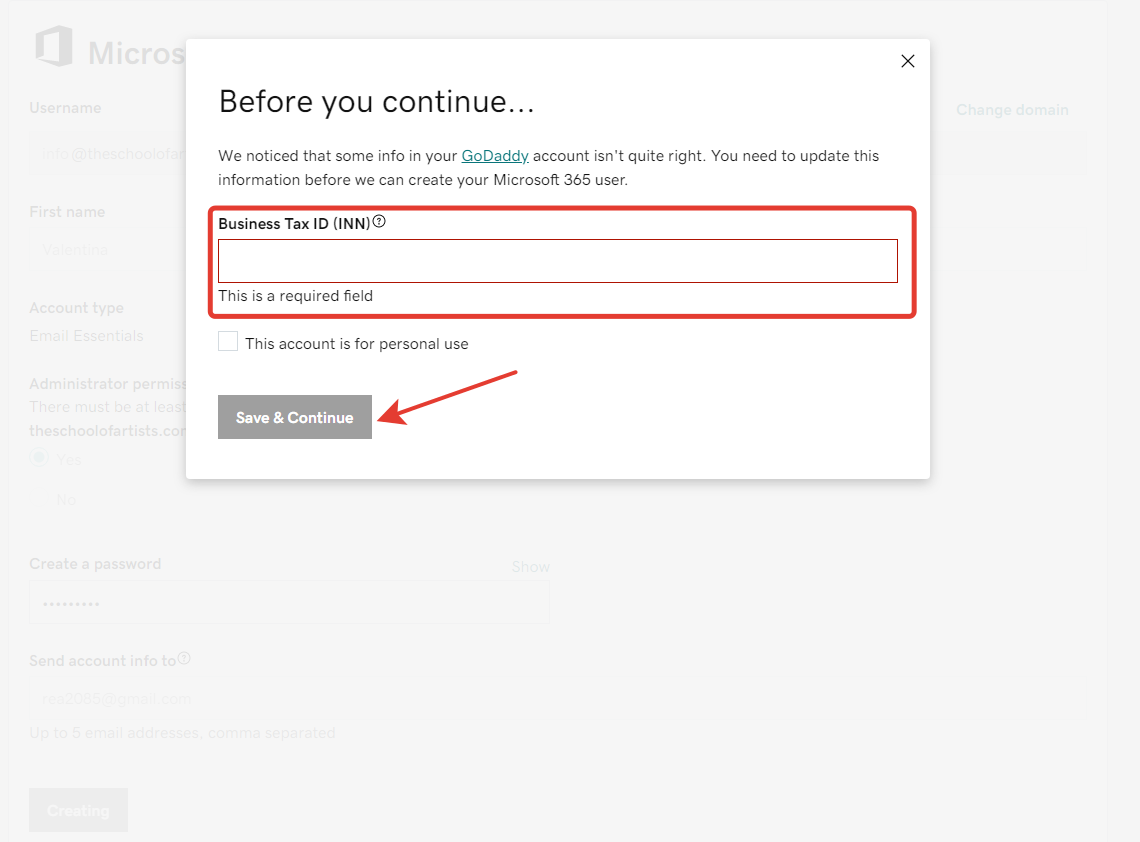
Specify the INN (Business Tax ID), if it was not previously specified.
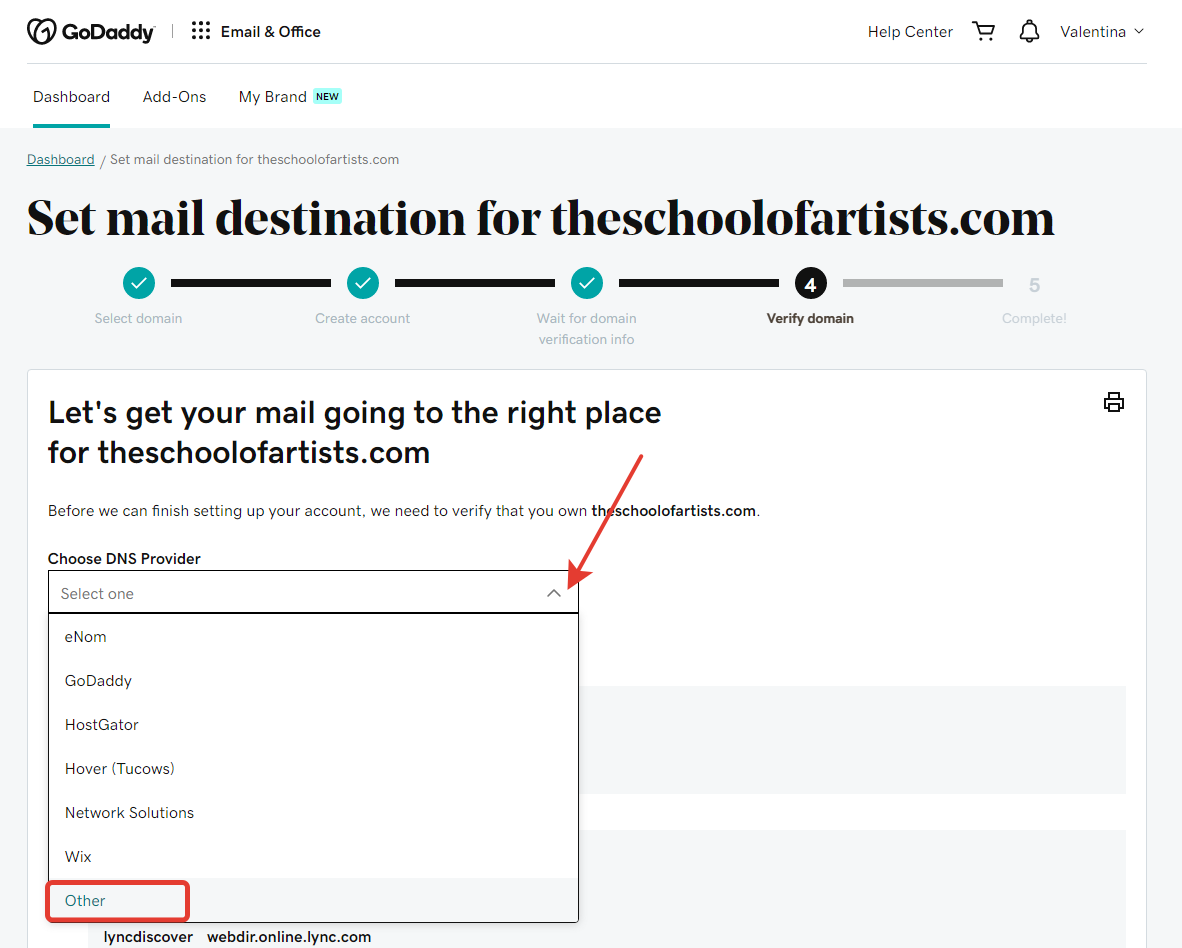
Confirm ownership of the domain.
To do this, select "other" from the list of DNS providers
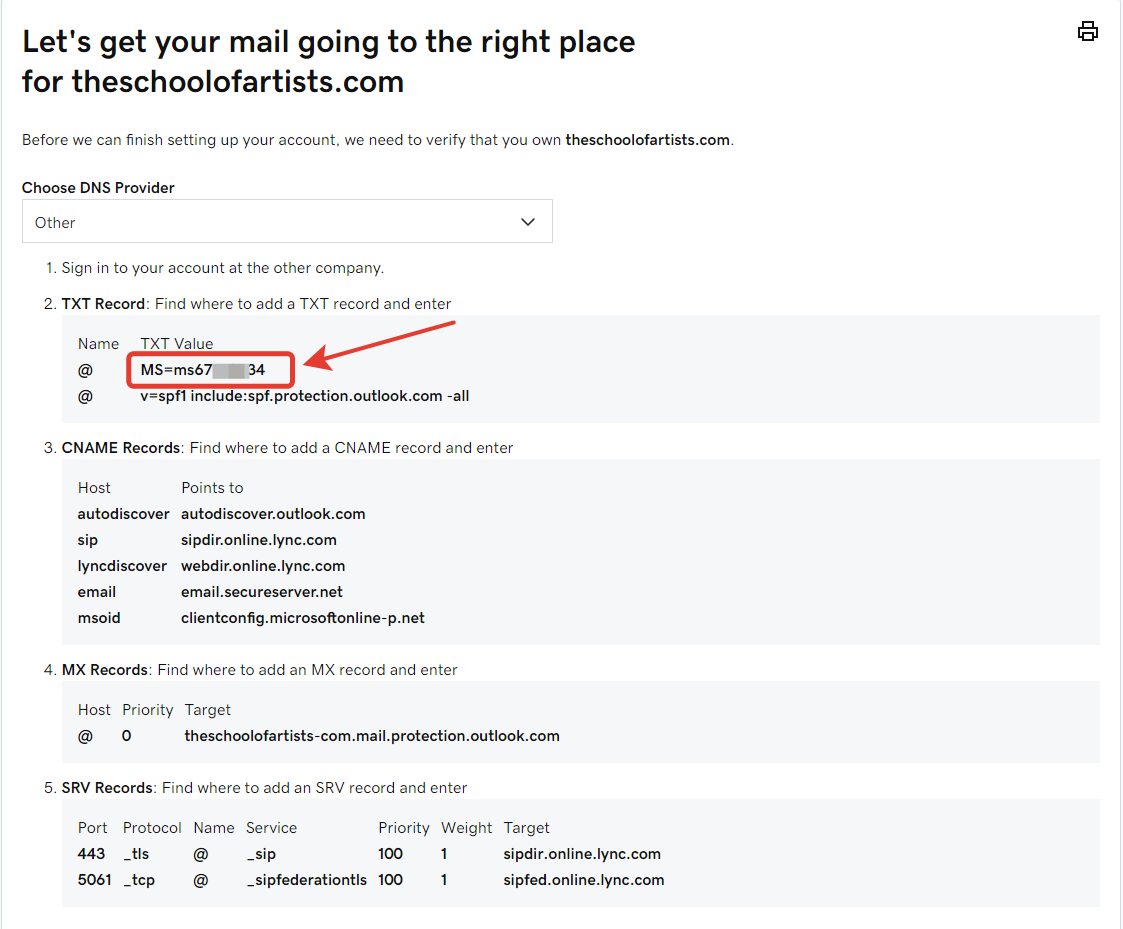
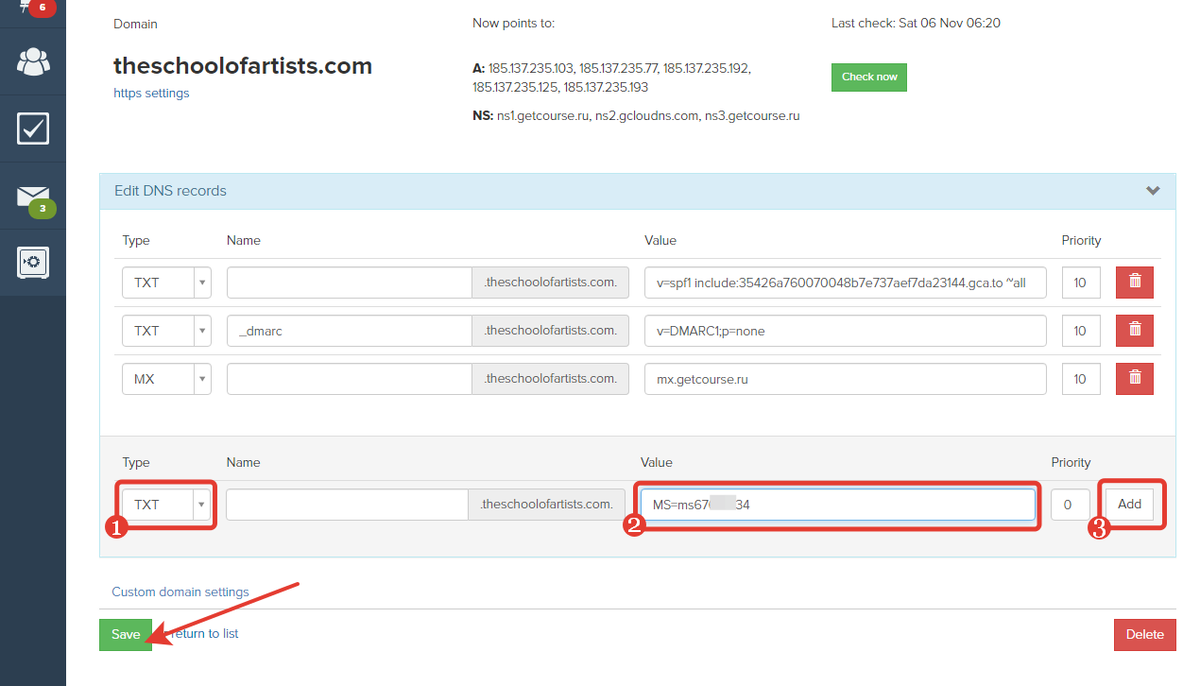
Copy the values of the first TXT Record:
Go to your GetCourse account in the "Account Settings — Domains" section.
1. Select the TXT Record type.
2. Enter the value that GoDaddy suggests.
3. Click "Add".
4. Save the changes made to the DNS zone.
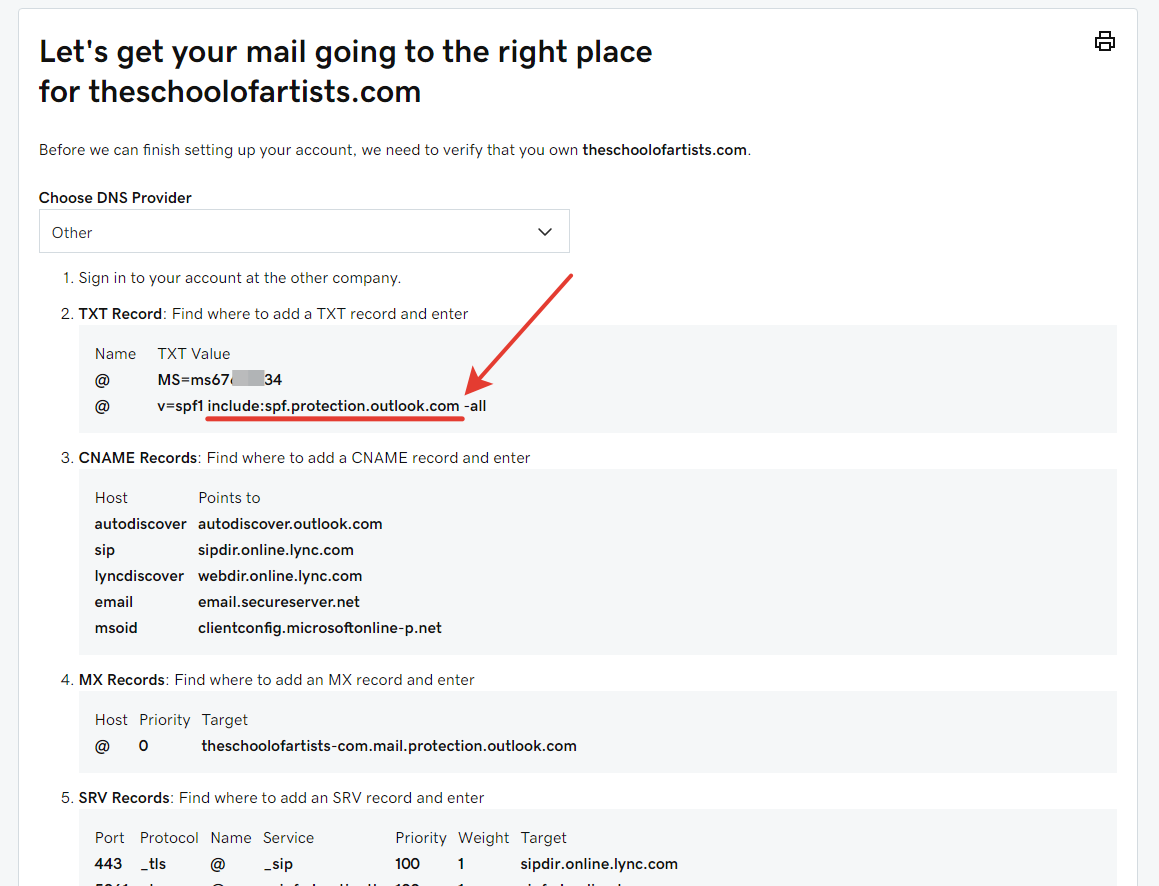
Also, when sending emails not only from GetCourse, but also from the domain mail service, it is necessary to combine the GetCourse SPF record with the SPF record offered by the GoDaddy service.
Copy the construction from the GoDaddy service: include:spf.protection.outlook.com
Add it to the existing GetCourse SPF record:
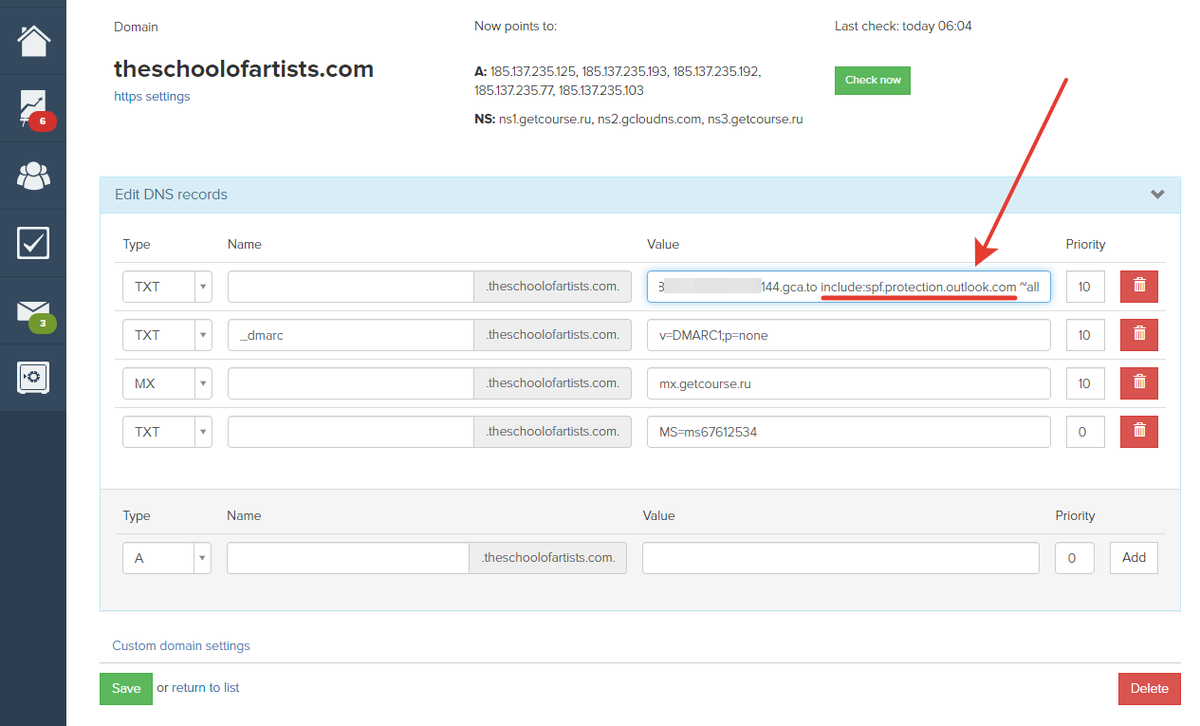
Please note: There should be only one SPF record.
Next, copy the MX Record from the GoDaddy service and add it to the DNS zone of your domain on the GetCourse. Save the settings.
The GoDaddy MX Record looks like this:
Record type — MX
Name — @
Value — ХХХХХХХХХХ.mail.protection.outlook.com (instead of "XXXXXXXXXX", your domain name is displayed in the mail settings section)
Priority — 0
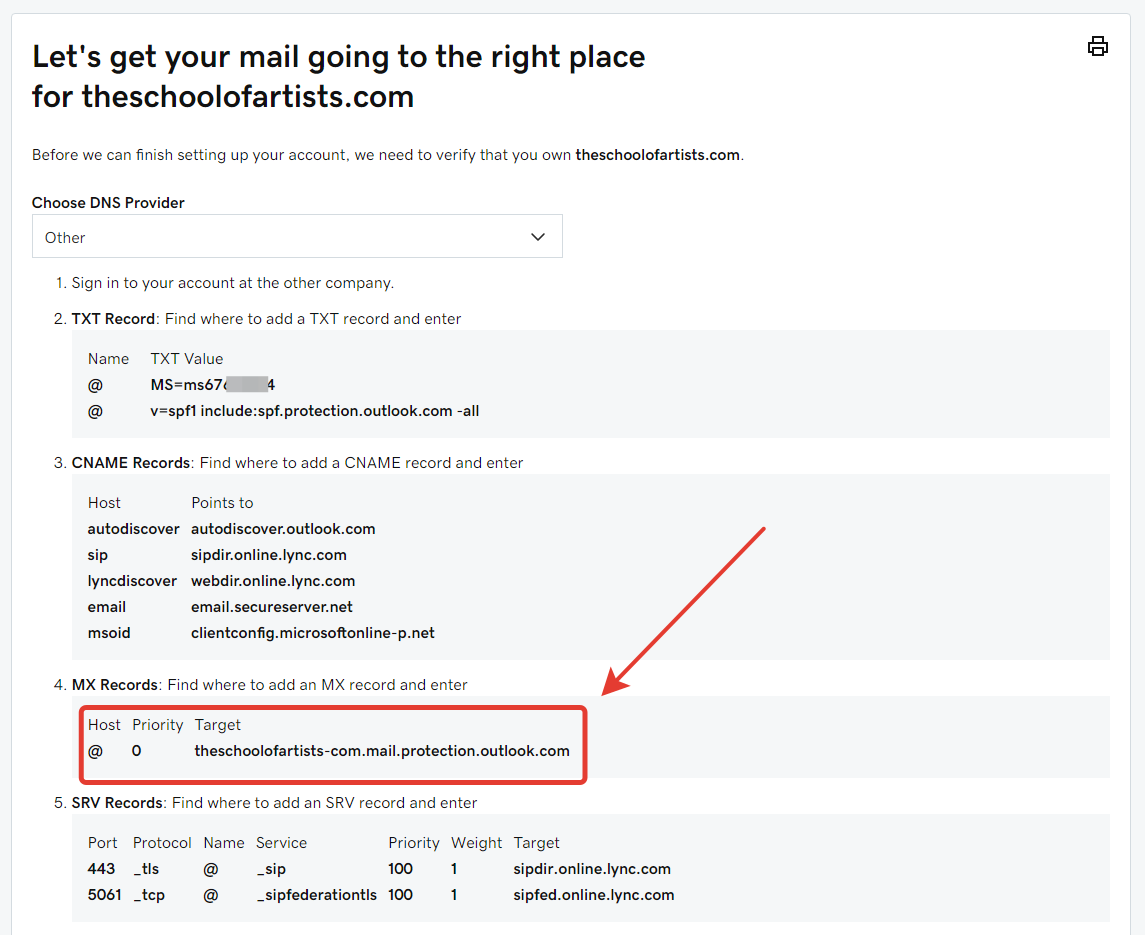
Please note: after adding a new MX Record offered by the GoDaddy service, it is necessary to delete the existing MX record. So, there should be only one MX Record left in the domain settings.
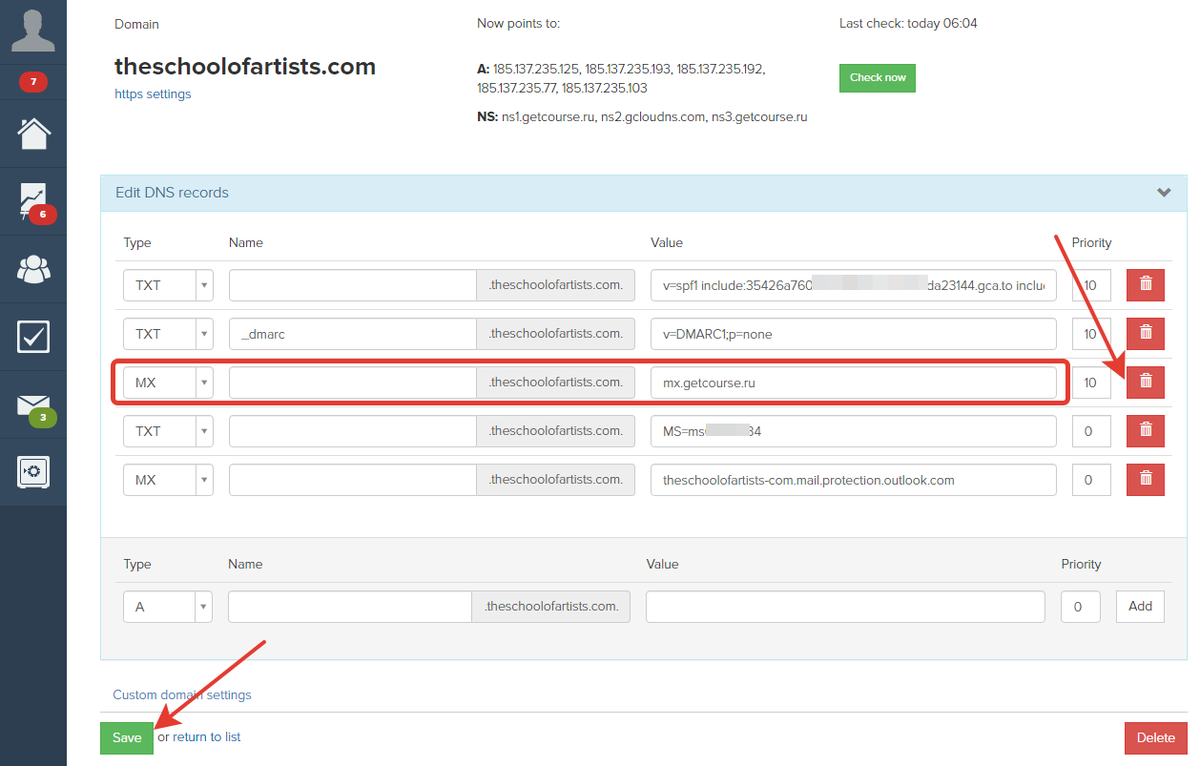
When GoDaddy "notes" the MX Record, you can continue configuring mail. Updating this record on the GoDaddy can take up to 48 hours.
To check if the changes have taken effect, click on "Check My Settings":
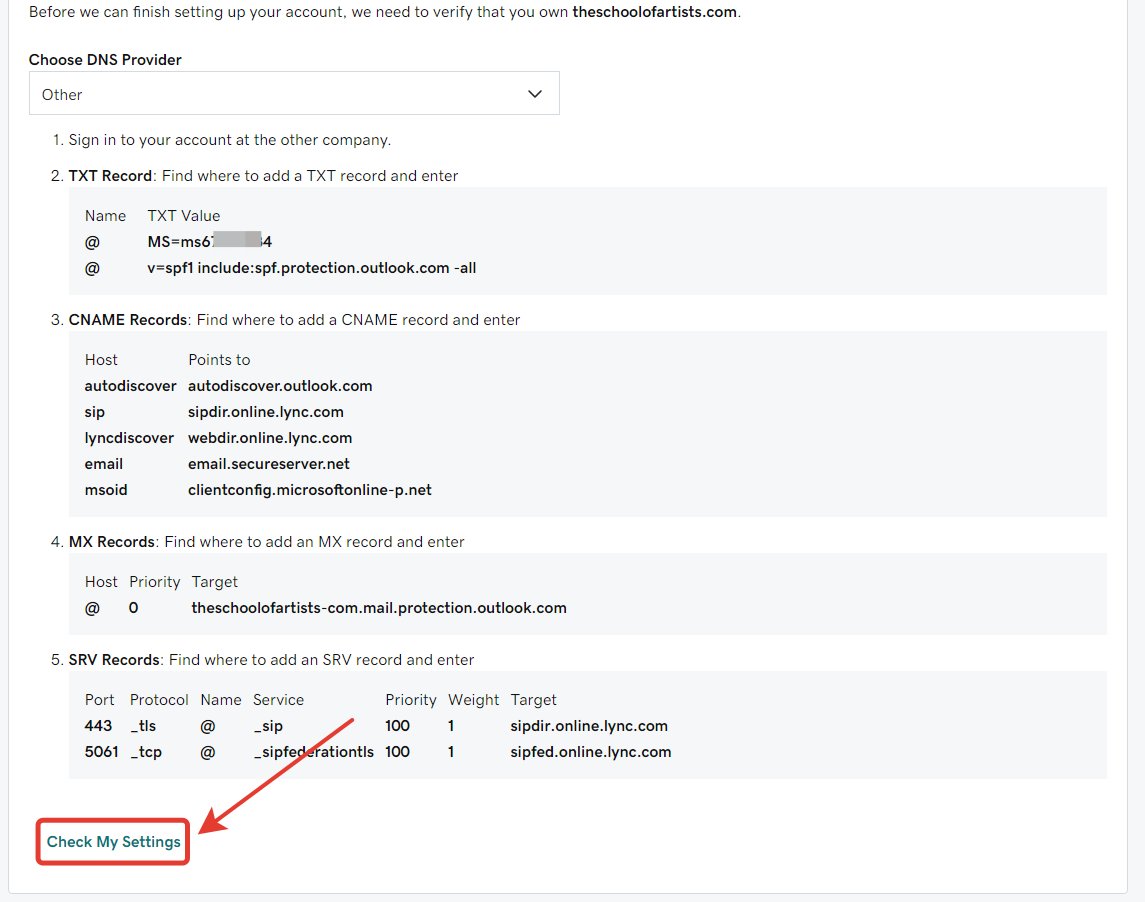
When all records are updated, a corresponding message will appear.

5. Setting up a domain and domain mail, if the domain is located on GoDaddy servers.
5.1 Settings on the GetCourse side
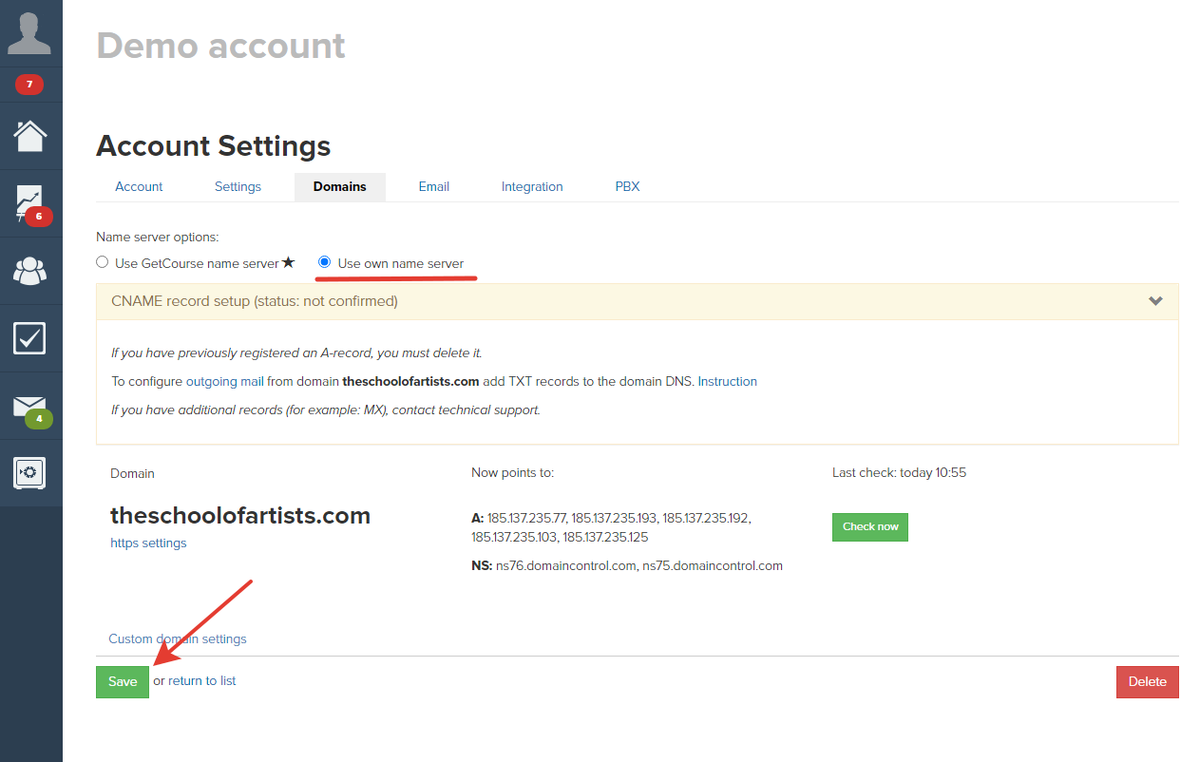
In the second case, move the selector to the "Use own name server" position and save the setting.
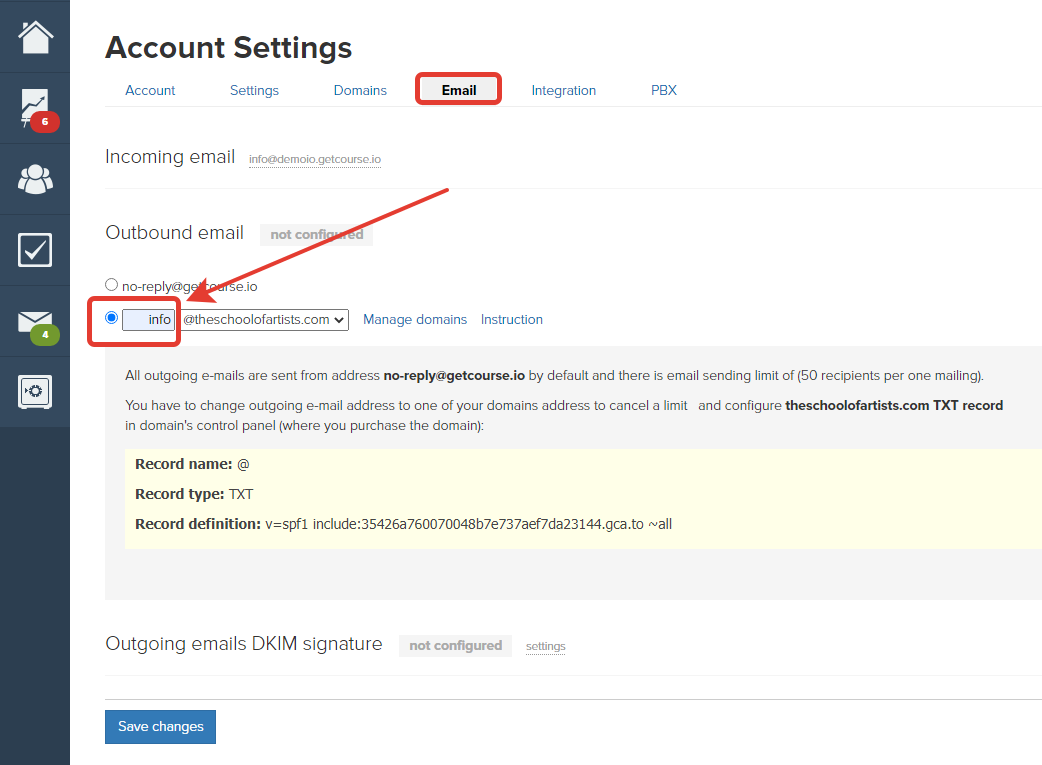
Go to the "Mail" section and move the selector next to the domain. Come up with and specify a name for the domain mailbox — emails from the GetCourse account will be sent from this address.
5.2 Settings on the Godaddy side
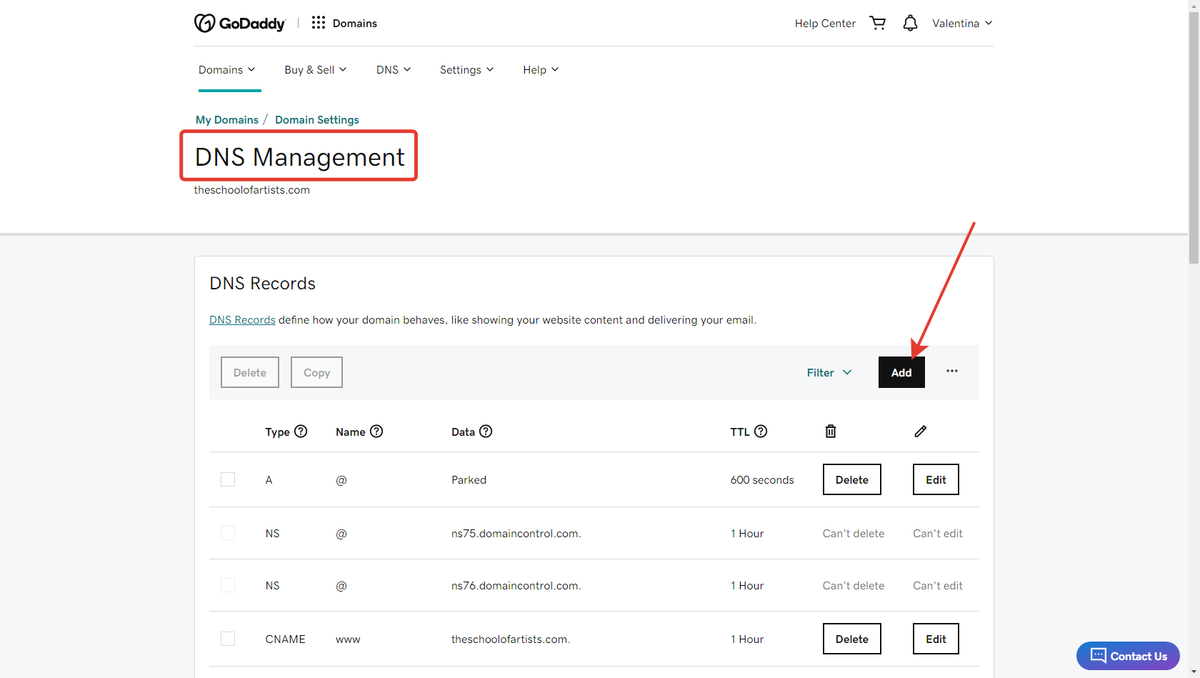
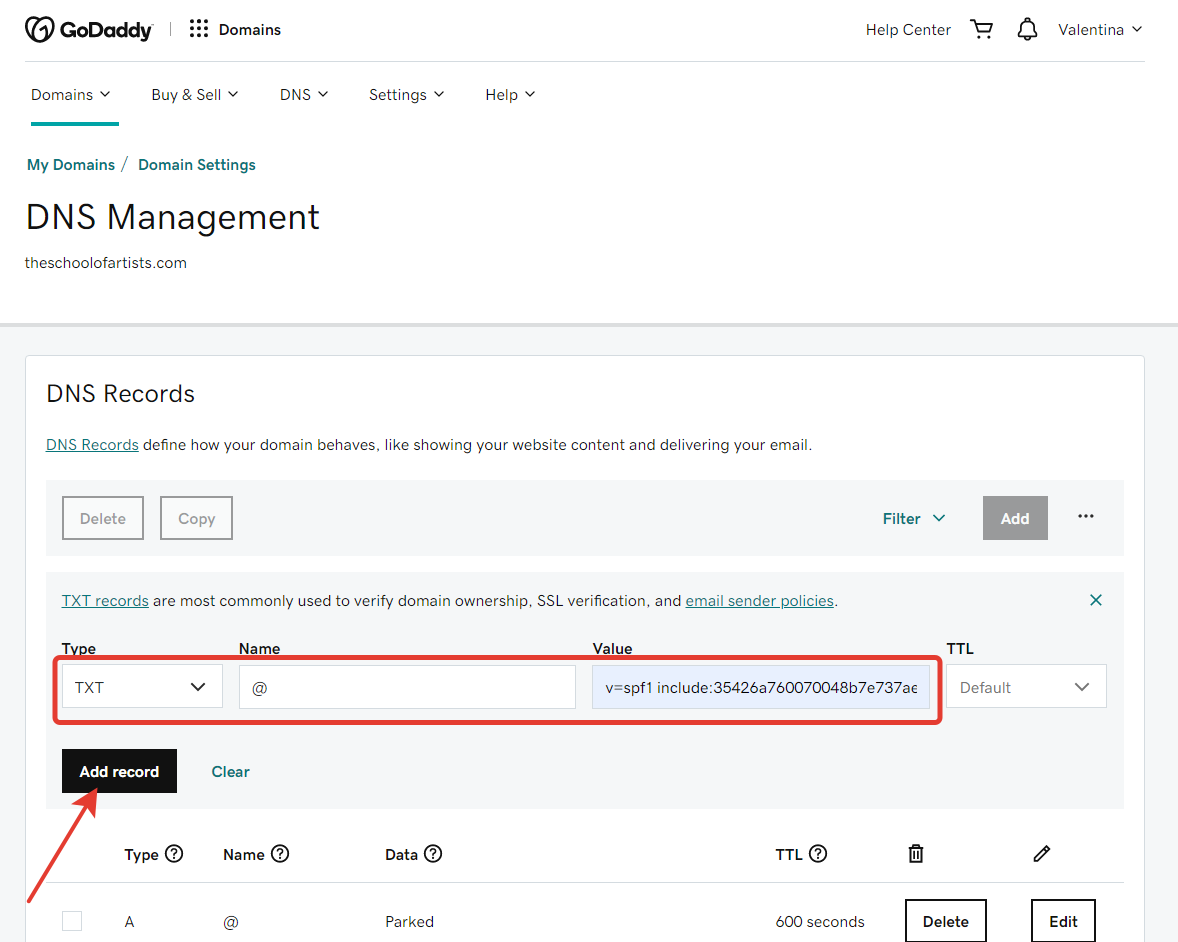
Go back to the DNS zone settings of the domain in the GoDaddy account. Enter the GetCourse SPF Record.
Please note: A unique SPF Record is automatically generated for each account. The value of the record must be copied from the "Account Settings — Mail" section.
Important: The SPF must be one. If there is already an SPF Record for the domain, it must be deleted or merged with the GetCourse record (if you want to keep the ability to send mailings from other services).

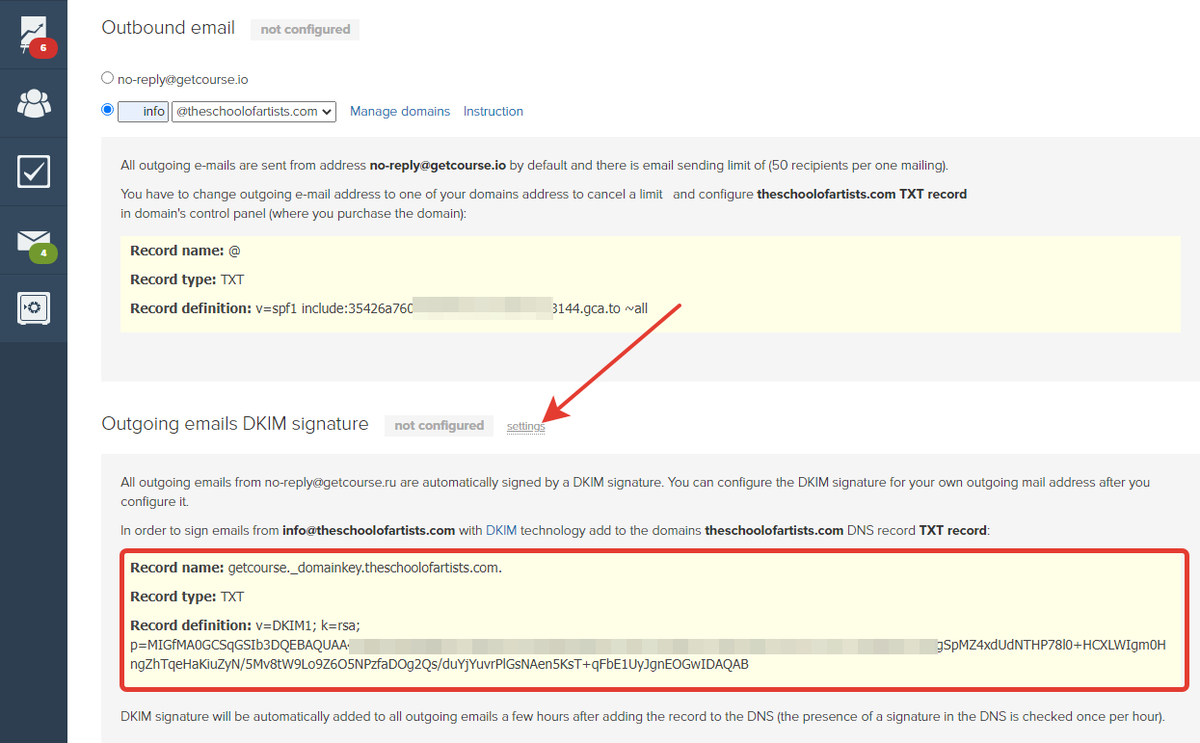
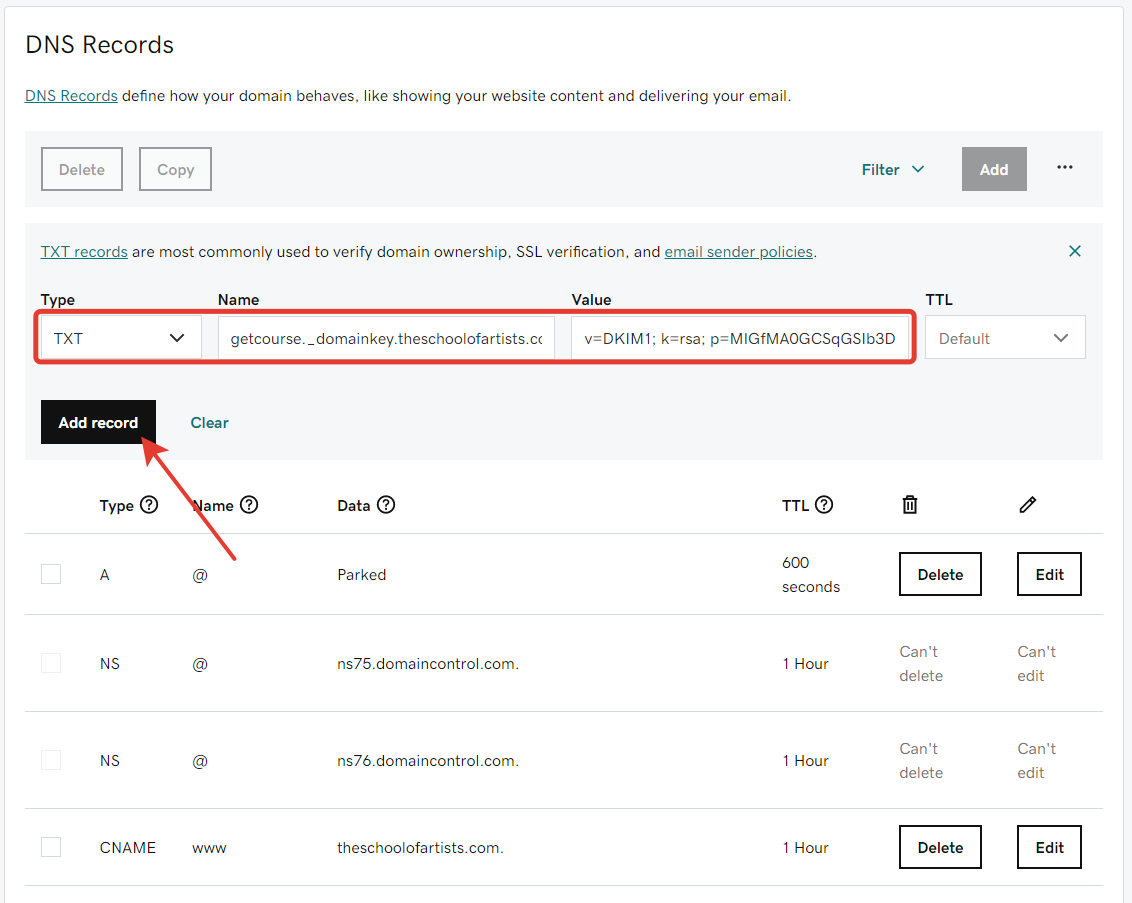
Enter a DKIM signature where:
getcourse._domainkey.domain.com . — record name; TXT — record type;
v=DKIM1; k=rsa; p=MIG... — the value of the record (you need to copy it from the Getcourse account in the "Account Settings — Mail" section).
The added DKIM signature will be displayed in the domain management zone at the bottom.

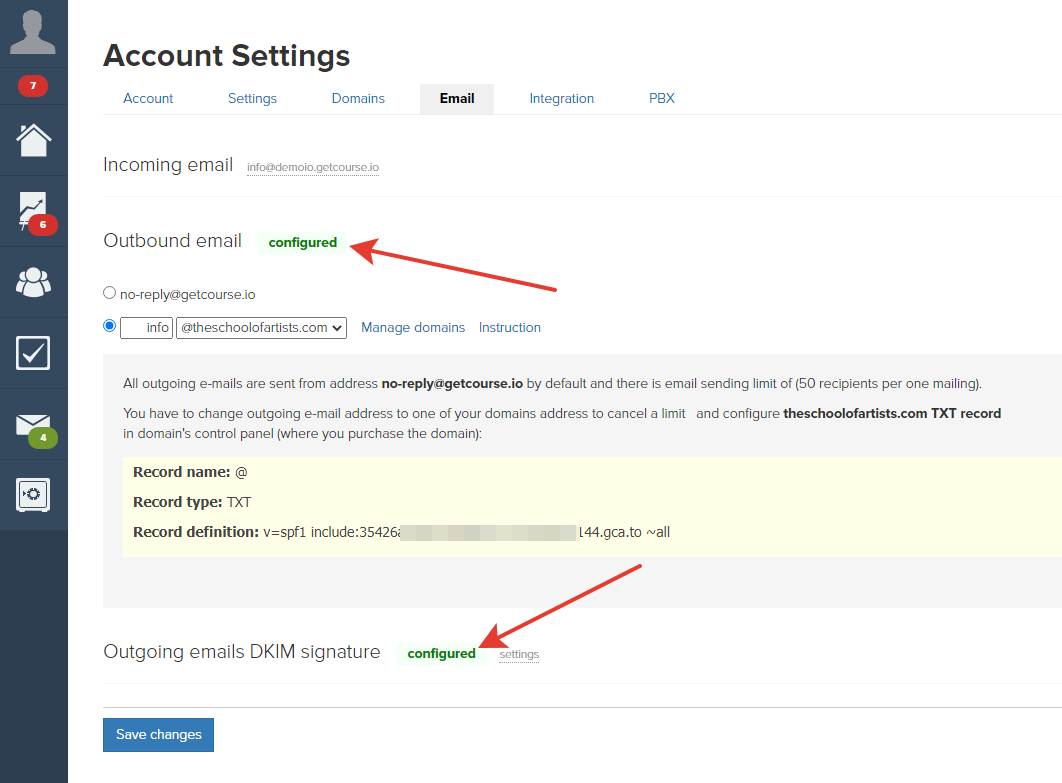
If all the settings are made correctly, then after a while both indicators in the "Account Settings — Mail" section will turn green.
*In Safari web browser, these mail settings and DKIM signature indicators are not displayed. When making settings, it is advisable to use other browsers, for example, Google Chrome, Mozilla Firefox, etc.
5.3 Setting up Domain Mail
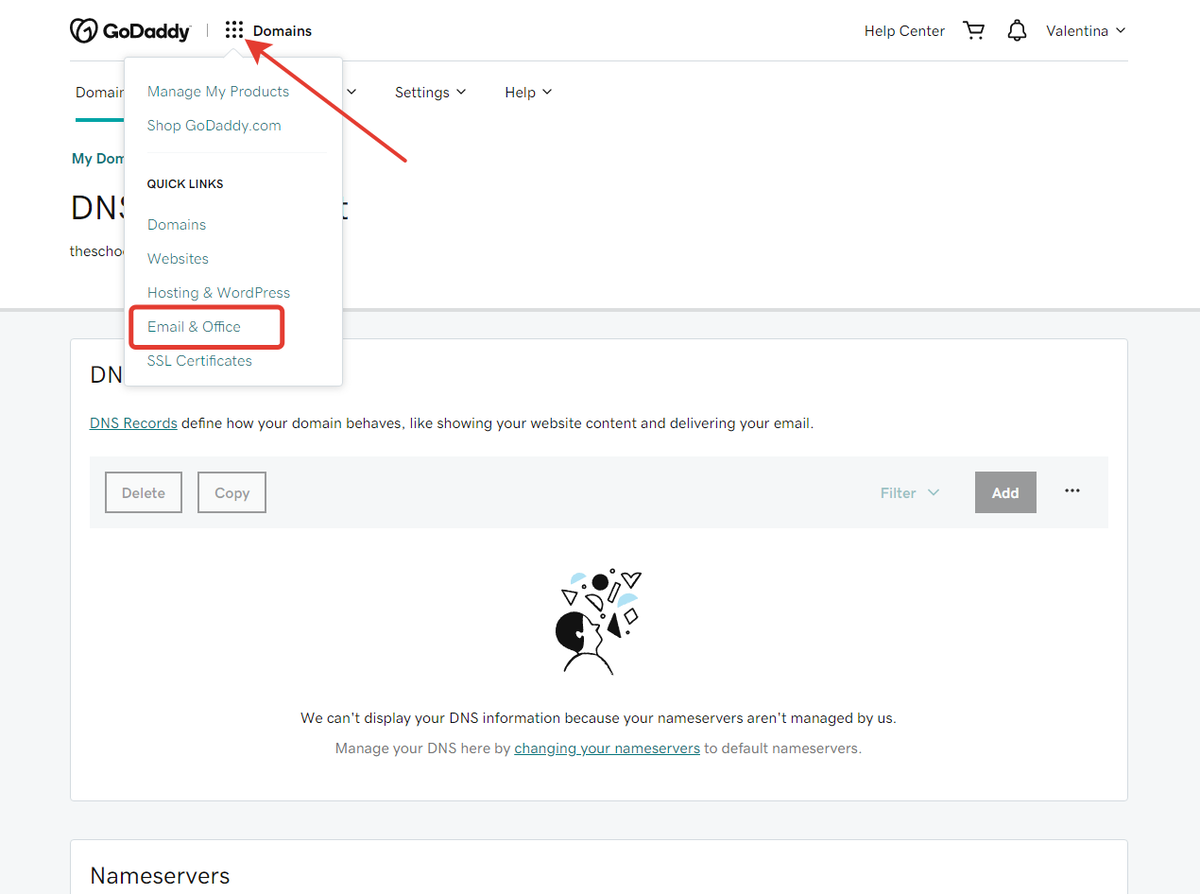
Next, to configure the domain mail, go to the Email & Office section:
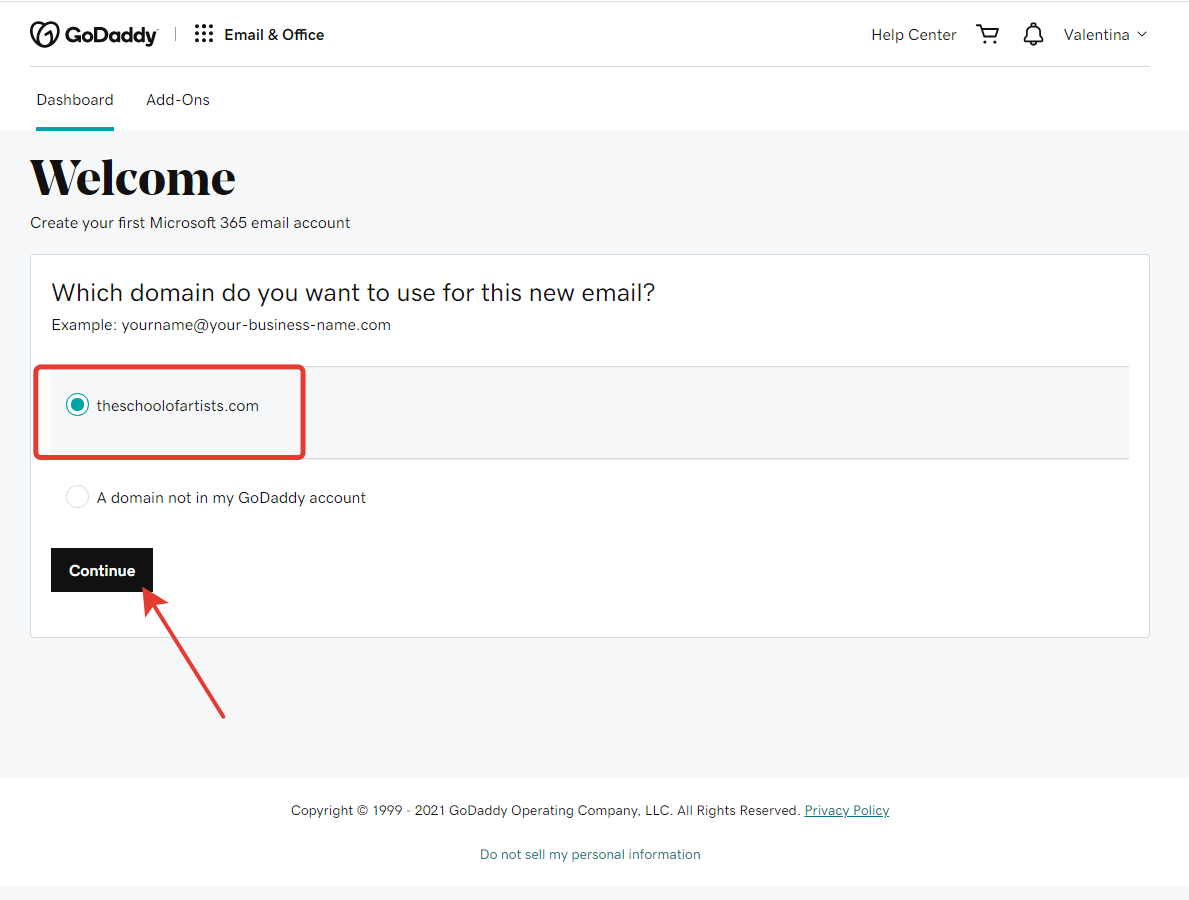
Select the domain on behalf of which you will configure mail:
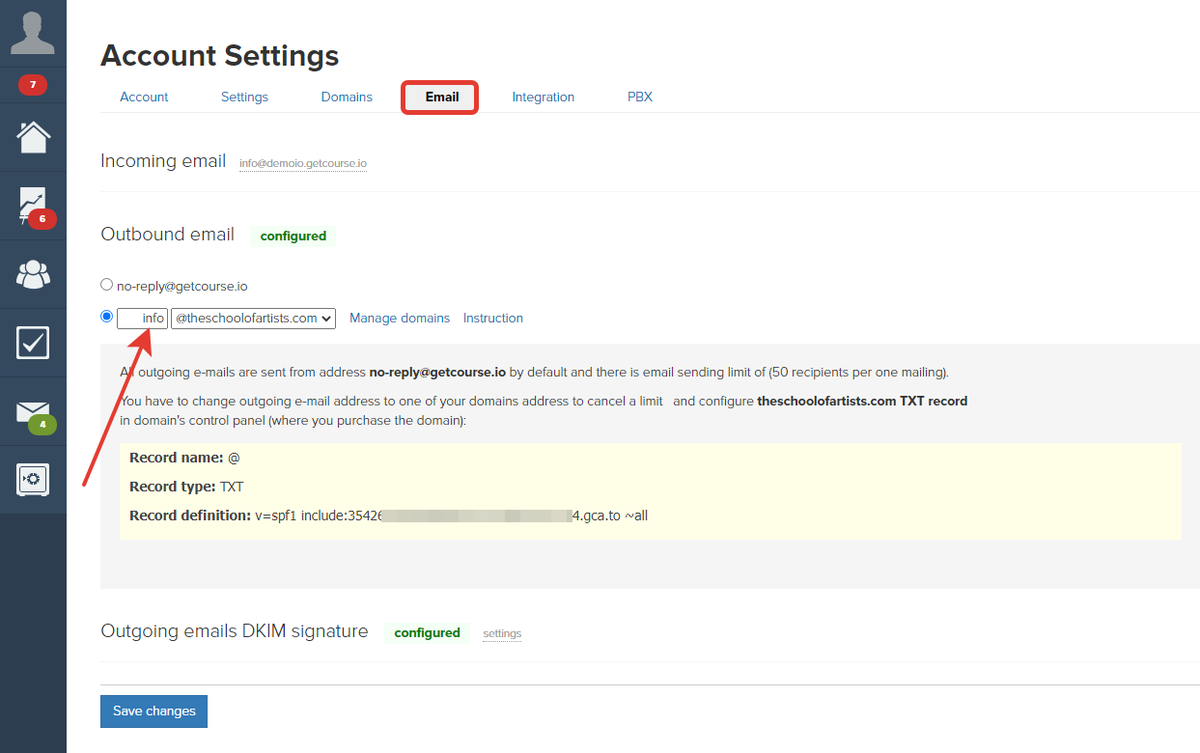
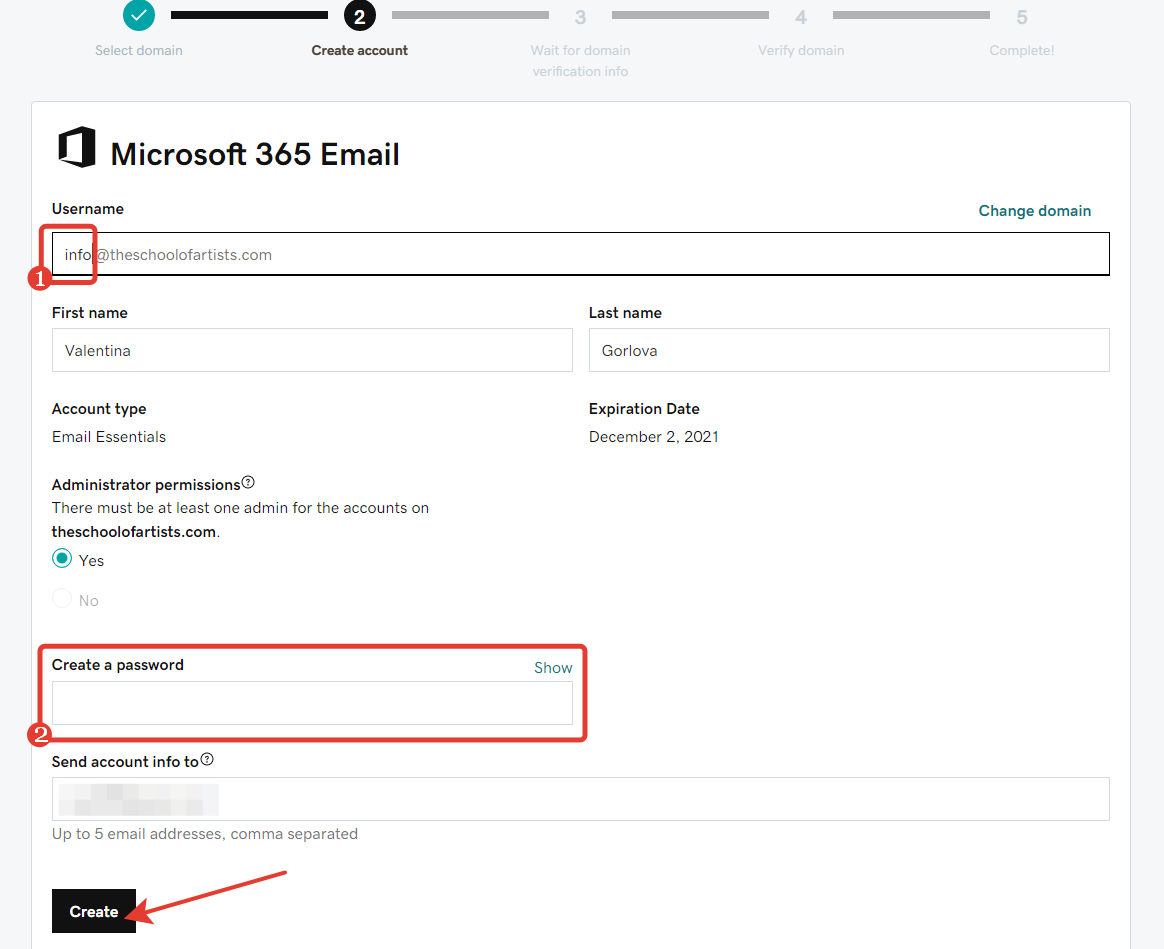
Create a mailbox with the name (1) that you specified on GetCourse in the "Account Settings > Mail" section. Set the password (2) and click the "Create" button to save the setting.
6. Setting up Email forwarding
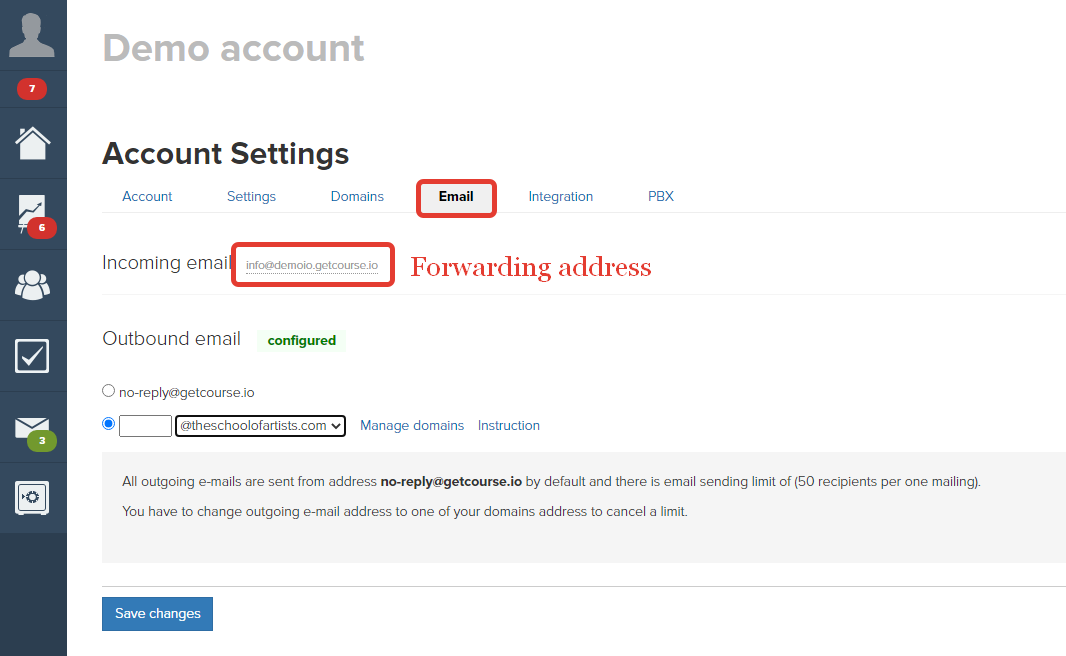
You can receive emails sent to the domain mailbox address directly to your GetCourse account in the Inbox section. The received email will be linked to the card of the user who sent it. To do this, you need to configure the forwarding of emails from your domain mailbox to your GetCourse account.
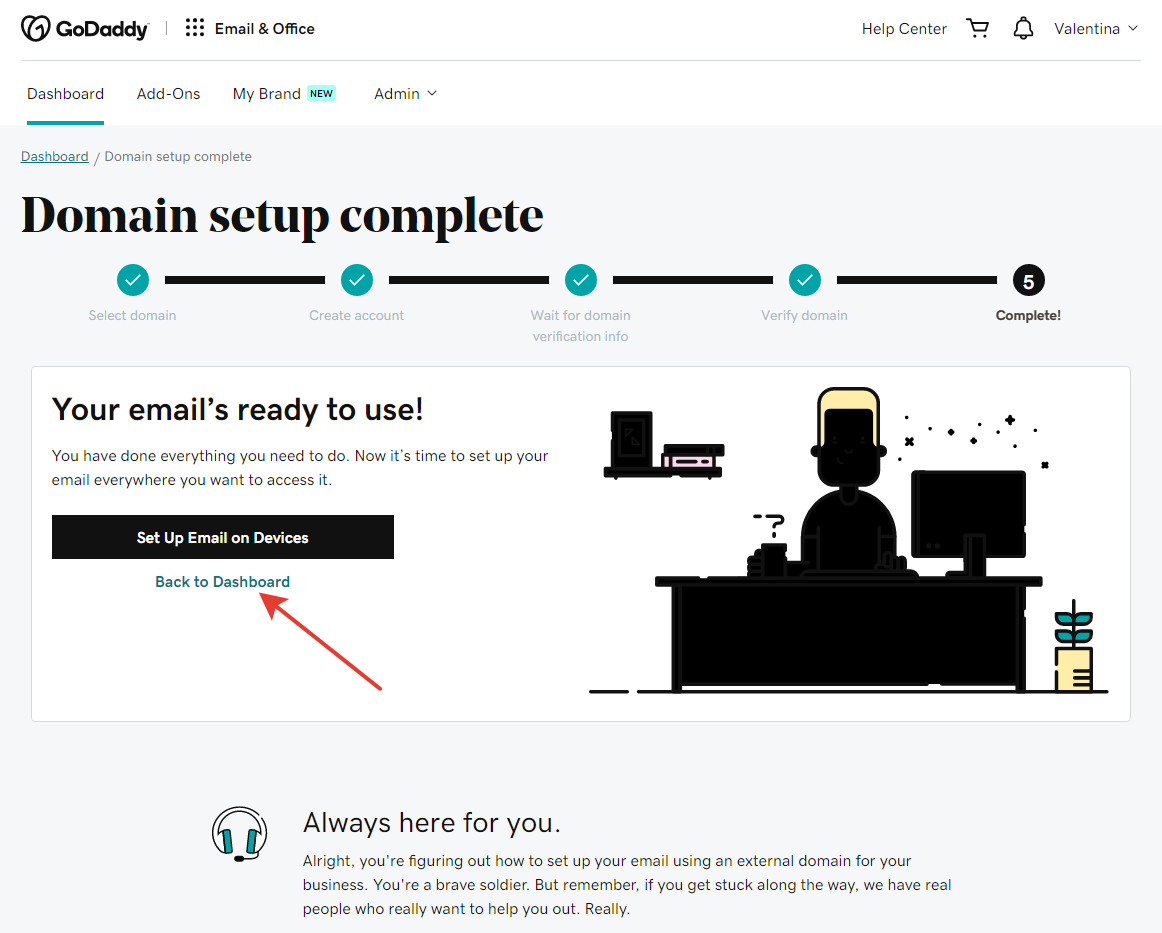
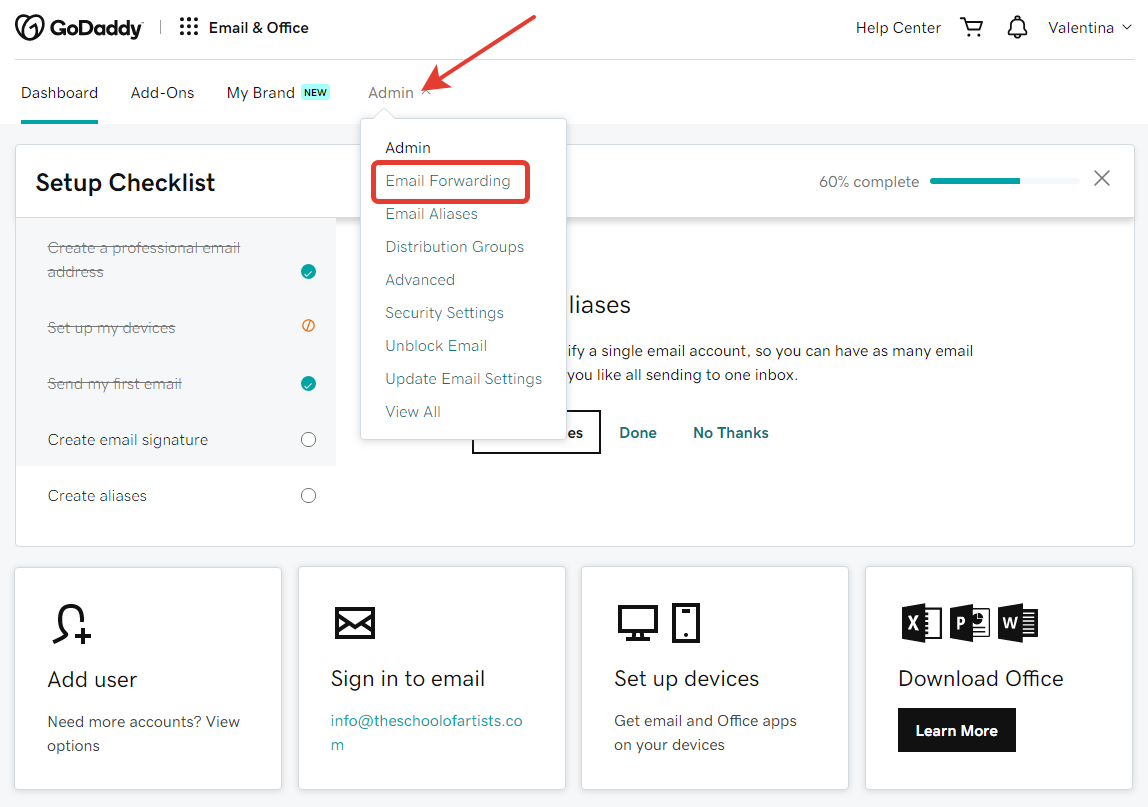
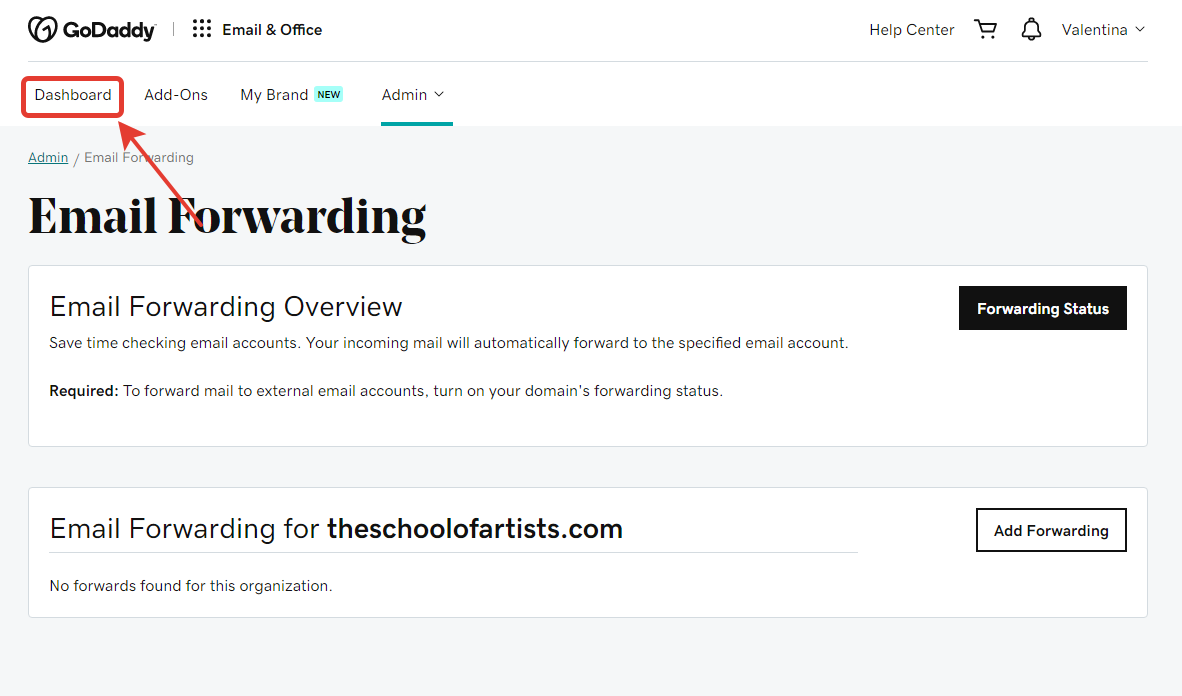
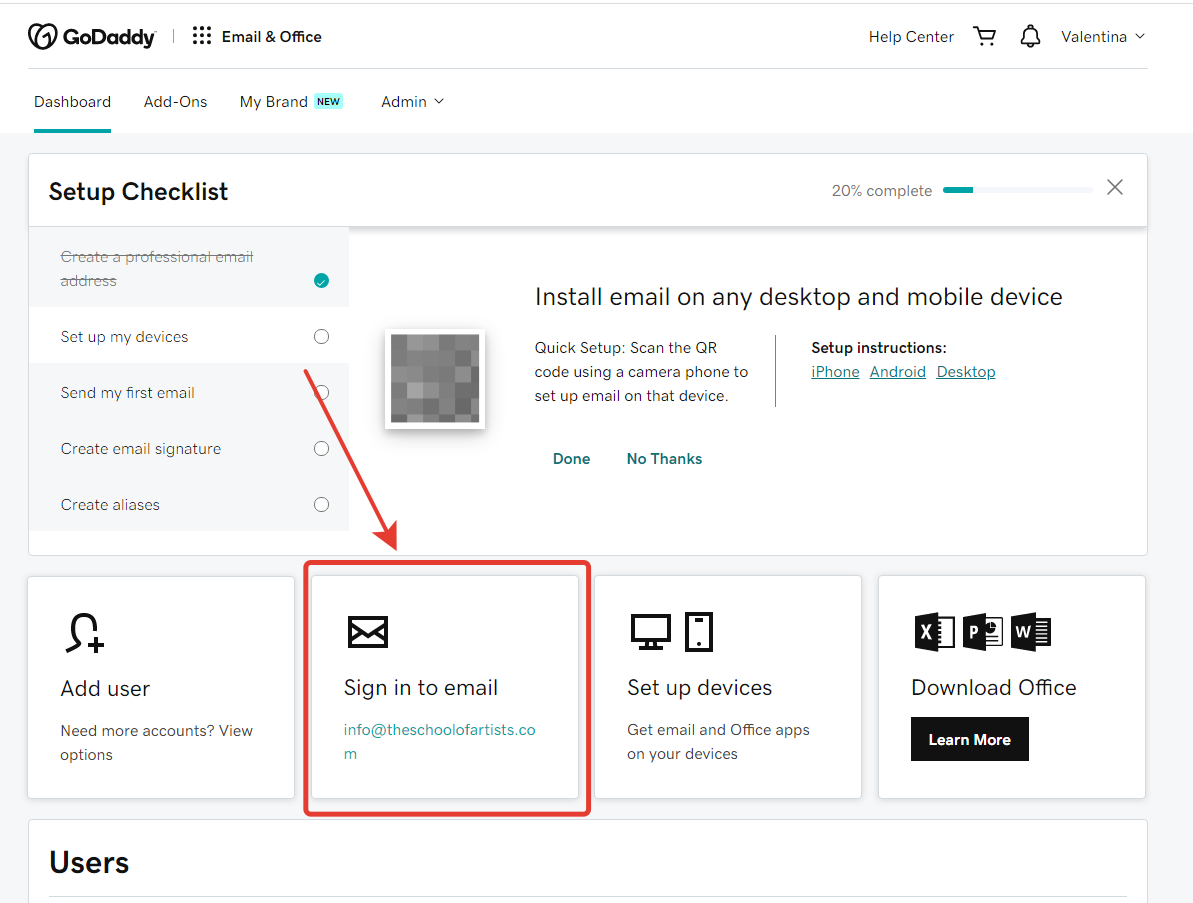
To continue setting up mail, go to the GoDaddy account forwarding settings. To do this, click "Back to Dashboard" and select "Admin > Email Forwarding".
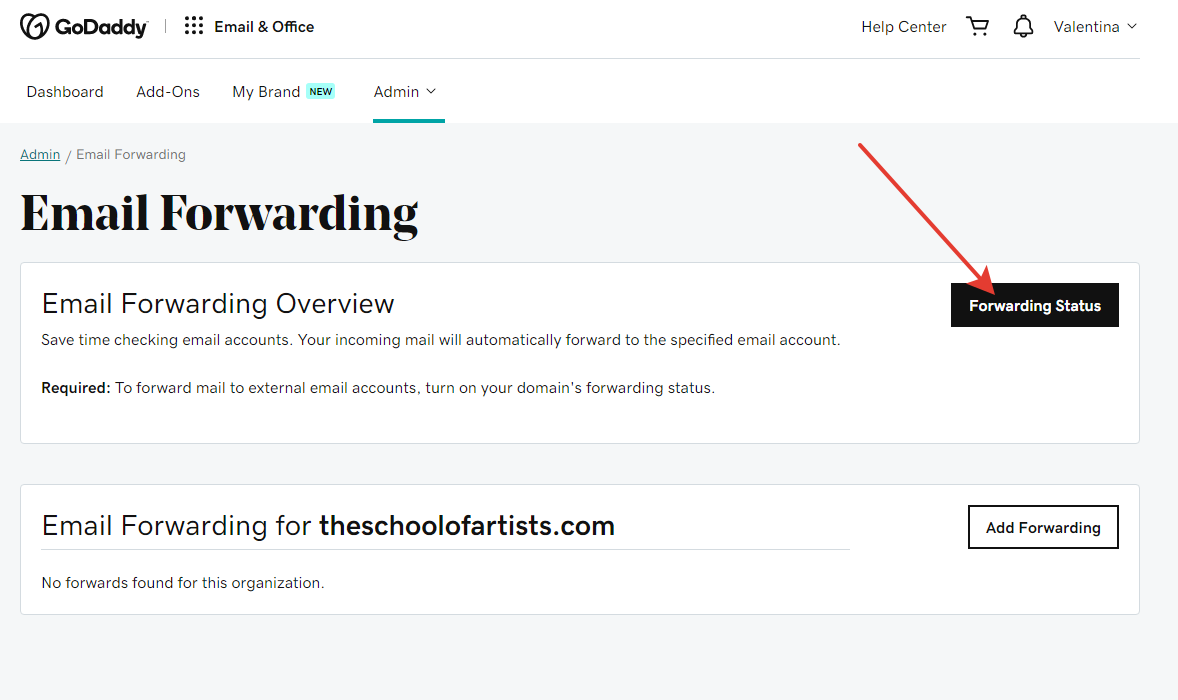
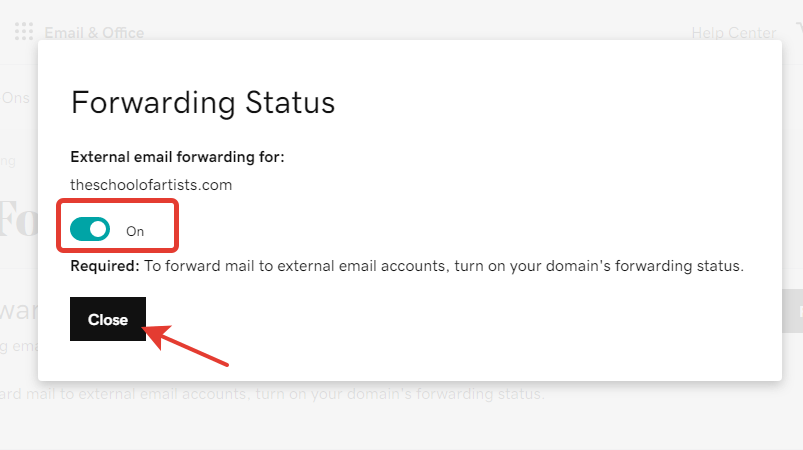
Click on "Forwarding Status" and select the ‘on’ option.
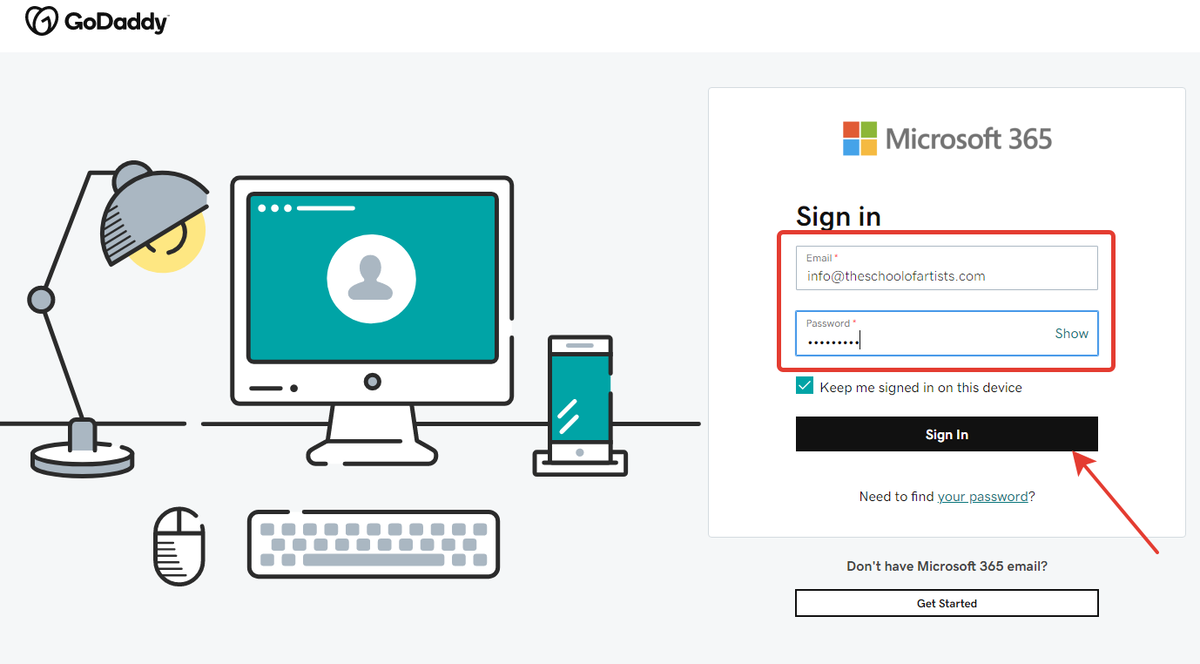
Next, log in to the created mailbox. To log in, use the email and password specified when creating the mailbox.
At the top of the page, select "Settings" (gear icon) → "View all Outlook settings".

Go to the "Mail → Rules" tab. Click the "Add new rule" button to go to the Forwarding rules settings window.
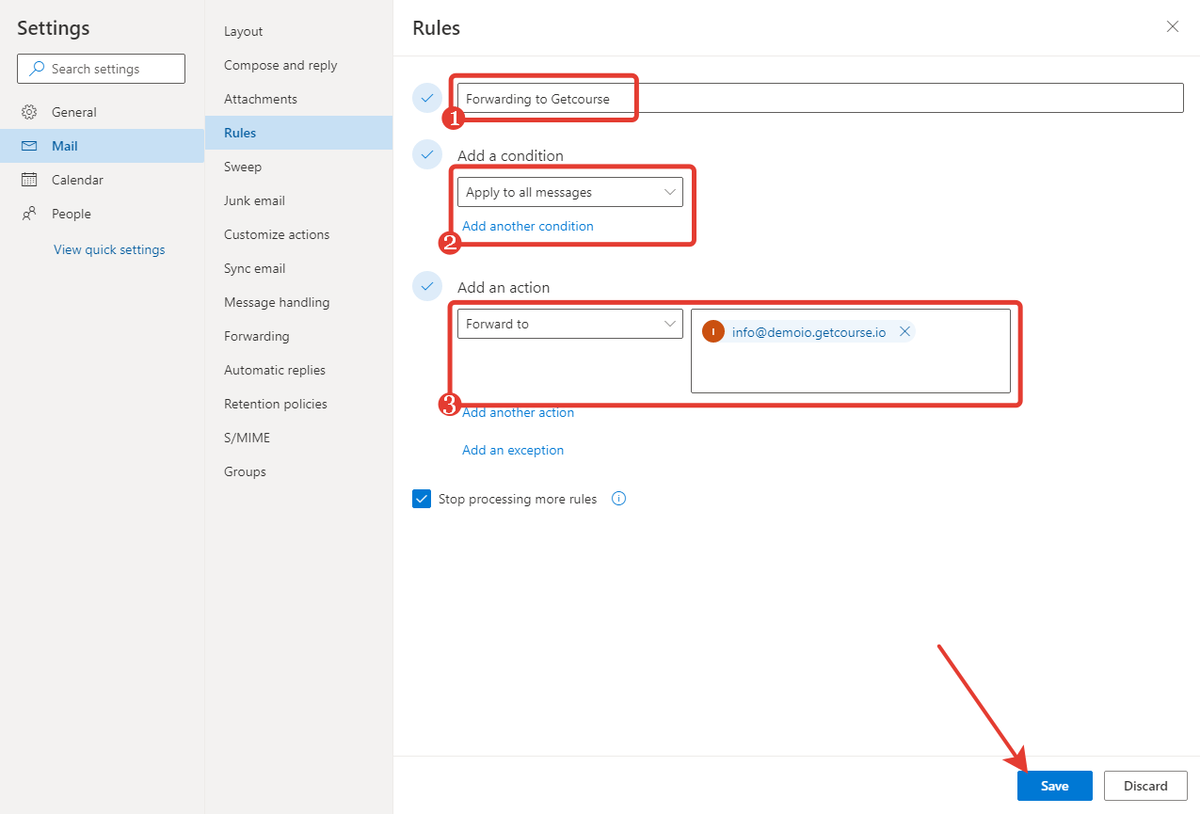
In the forwarding rules:
- Specify the name of the rule.
- Select the condition "Apply to all messages".
- Add the "Forward to" action and enter the email address for forwarding — Specify the system address that is specified in your GetCourse account in the "Account Settings" section — "Mail".
- Click the "Save" button.
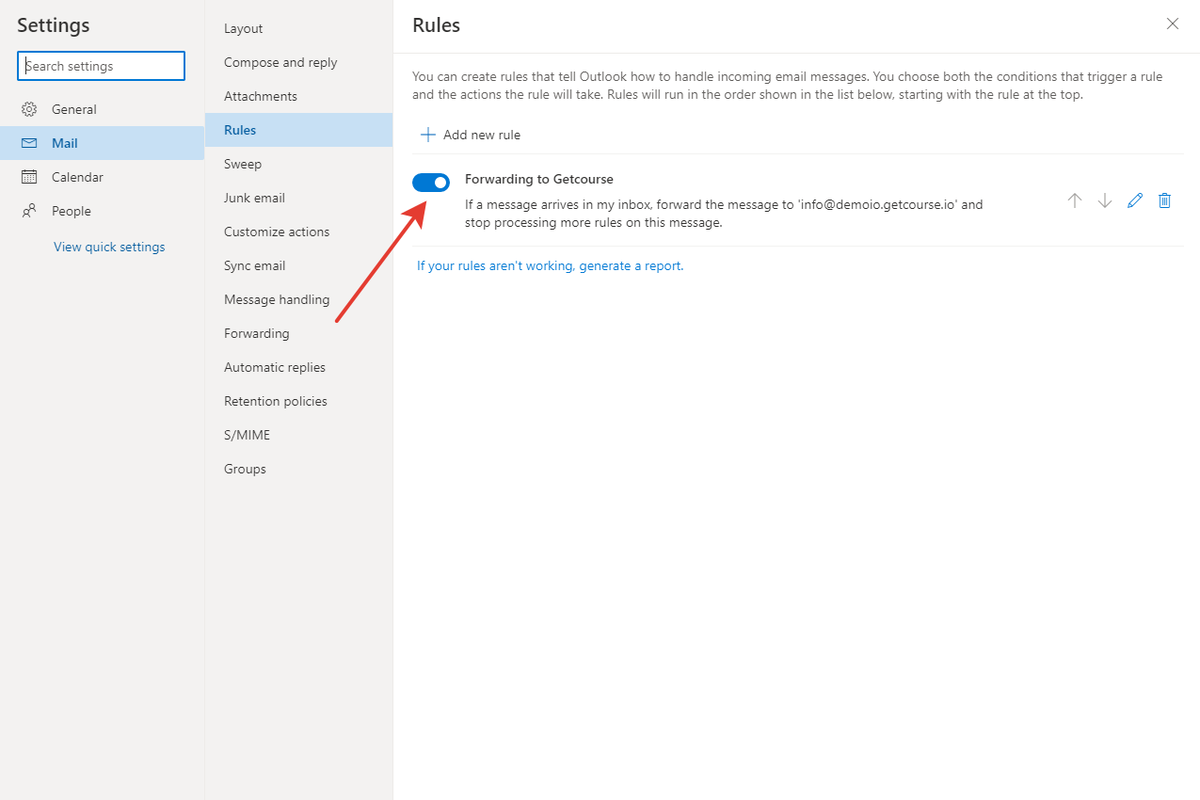
If everything is done correctly, a new mail processing rule will appear in the mail settings and the indicator is turned on.
7. Checking the correctness of the settings made
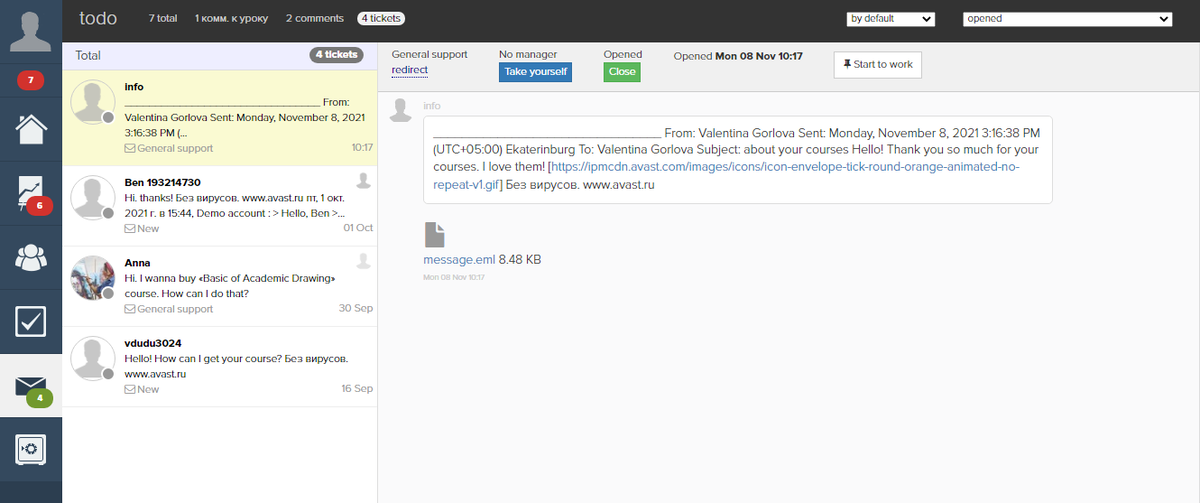
To check the correctness of all the settings made, you can send an email to the created domain mailbox. The contents of this email should be displayed in your account in the Inbox section.
Please note: emails sent to the account from the administrator’s e-mail addresses are not processed.
We use technology such as cookies on our website to personalize content and ads, provide media features, and analyze our traffic. By using the GetCourse website you agree with our Privacy Policy and Cookies Policy.

please authorize