Using GetCourse platform you can host webinars - live stream webinars in real time.
A live webinar can be automatically saved - which can be used to run recorded webinar or autowebinars - which can be an emulation of live broadcast and the activity of participants.
- Selling blocks - information blocks enabled by the presenter to collect contacts or for sales. Showing and hiding these blocks is recorded and then repeated in the “Autowebinar”.
- Presentations - slideshows instead of videos or in addition to videos. Changing views and switching slides is then repeated in the “Autowebinar”.
- Teaser pages - special, beautifully designed pages that are displayed before and after the webinar so as not to show the boring look of an empty sales room and to prevent commenting before and after the webinar when the presenter does not control the activity of the viewers.
The webinar page itself will contain the minimum required set of blocks: video, chat, selling blocks. This ensures a reliable connection on any device, including mobile, even with very large audiences.
The webinar room supports up to 20,000 viewers. If you are planning to host a webinar with a large number of participants, please contact technical support at least three days before the date of the event.
Content of the article:
- Important
- Access to the webinar for employees
- Preparing for the webinar
- Webinar creation
- Webinar interface:
- Hosting a live webinar
How to ensure the best webinar quality?
In order to ensure stable transmission/reception of the broadcast, the following points must be taken into account:
- Specifications (power) of the device:
— during the broadcast, it is recommended to close all unused programs and applications on the PC. - Internet connection speed and stability:
— Reliable network traffic provides stable video stream. - Internet browser:
— it is recommended to close all inactive tabs;
— use the latest (updated) versions of browsers and periodically delete cookies and cache.
These recommendations should be followed by both the presenter and the audience of the webinar.
How can an employee be given access to webinar management?
Your account administrators always have the ability to create, modify and host webinars. By default, employees are deprived of this opportunity.
If the right to create/manage a webinar needs to be granted to an employee, then read this article.
Preparing for the webinar
Before hosting a webinar, you must to:
1. Choose a way to conduct the webinar:
— Via browser
— Via YouTube (you need to prepare a YouTube account in advance - for more details, see the article “Configuring a YouTube account and creating a broadcast”).
Please note: there is a restriction on broadcasts conducted via the browser - no more than two broadcasts can be launched in your account simultaneously.
This limitation does not apply to broadcasts via a video encoder or YouTube, or to webinars.
2. Upload presentations (slides) - if you plan to show viewers a presentation with visual materials - or a cover slide. Read more in the “Webinar presentations” article.
3. Prepare selling blocks - buttons or order forms, which the presenter may enable. This is convenient if you want to sell a paid product during the webinar or after its end. Read more in the article “Selling blocks for webinars”.
4. Prepare teaser pages - “Page before start” and “Page after end”, so that before the start of the webinar and after its end, viewers will see not an empty webinar room, but pages with information.
They must first be created in the page constructor, in the section “Website" - “Pages”. You can place on the “Page before start”, for example, a countdown timer until the start of the webinar, a form for collecting contacts, etc. Before the start of the webinar, users will see the “Page before start”. When opening a webinar room, users are automatically redirected to the page with the broadcast. When the broadcast is over and the webinar room is closed, users will be automatically redirected to the “Page after end”. This page will serve as a protection against unmanaged chat activity.
Note: if a page is not selected in the webinar settings before it starts, the page that is generated automatically will be displayed. The following data will be displayed on this page: 'Title' / 'Title for viewers', 'Description', countdown timer to the set 'Start Date', 'Cover'.
5. Prepare a webinar plan for the speaker — this is a checklist of actions that the speaker will have to perform during the webinar and mark it.
Webinar creation
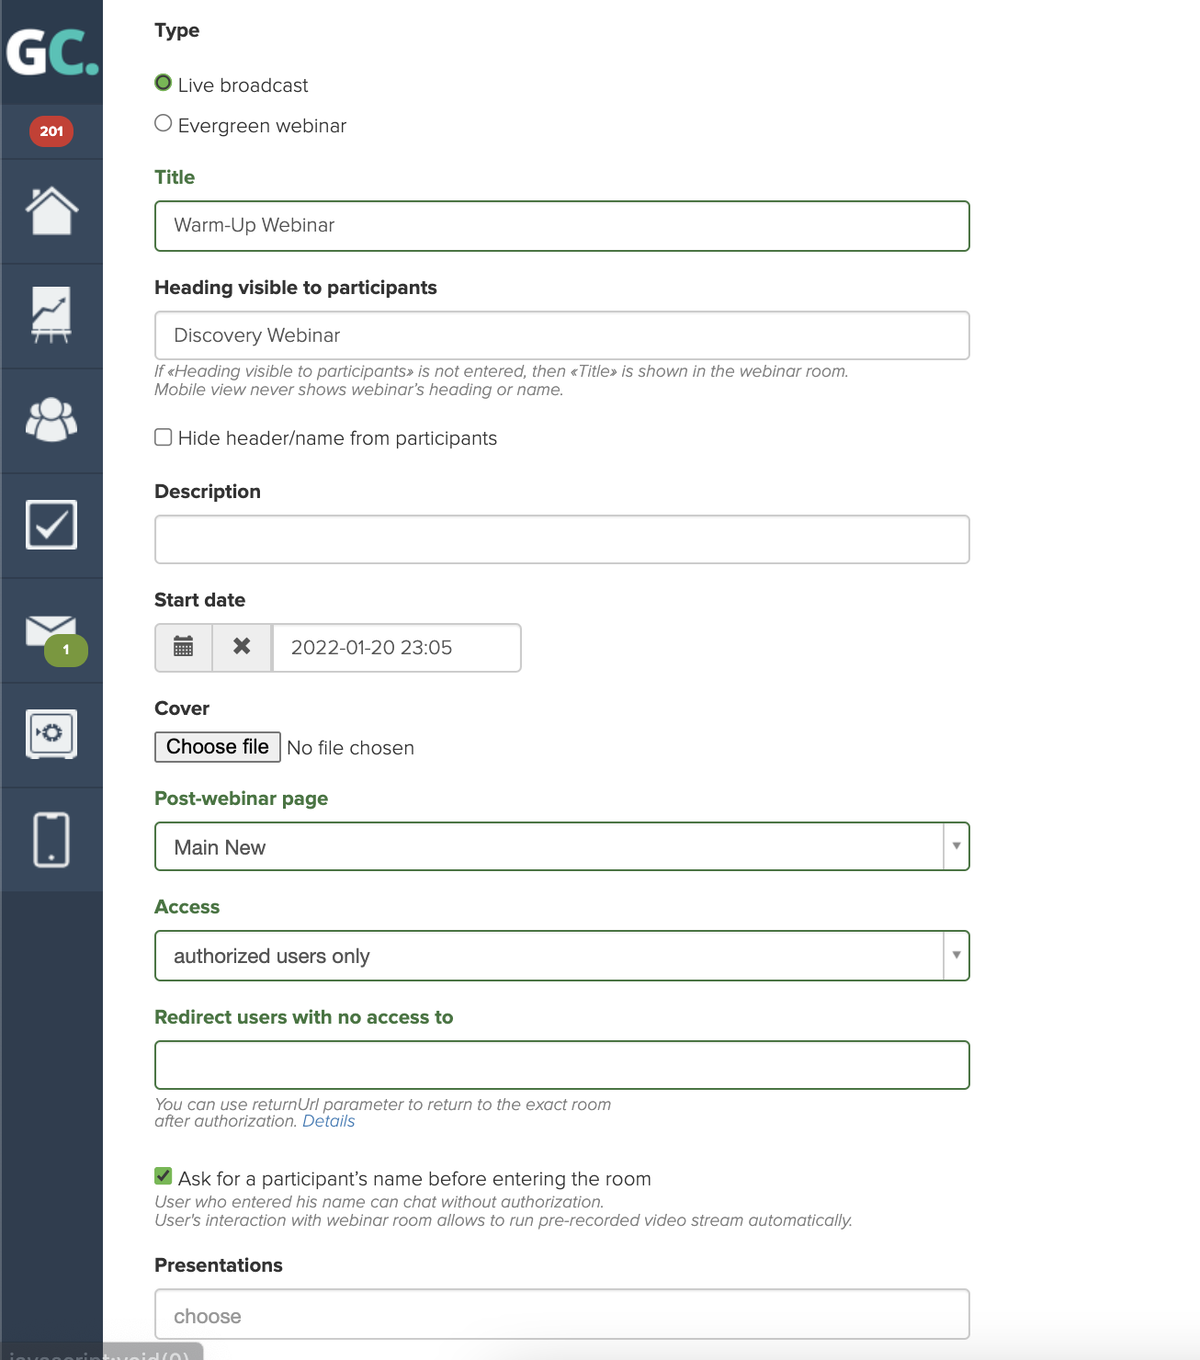
Create a webinar in the section “Website” - “Webinars” - “Create a webinar”:
Webinar interface
The title will be displayed in the headline on the webinar page and will be seen by users.
“Page before start” and “Page after end” are teaser pages that are pre-created in the page constructor.
If you don’t specify additional pages, users will immediately go to the page with the broadcast and after closing the room they will remain on this page.
- for all visitors who received a link to the webinar;
- only for authorized users;
- only for selected groups (user must be logged in).
When choosing access for authorized users or by group, it becomes possible to specify the address for redirecting those users who do not have access to the webinar.

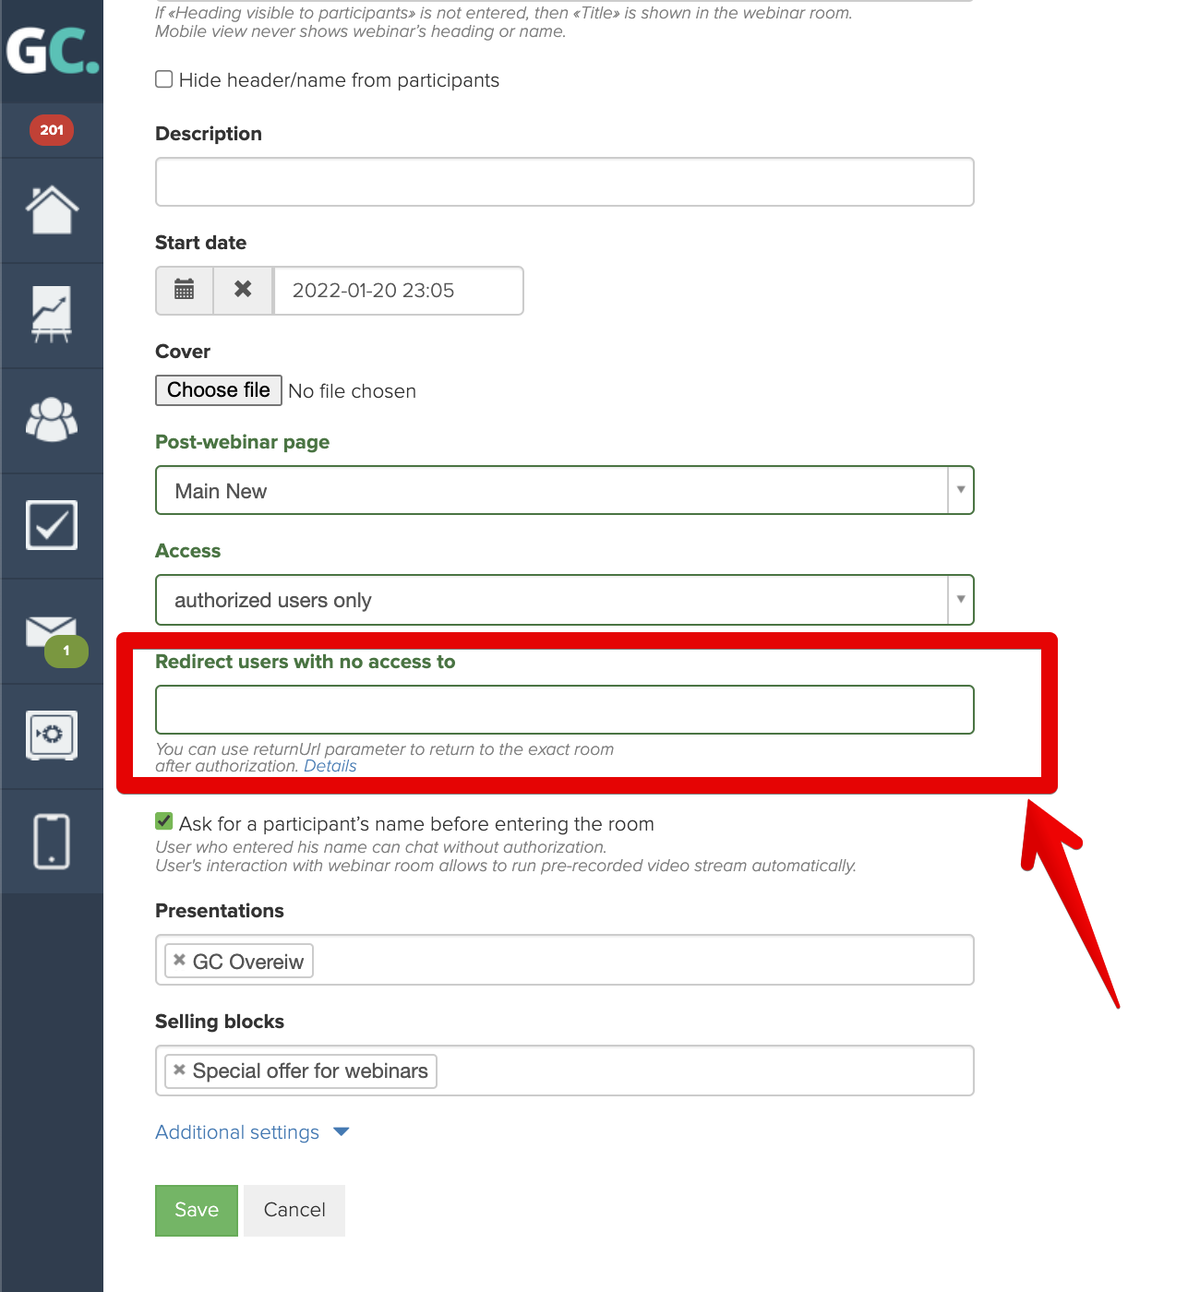
When specifying a page address for a redirect, it is possible to use the ?returnUrl={selfUrl} parameter (added to the page address).

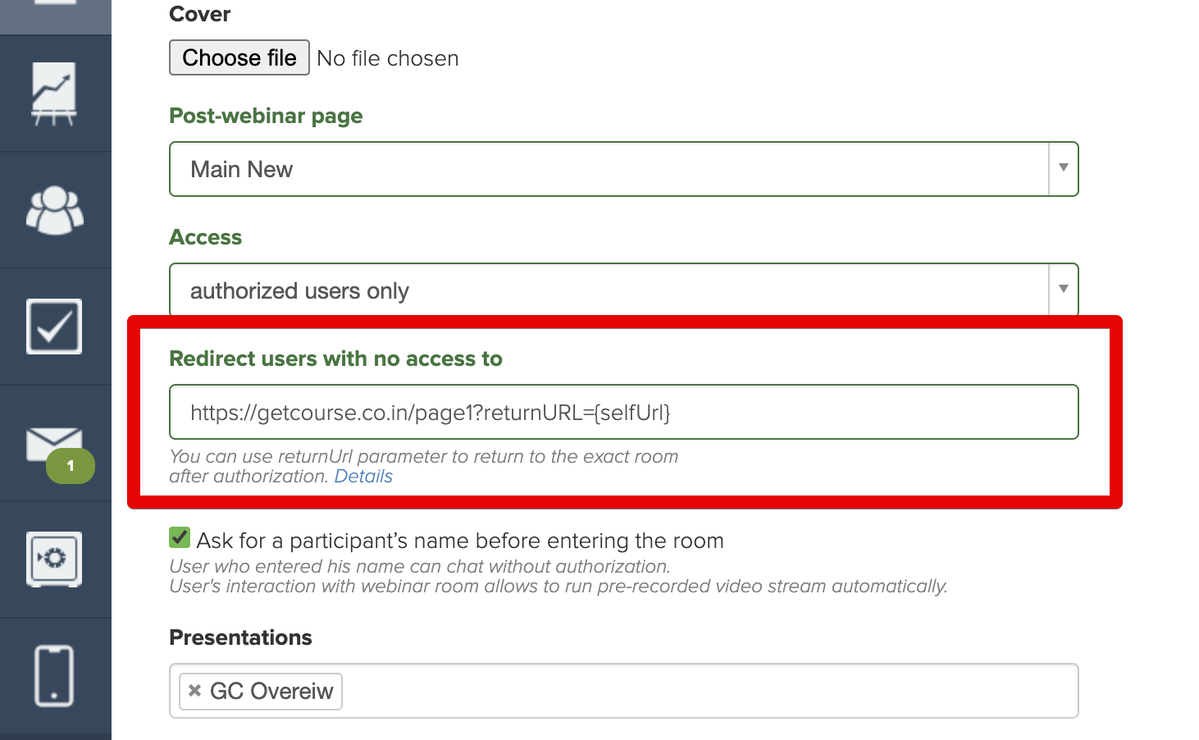
The meaning and benefit of this parameter is that you can create one beautiful page with an authorization form for different webinars, which will automatically return users to the desired webinar.
For correct operation, on the page to which you redirect users without access to the webinar, you need to create a registration form. This form will authorize the user who filled in the fields and clicked on the button. If access to the webinar is allowed for all authorized users, then the operation “Redirect” must be added to the form handler, the variable {returnUrl} must be specified in the address and the “Replace variables in URL” checkbox must be checked

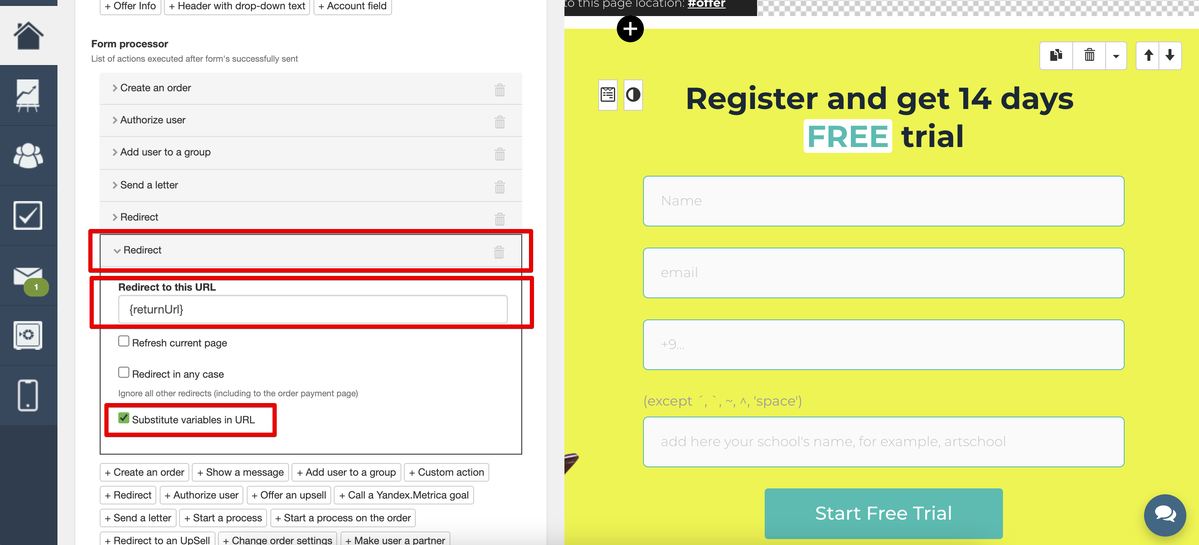
If access to the webinar is organized only for a group of users, then it is necessary to specify the adding to the required group in the form handler.

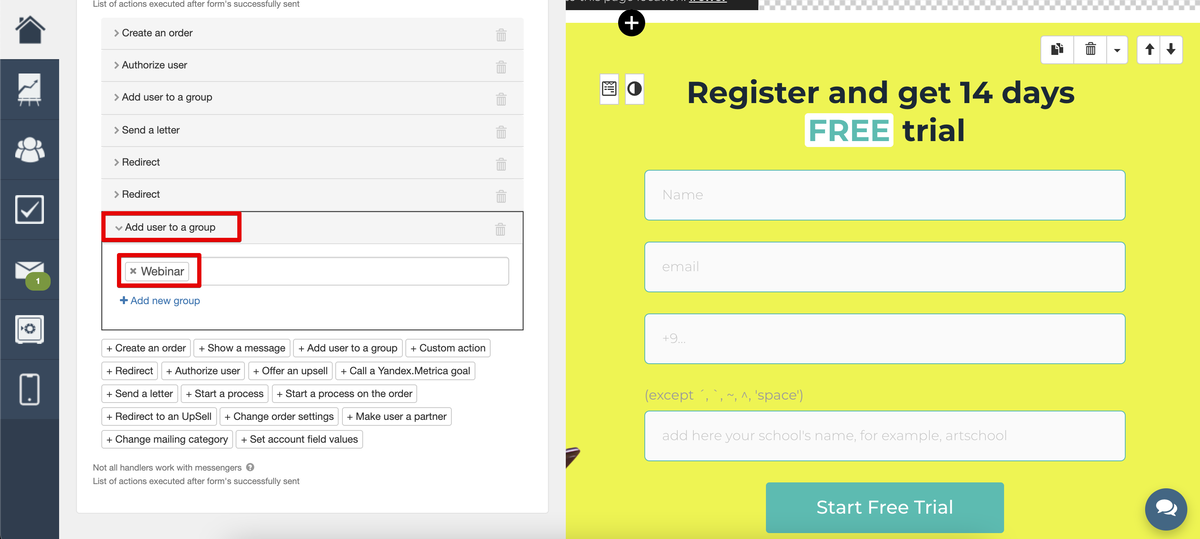
If all the settings are made correctly, then a user who does not have access to the webinar, when clicking on the link for viewers, will go to the redirect page, fill out the form, be authorized in the system (and also be added to the group if there is a corresponding handler). When redirecting, the form will substitute the value from the get-parameter (in which the address of the room was passed) instead of the variable, and the redirect will lead back to the room of the desired webinar.
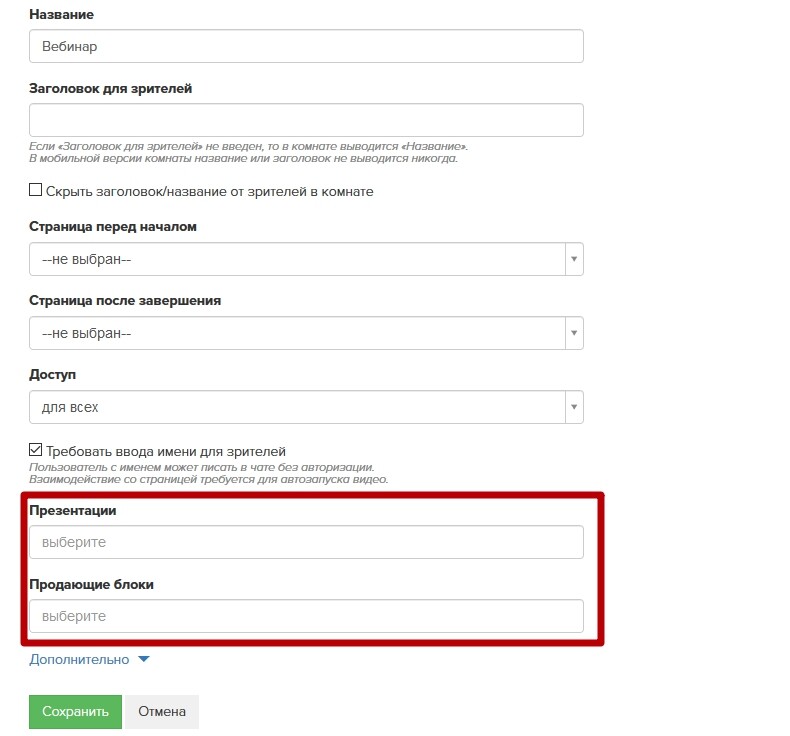
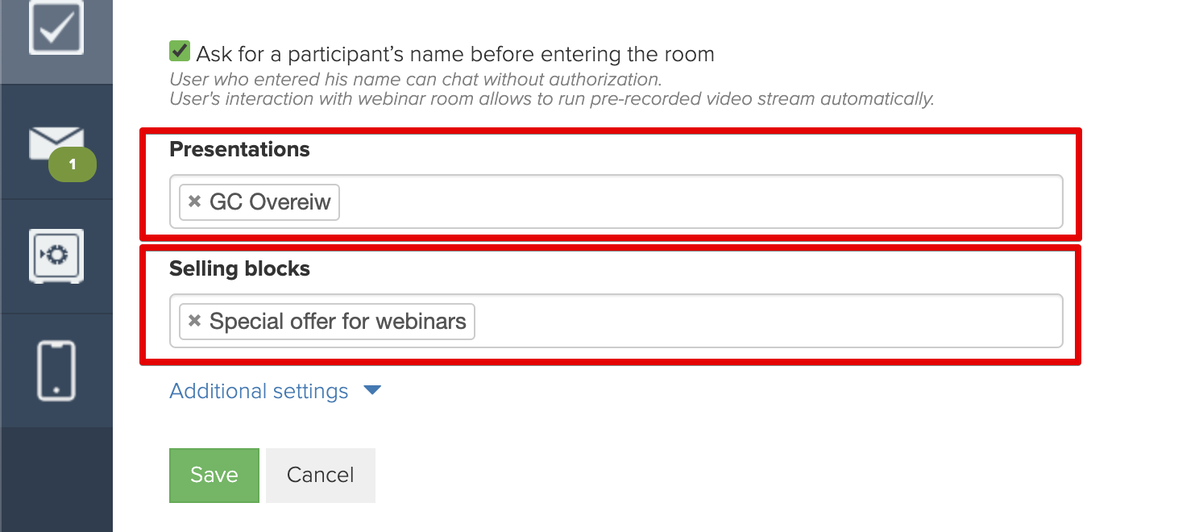
In the webinar settings, you can check the checkbox “Require name input for viewers”. It allows you to initiate an active user action on the page, which is necessary for the autorun of the webinar. It is convenient to use this setting if you don’t want to create an authorization form before showing the webinar, but want all users who attended the webinar to be able to send messages via chat. If this option is enabled, then before entering the webinar, users will see a name input window. Unauthorized users who entered their name in this window have the opportunity to write messages to the chat during the broadcast. If this option is disabled, only authorized users can send messages to the chat.
Note: At the webinar, an unregistered viewer who entered a name at the entrance and did not take any action, but registered in any way after the end of the webinar within 4 days, will be displayed in the selection of webinar participants after he registers.
It means that information about visiting the webinar is saved even for users who have not been registered within 4 days. And then for such users, you can also launch an autofunnel, as well as for other viewers of the past webinar.
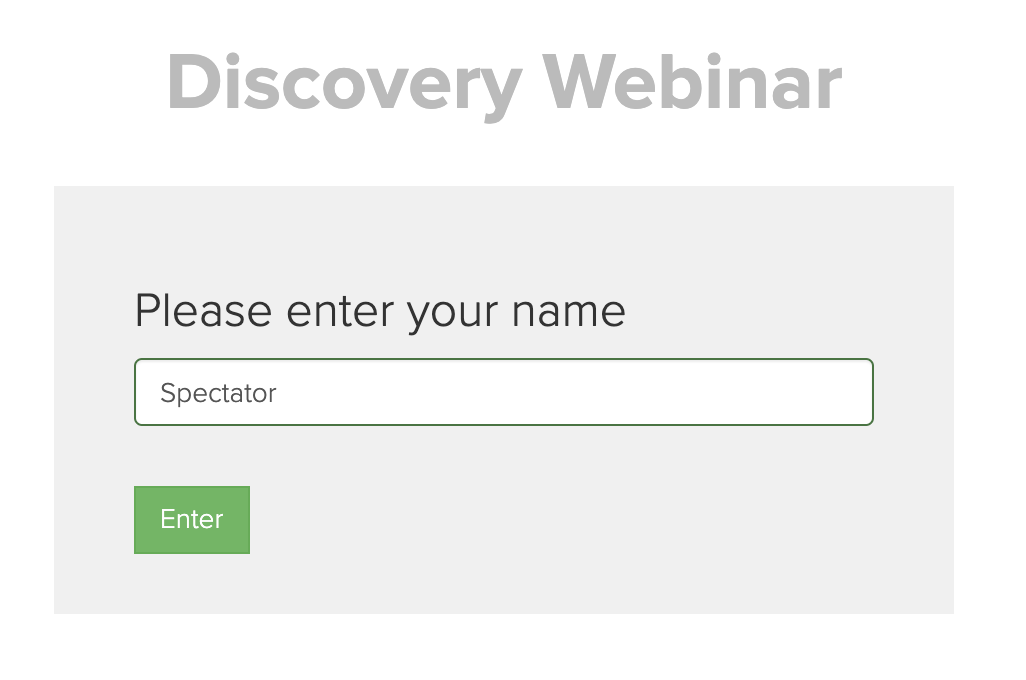
Selling blocks and presentations - here you can specify a list of selling blocks and also specify presentations for this webinar.
In the future, these settings can be customized:
- method of conducting a webinar:
- Via YouTube
- Via video encoder
- Via browser
- options for displaying your broadcast on smartphones.
And it is also possible to check or uncheck the checkbox “Show participants' number in the room”.
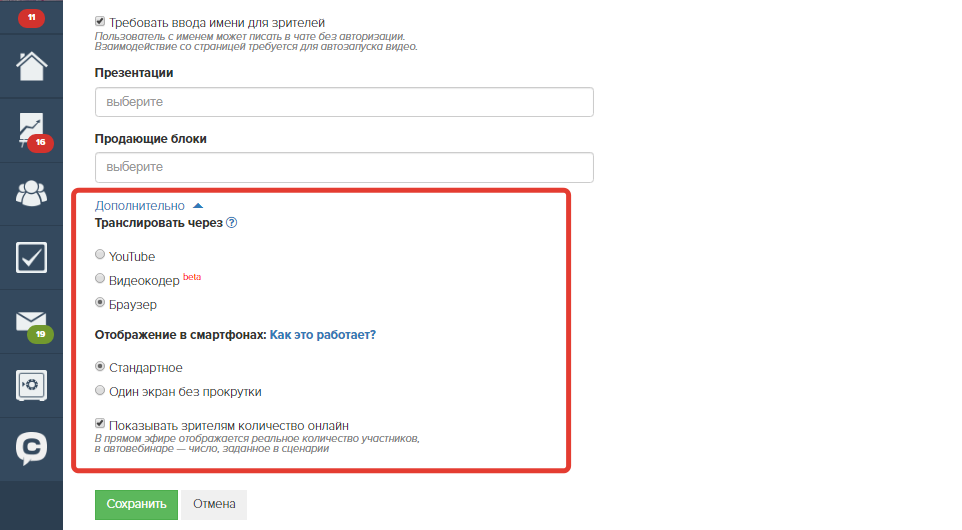
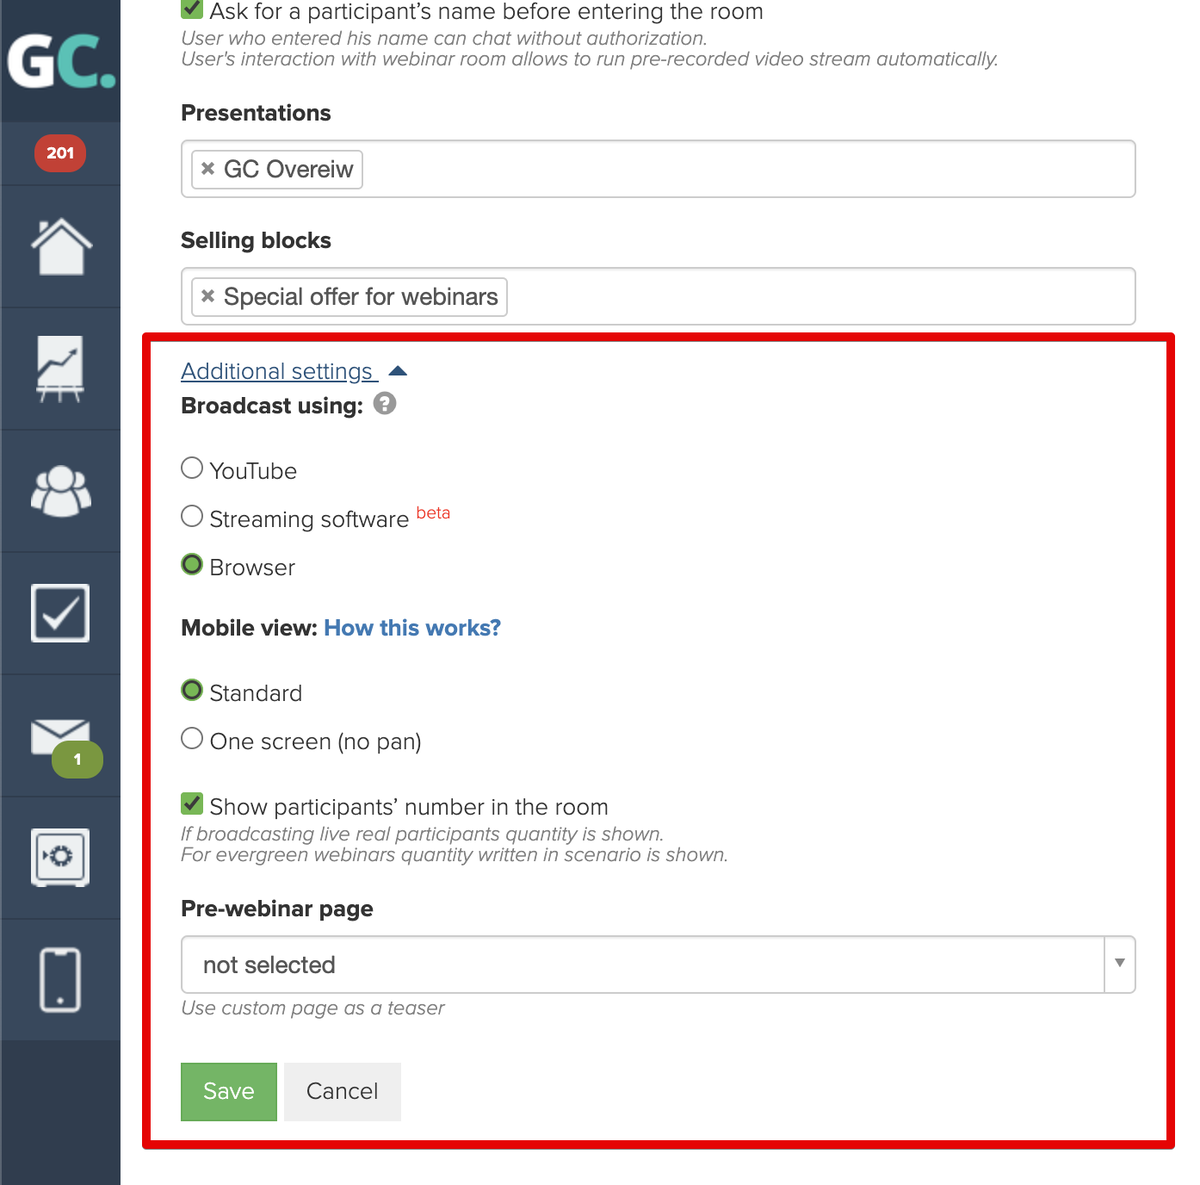
The option “Show participants' number in the room” allows you to enable or disable displaying the number of webinar viewers for viewers themselves.
After creating a webinar, you will go to the webinar room editing mode.
A room is a webinar (or autowebinar) page. Only one webinar (or autowebinars) can be running in a room at a time.
Please note that the host cannot control the webinar from a smartphone - he can do this via PC or laptop only.
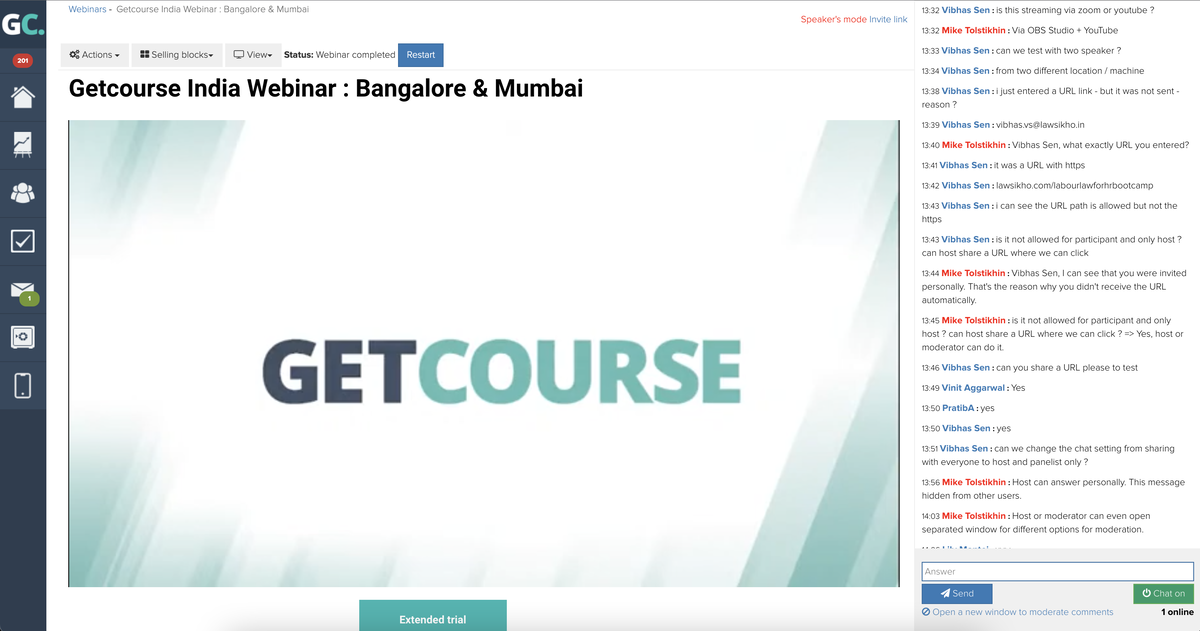
You can control the room status using the button on the room editing page. The label on the button changes depending on the current status of the room.
| Room status | What viewers see | Button designation |
| Room is not open | The “Page before start”
(if not set - an empty webinar room
with the inscription “Waiting for the start of the broadcast”) | Open webinar room |
| Room is open | Webinar room without any broadcast running | Start broadcast |
| Broadcast started | Webinar room and running broadcast | Close room |
| Webinar is completed | The “Page after end”
(if not set - an empty webinar room
with the caption “Broadcast has completed”) | Restart |

Please note: a webinar room can be in the “Room is open” status (before the start of the broadcast) for 12 hours.
After this time, the room will automatically close.
A webinar room can be in the “Streaming” status for 6 hours.
If the broadcast is not finished earlier, the webinar room will close automatically.
If there was an automatic closing, then the webinar script is finalized in the usual way.
Chat
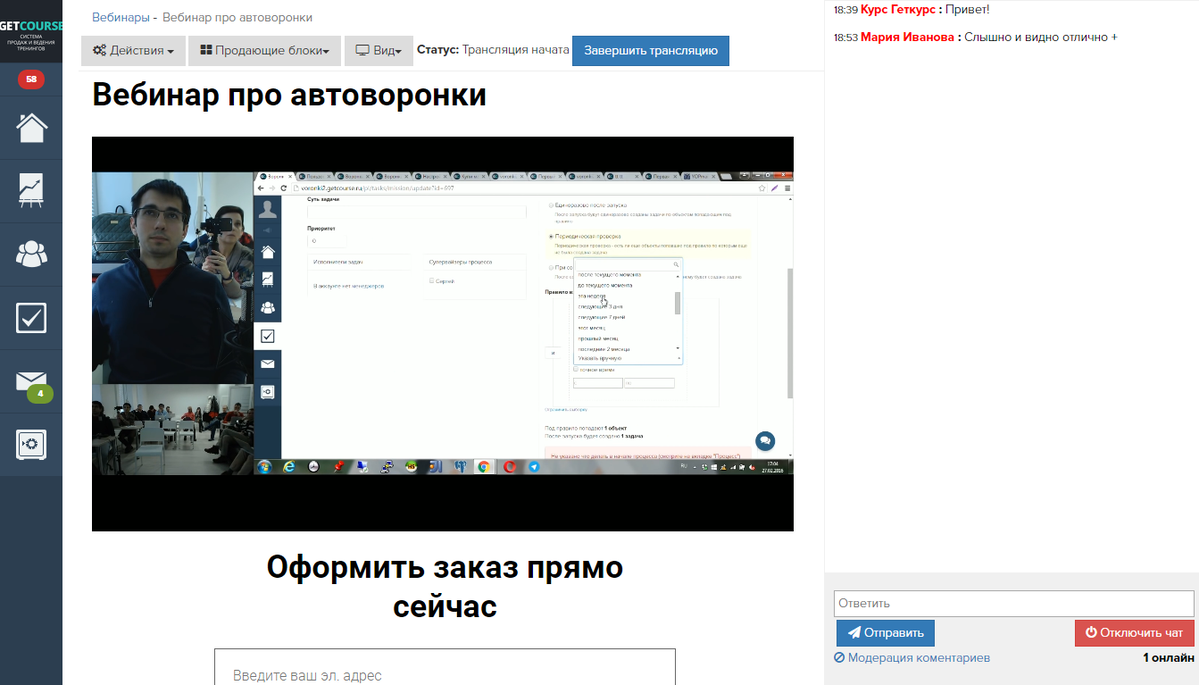
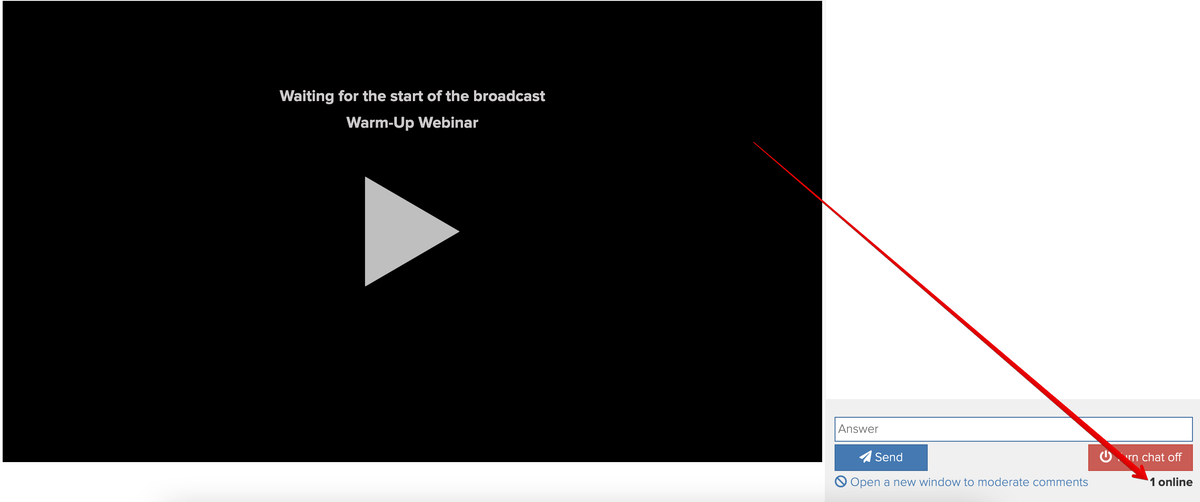
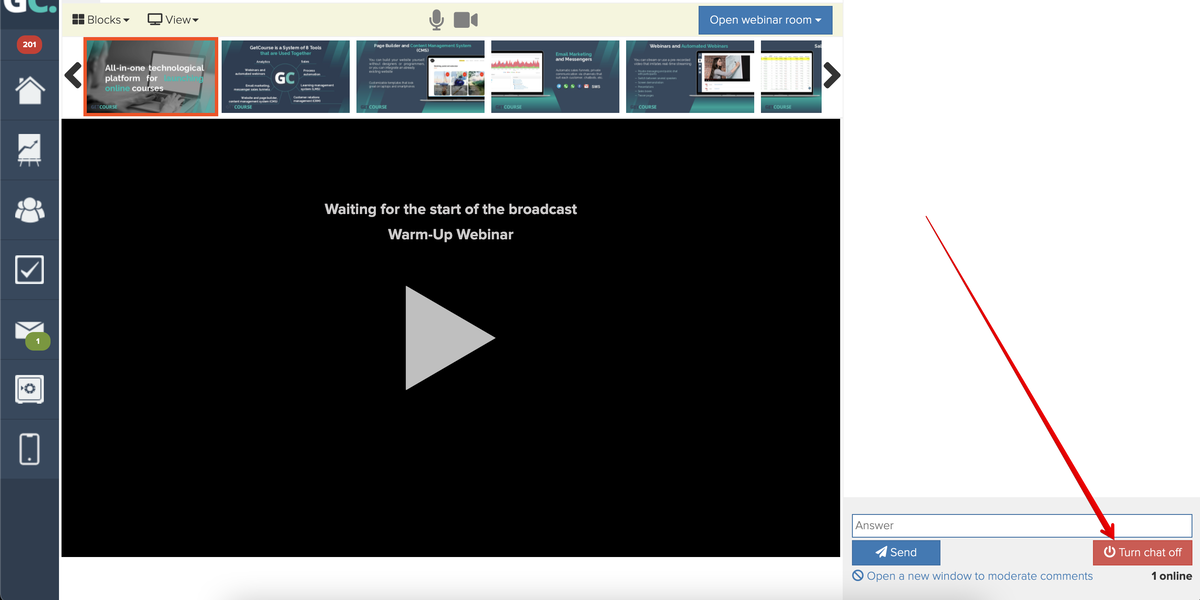
On the right side of the webinar room there is a chat where students can communicate and ask questions to the presenter. The number of online users is also displayed there - these are those users who are currently online in the webinar room page.
All comments that the user leaves in the chat of the webinar will be available in his profile in the “Comments” tab.


Moderation of comments
During the broadcast, chat control and comments moderation are available.
Please note that students cannot post links to the chat - only employees can do this, and their links will be clickable. Also, if the comment is written by an employee, the employee's name will be highlighted in red.
If you click “Disable chat”, then it will stop, new comments from participants will not be displayed in it.

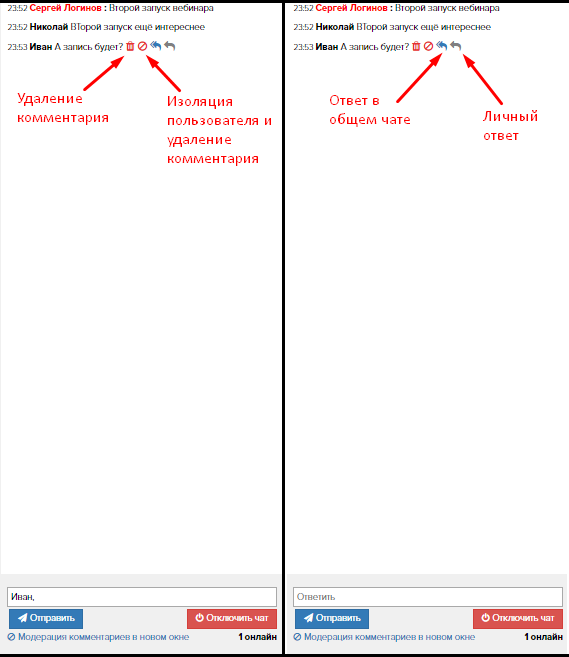
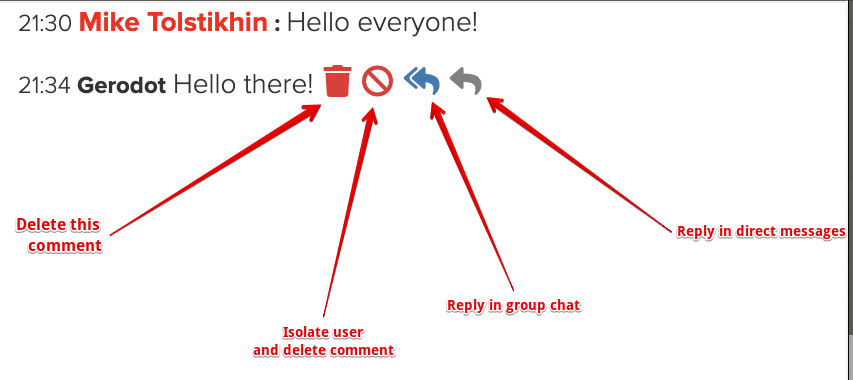
As part of comments moderation, you can simply delete an individual student or administrator comment, or delete the comment and isolate the user who left it. New comments of an isolated participant will not be displayed in the public chat, they will be visible to him only, and he will not know that he is isolated. Isolation action deletes one comment anyway.
In addition, the webinar presenter can reply to a specific user comment in two ways: leave a response in the public chat with a mention of the user or write a personal reply that will not be visible to other users.
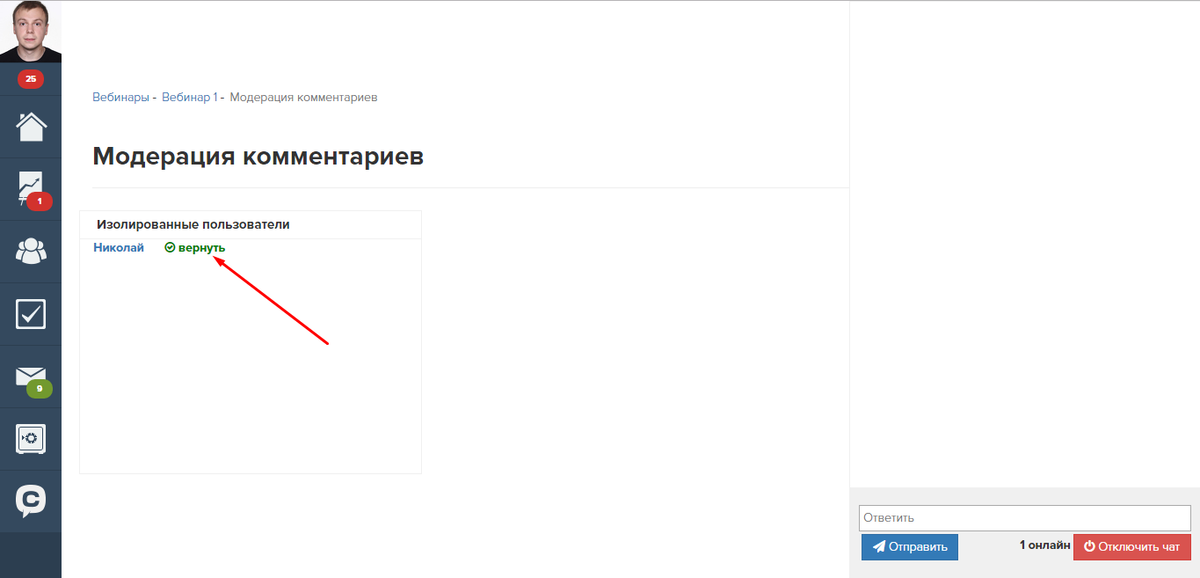
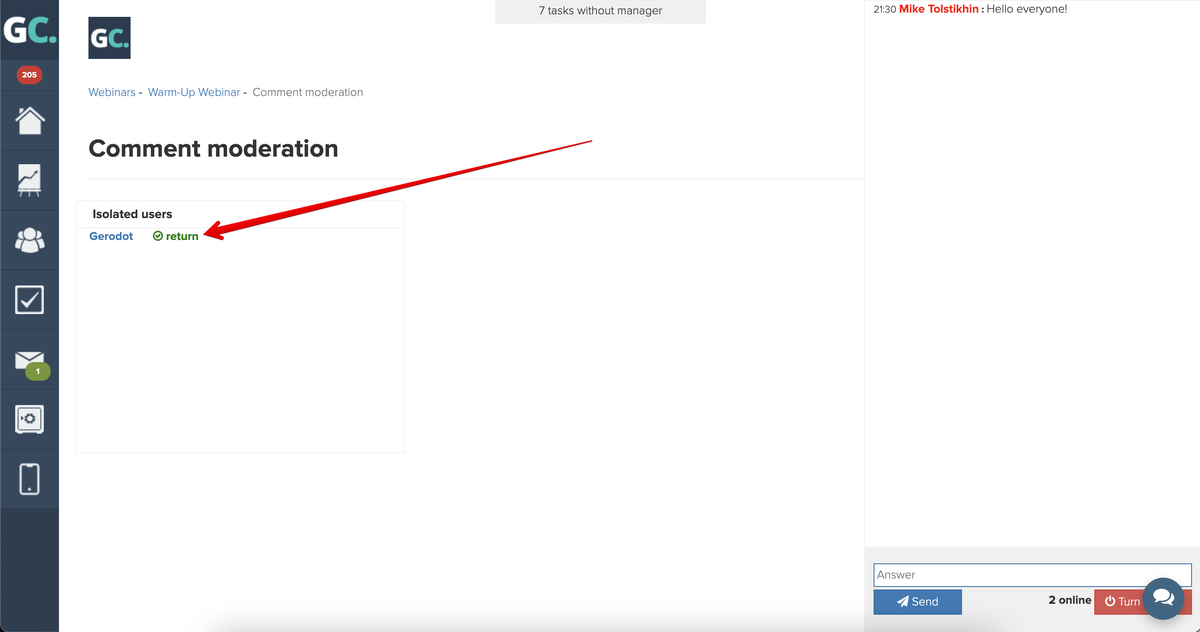
The “Comments moderation in a new window” section displays a list of isolated users. The isolated user can be returned and he will again be able to leave comments visible to all webinar participants in the chat. However, his deleted comment will not be restored.
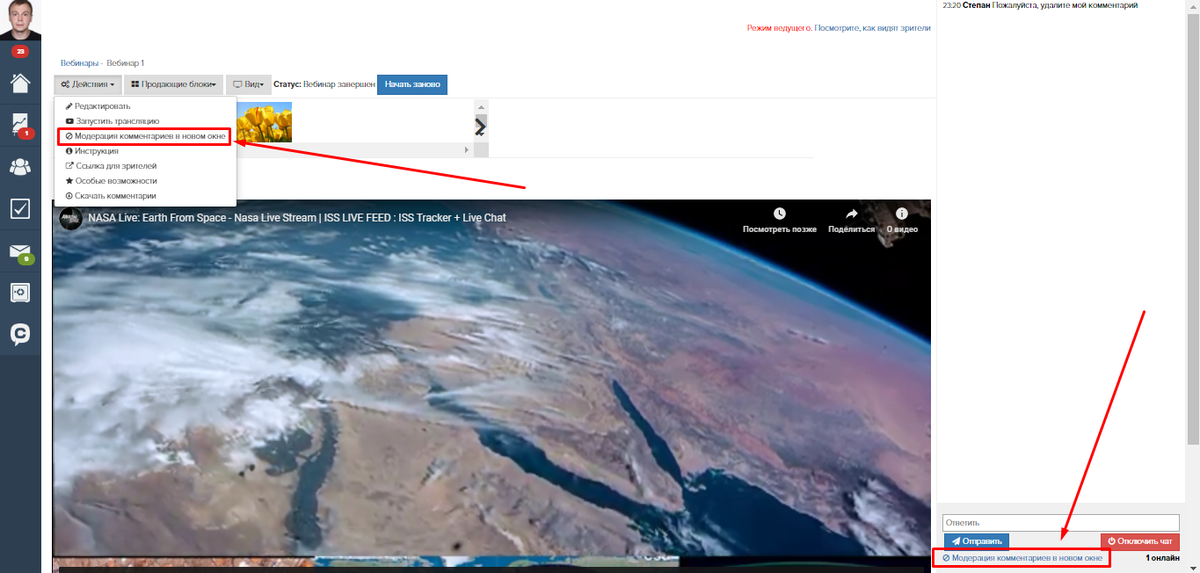
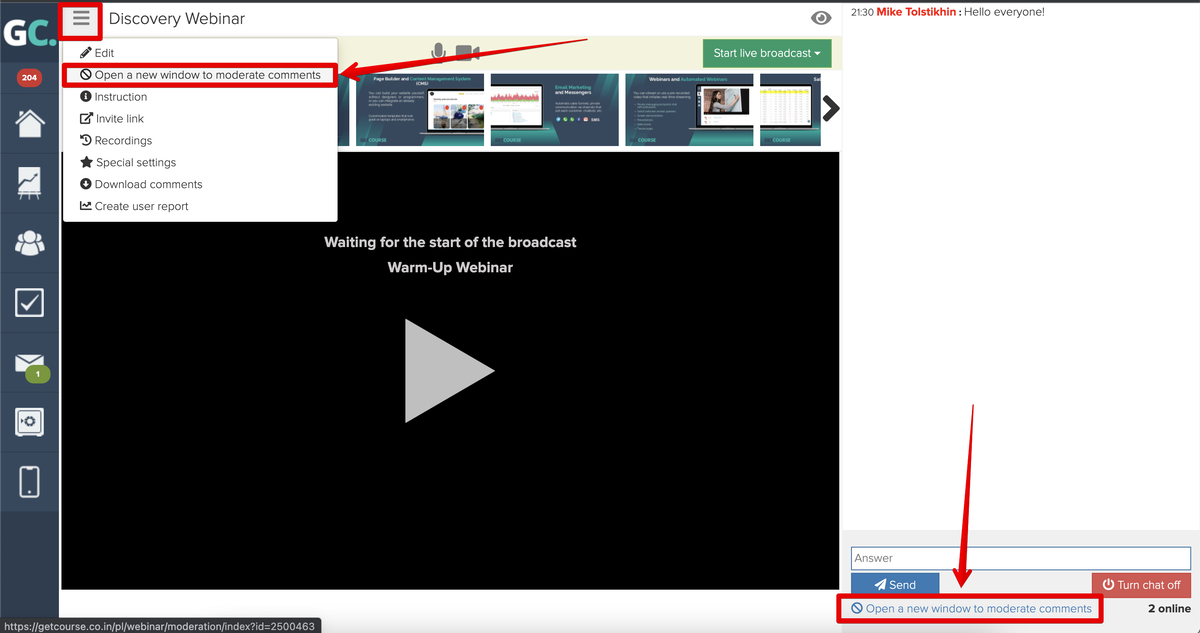
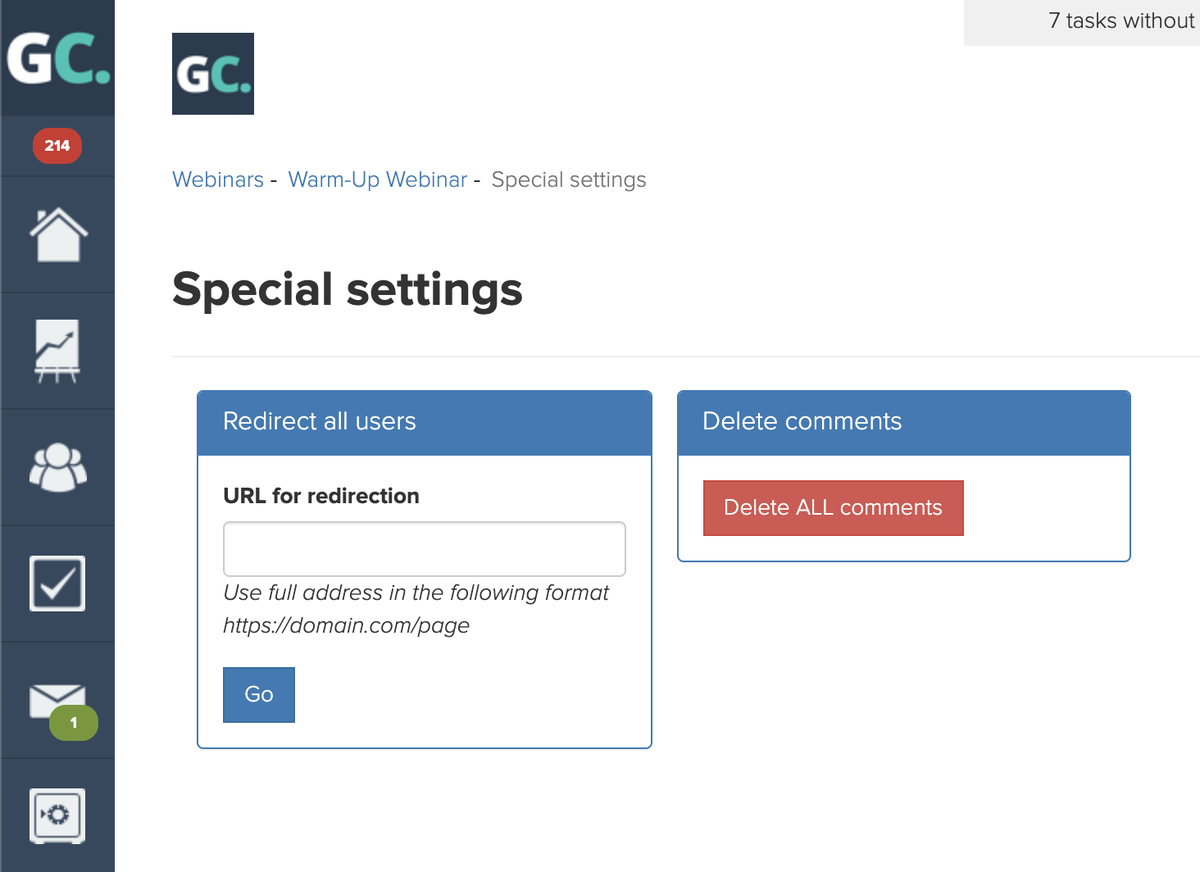
In the “Special settings” section, you can delete all comments in this webinar room. This action will delete the comments of all participants of the webinar for all its launches.
Also in this section it is possible to perform forced redirection of all viewers to a specific page - for this you need to specify the URL of the page for redirection and click the “Run” button.
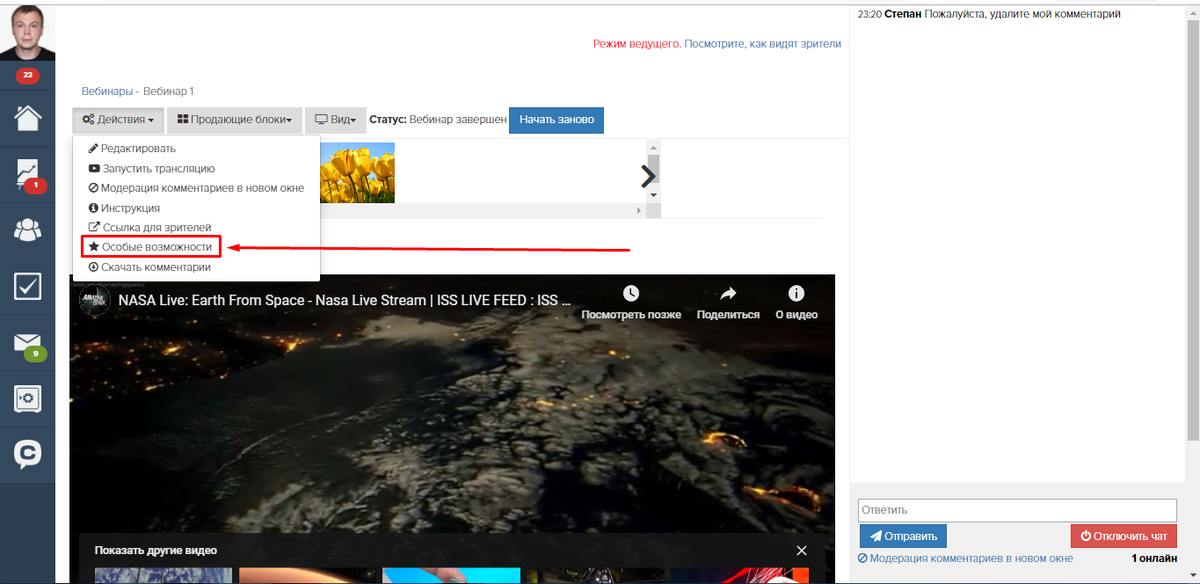

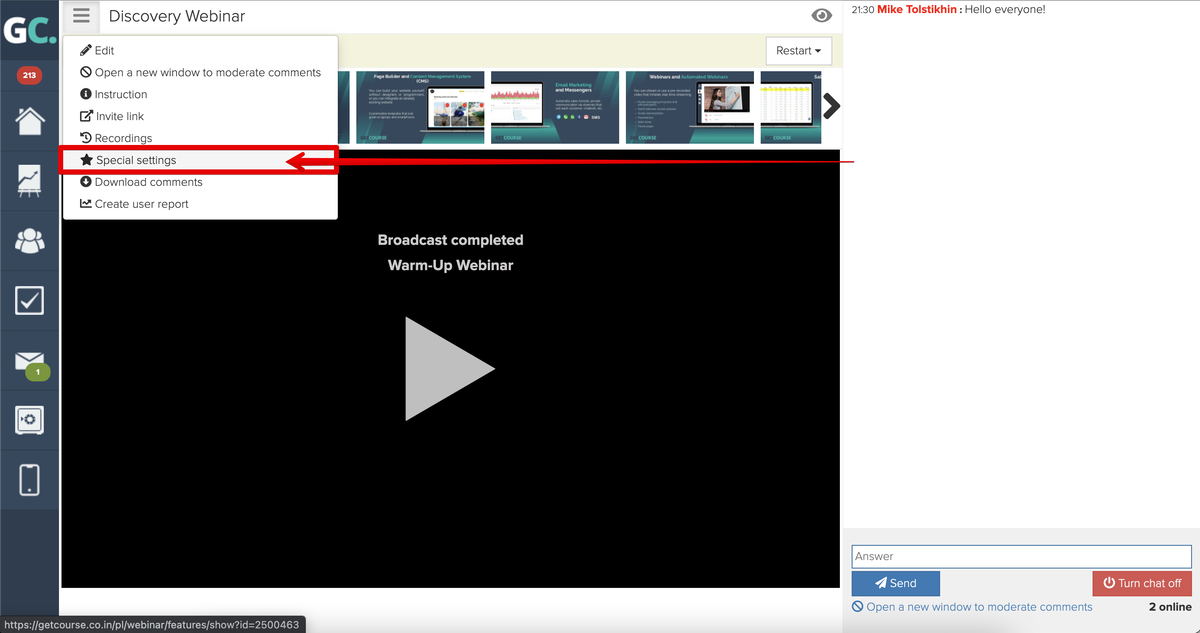
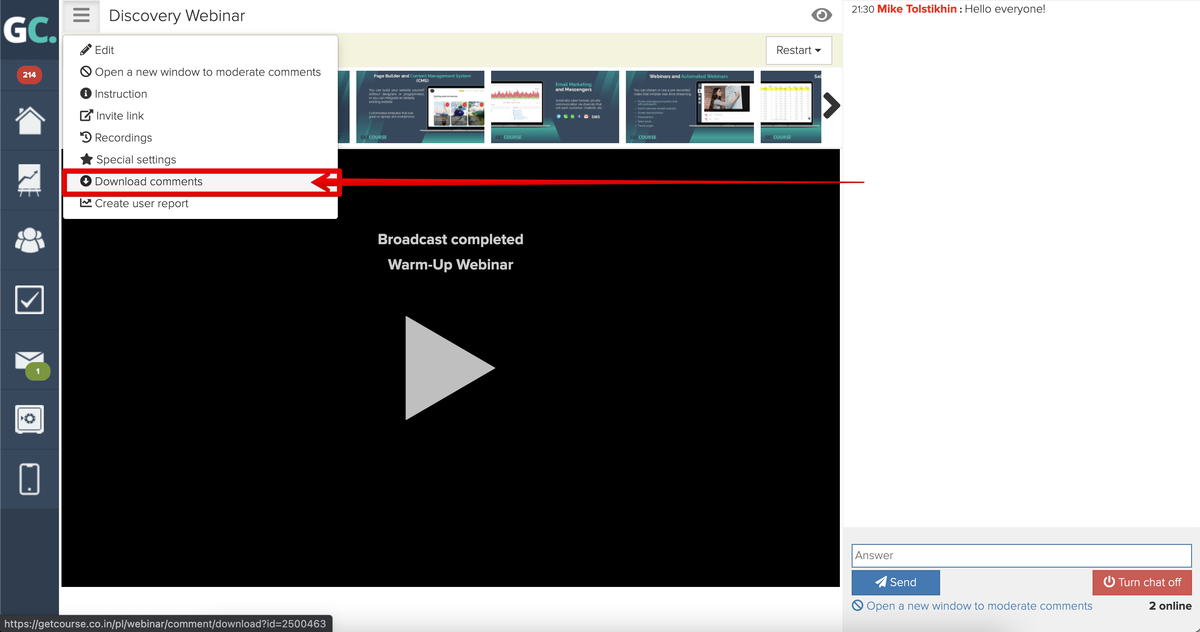
For the convenience of processing and analyzing comments, you can download them. To do this, in the “Actions” go to the “Download comments” section.
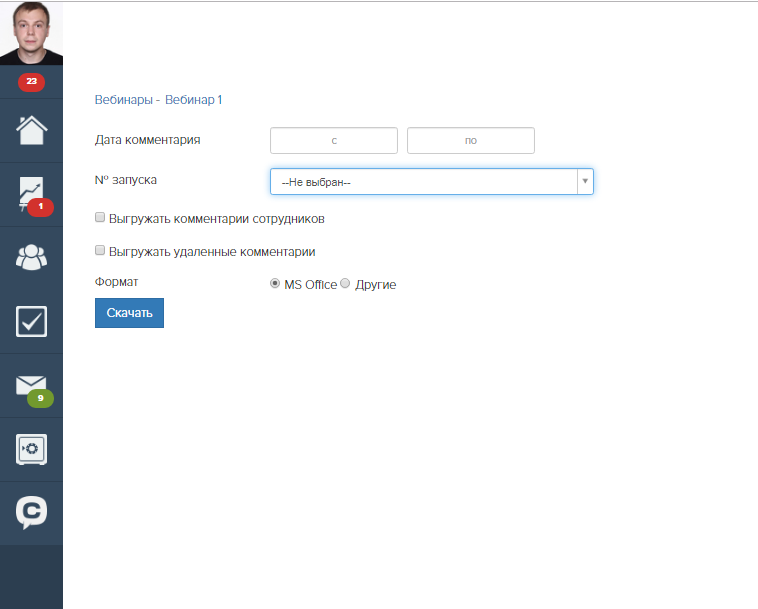
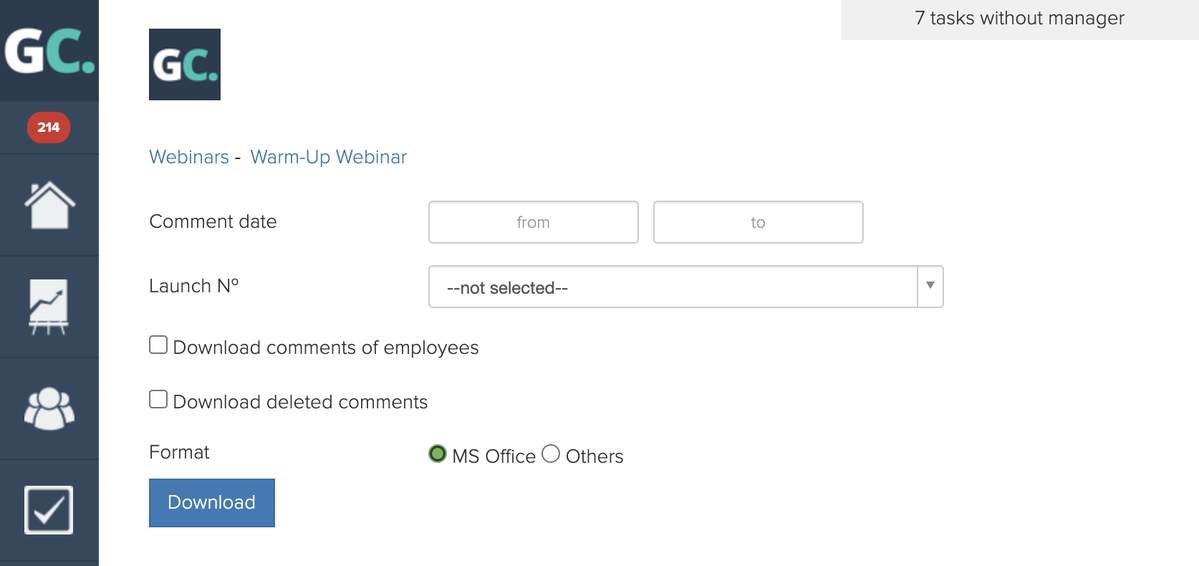
You can choose from two options of filtering comments: for a certain period or by a specific launch.
If comments from several launches fall within the specified period, all of them will be uploaded to a file, where the launch number will be indicated in a separate column.
You can select the filtering option that suits you best and download comments to a CSV file. If you specify a period or launch, in which no comments were left, an empty file will be generated.
By default, only comments from webinar viewers are downloaded. However, if you check the appropriate checkbox, you can download employee comments.
It is also possible to upload deleted comments. This feature will allow you to download even those comments that were deleted during the webinar or after its completion.

Collecting statistics
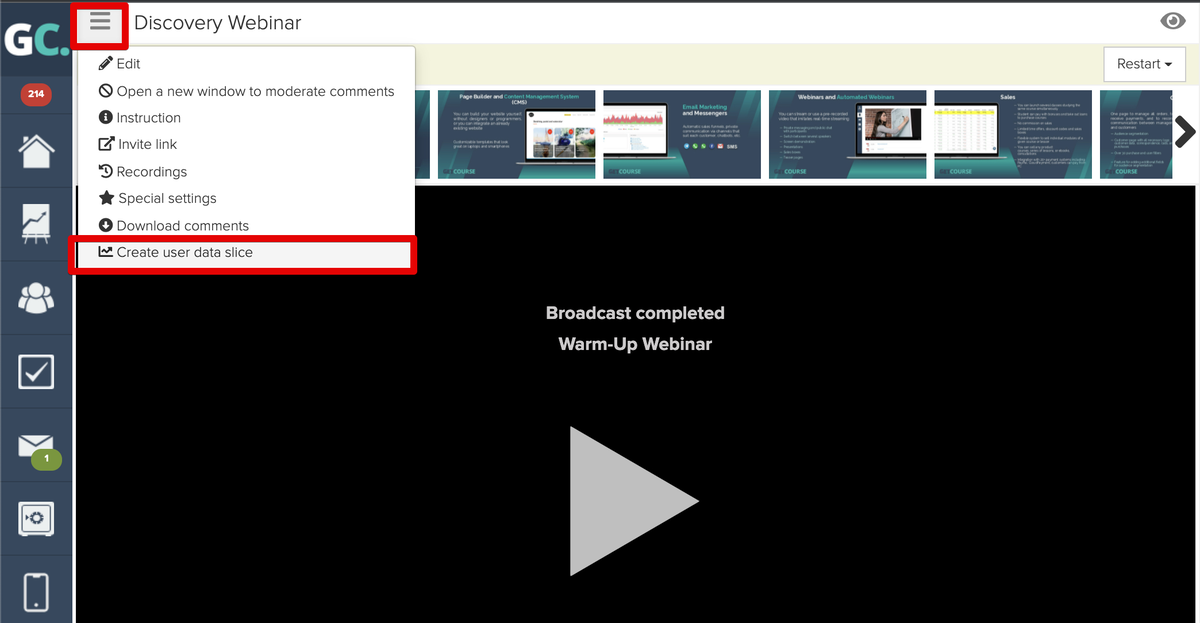
The section “Create user data slice” is used during a webinar or autowebinar to accurately measure the list of users who were present at a particular important moment.
For example, when a speaker says a key idea and immediately after makes a slice of the list of users. After that, you can call the participants on the list and ask a specific question.
To record a slice, you must enter a name for the slice and save it.
For an autowebinar, you need to add the “Create user data slice” command to the script.

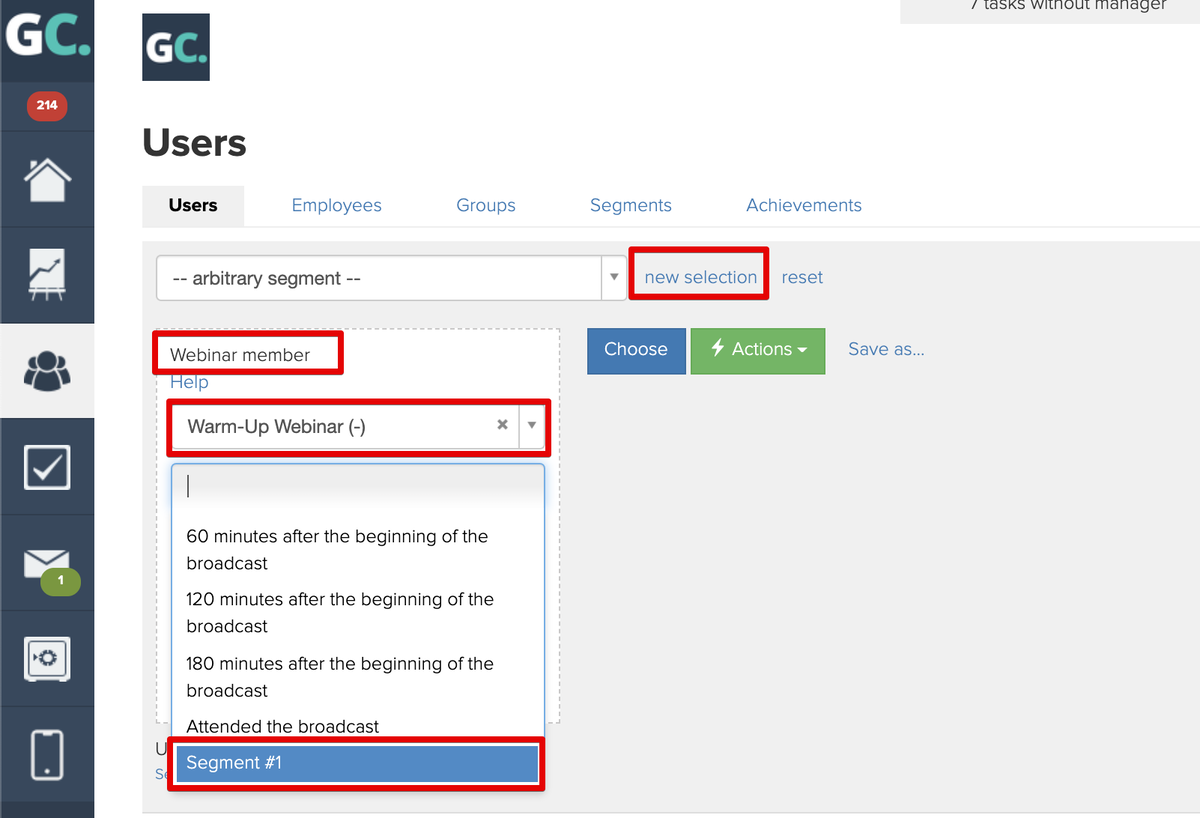
In order to make a selection, create a condition “Webinar participant” and select the desired slice(s) or several parameters at once.
The list of users in the slice can be seen after 1-2 minutes after its creation.
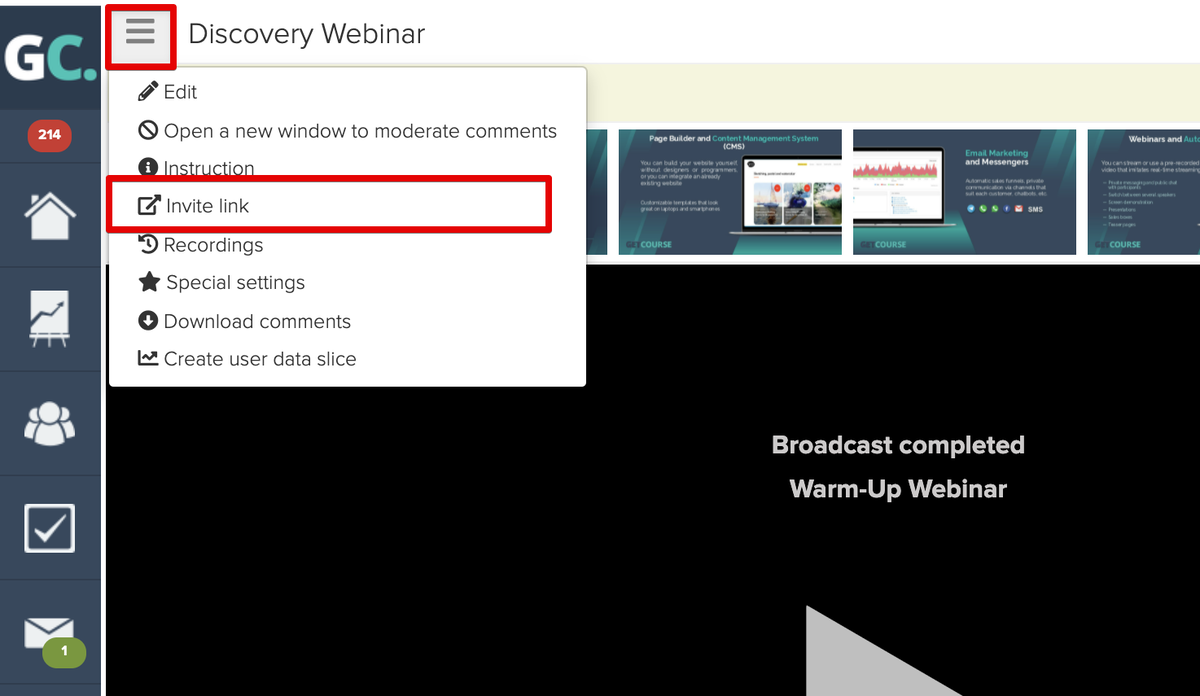
You can check the way users see the webinar room at the moment using the “Invite link” option. Learn more about the details of the webinar room display in the article: “How will the webinar room be displayed to the audience?”
Be sure to check the room through the eyes of the audience to understand how they see it and how best to use the capabilities of the webinar room for your tasks.
Also you are sending the “Invite link” to users so that they can enter the webinar:
Hosting a live webinar
The launch of the broadcast is described in the attached articles:
- Via browser
- Via video encoder
- Via YouTube
It means that you need to choose the type of hosting that suits you and follow the instructions in the attached article.
We use technology such as cookies on our website to personalize content and ads, provide media features, and analyze our traffic. By using the GetCourse website you agree with our Privacy Policy and Cookies Policy.

please authorize